
As a recent winner (for here and here) I was invited by the wonderful crew at Our Creative Corner to Guest Design for them today. I was generously given an opportunity to showcase any card or project, big or small. Me being me, I went big! Please pop over to Our Creative Corner for further details of my showcase including a Q and A. Their blog really is well worth a visit at any time as the Design Team there are ‘le crème de la crème’ in paper crafting.
My project has been inspired by a padded Christmas Tree that my Mum made for our family home many years ago. Basically my 'Tree' is made up of 10 fabric triangles and a pot! Each of the triangles has a hand stitched muslin front and back with wadding in between to pad them. On top of each triangle I have made a little scene just as if I were making a card. Each triangle is 7.5" wide so the whole tree is quite big, though very light.
This is the original tree made by my Mum

Here is my tree all ready for Christmas!


.
The following pictures show each element of the tree in more detail. Please also scroll further down this post where you will find outlined in detail all the ingredients and methods used.
I would especially like to thank everyone at Our Creative Corner for so kindly hosting my showcase today and a big thank-you to my Mum for making the original tree. I now have 2 trees that I will always treasure.
Thanks so much for stopping by my blog.
Nicola x
Triangle 1 – Reindeer

Triangle 2 – Pink Cherub with children

Triangle 3 – The Night Before Christmas

Triangle 4 – Bluebirds at Home for Christmas

Triangle 5 – The 3 Wise Men

Triangle 6 – Angel with horn

Triangle 7 – Santa Claus

Triangle 8 – Little Flower Angel


Triangle 9 – Santa's Boot

Triangle 10 – Dove of Peace

The Pot

I wish to enter my Christmas Tree to the following challenges;
Live and Love Crafts - Christmas
Viintage Stamping Challenge - Red/Green/Blue/Purple
The Artistic Stamper - Anything Goes
The Crafty Bloggers Network - Christmas Anything Goes
The Stamp Man - Emboss It
Eclectic Ellapu - Its a Vintage Thing
Frilly & Funkie - Tic, Tac, Toe - Lace, Distress Stains, Glitter
Anything But a Card Challenge #5
Southern Girls Challenge - 46 Days to go - Christmas Projects
Paper Crafting Journey - Anything Goes
Details of ingredients and methods used:
Triangle 1 – Reindeer

Base white corrugated cardstock covered by red SEI Velvet paper. Stamped with Versamark and embossed with Sparkle n Sprinkle EP, Image by Penny Black (2803K Let’s Play). Metal Nunn Design snowflake, Prima wooden timepiece and Tim Holtz game-spinners all embossed with Ranger Distress Vintage Photo EP. Snowflakes punched (Woodware) from Ferro Gold paper. Jingle bells by Darice affixed with string. Crystals, pearls, ‘branches’ and pom-pom ribbon from stash.
Triangle 2 – Pink Cherub with children

Background paper by Melissa Frances (5th Avenue). Edger punch by Martha Stewart. Next layer Bazzill CS. ‘Wallpaper’ background is white SEI velvet paper stamped with Distress Ink. Stamp by Justrite (Autumn Damask CL-03895). I painted metal corner frames with gesso then pearlescent mix to match center resin frame by Melissa Frances. Added Adirondack pink paint dabber and slight gold gilding wax to frames. Beautiful cherub stamp image is by Stempelglede (Vintage Christmas). Stamped with Ranger Archival ink onto speciality stamping paper. All paper and frames ‘aged’ with Ranger distress inks. Gave little satin stars some centre crystals and placed around circular frame. I tea-bag stained and crackle painted some small tags. Attached seam binding ribbons and decorated each tag with Christmas charms. (All hidden, but tags do pull out). Next I stamped the silhouette stamp by Hero Arts (F5468 Musical Walk) onto organza ribbon using Encore Ultimate Metallic Gold, Silver and Bronze inks. Added musical charms and pom-pom ribbon from stash.
Triangle 3 – The Night Before Christmas

Background is of white stitched cotton paper on Indian gold cardstock. Stamps from Stampington & Company (S7338 – Classic Christmas). Using Encore ultimate metallic inks in gold, silver and bronze I stamped reindeer on tissue paper and them glued to punched CS ovals. Also stamped from same set Santa moon using Delicata Golden Glitz and text using Versafine Crimson Red that I clear embossed. Added mulberry trees, punched snowflakes, stars,bows, jingle bells and clock. Then it started to snow with Melissa Frances mica flakes!
Triangle 4 – Blue Birds at Home for Christmas

First of all many thanks to Astrid at the wonderful Astrid’s Artistic Efforts for beautiful free images. Base paper is a blue silk fibre paper with glitter particles. I printed some of Astrid’s images onto cotton based paper, backed them with silver angel hair paper and placed behind resin birdhouse by Prima (Ingvild Bolme) and resin bird by Melissa Frances. Dabbed all with silver stickles. Printed another gorgeous free image by Astrid onto the special Transfer Artist Paper (TAP by Lesley Riley). I then ironed that paper onto muslin to transfer the image to the muslin cloth. (If your printer has a mirror or reflection option choose this when printing, as the image is reversed when ironed). ‘Nested’ the birds with doily, silver mesh, stickled blue CS and some white tulle I had glittered. Punched snowflakes (Woodware, Martha Stewart). Added a blue satin bow. Drenched the snowflakes and roses in Distress Dry Glitter Clear Rock Candy. I didn’t know my Mum had a stash but she ‘donated’ the absolutely fabulous bling crystal chain along base edge – thanks Mum!
Triangle 5 – The 3 Wise Men

Background is a copper stitched handmade paper. I stitched two Inkssentials tags together. Stamped image by Stampington and Company (C8432 – Wisemen Postcard) using Ranger Archival black ink that I then embossed with Stamp n Stuff black detail EP. Achieved ‘desert colours’ with a mix of Distress Inks and Distress Metallic stains, (having masked top right corner). I had never used Utee before, but I am now a convert. Gave image 4 coats of Utee having mixed in some gold gilding wax and Melissa Frances glass glitter to top right corner during Uteeing. The beautiful gloss on the image doesn’t come across in photo. Also gave similar treatment to stamped sentiment by Stampington and Company (G1068 All the Year). Added stars, charms, Tim Holtz game-spinners and light bulb. Rubbed gilding wax around tag edges. Inked seam binding ribbon to match and dabbed with copper stickles. Finished by wrapping millinery netting around top and base to resemble dune shapes.
Triangle 6 – Angel with Horn
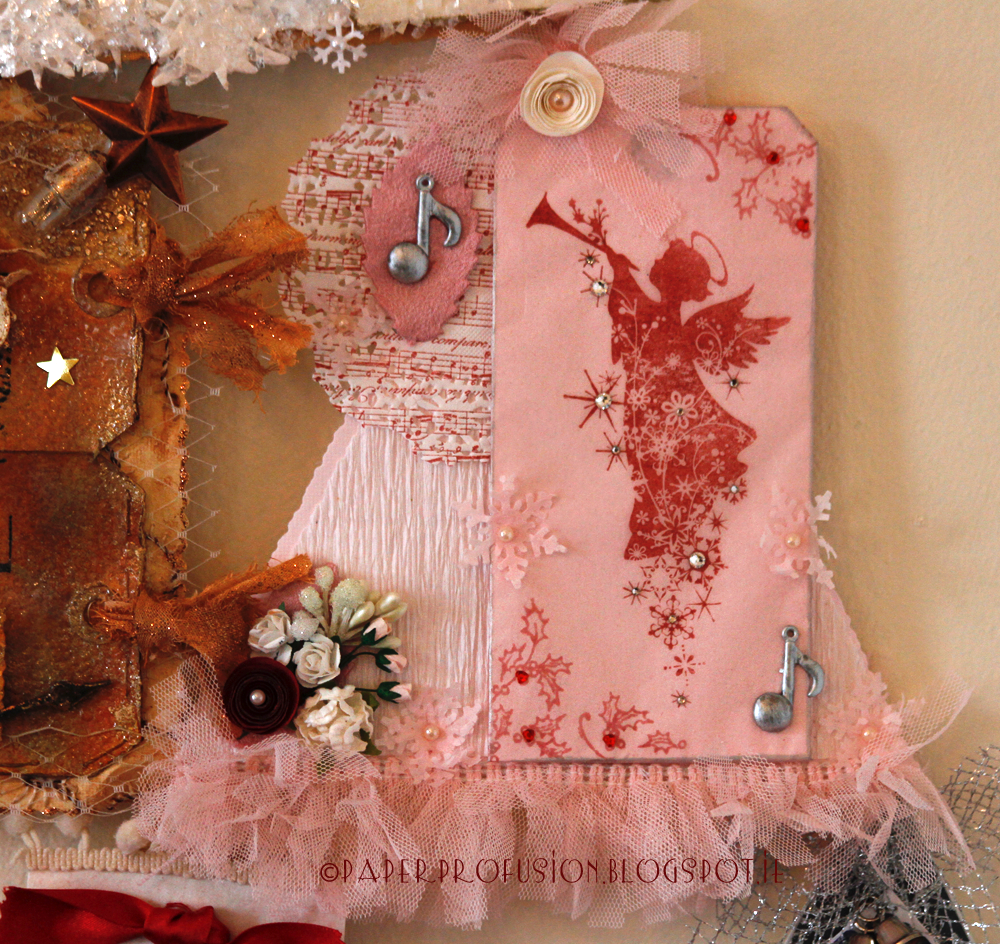
Background Bazzill CS topped with crepe paper. Stamped the cherub (Inkadinkado 98398 Silhouettes) with Archival ink onto pink tissue paper that I wrapped around a tag. Stamped corners (Stampendous SSC1068 Christmas Wishes). Painted metal music notes with Distress metallic stain in silver. Stamped music (Anna Griffin 580K21) onto doily. Added punched snowflakes, roses, pearls, crystals, leaves and berries. Fabulous pouf ribbon by Melissa Frances
Triangle 7 - Santa Claus

A heavy cotton fabric that was a soap wrapper and a music print ribbon form background. Used Gesso (by Claudine Hellmuth) for the first time and will use it often! Stamped Santa (by Stampington and Company - K5545 St. Nicholas) in Ranger Archival ink. Distressed the stamped image and backing doily with distress ink and metallic stain mix. Gilded edges with gilding wax. Using a Tim Holtz Journaling ticket I stamped ‘tickets’ (Ticket to Christmas by Unity Stamp Co.) and again coloured with gesso, distress inks and gilding wax. Added a crackle glaze to ticket – it didn’t really crack but became quite leather like which was good. Again, thanks to Astrid at Astrid's Artistic Efforts for her beautiful free images. I printed her postcard image onto cotton paper and inked to ‘age’ it. Added glossy accents to parts of Santa’s face and postcard for definition. Punched snowflakes, distressed their edges and coated them (and some gessoed Anita’s jingle bells) with Distress Dry Glitter in clear rock candy. Tied some bakers twine around a tiny spool from The Funkie Junkie Boutique. Tucked some of Rudolph’s stray fur behind ticket (just checking if anyone still paying attention!). Added charms, bow, brad by K & Co, punched branches and a masculine looking frill!
Triangle 8 – Little Flower Angel

Stamped angel by Stampington and Company (K5546 Angel Delivery) using Distress Ink onto special Transfer Artist Paper (TAP by Lesley Riley). Then I ironed that paper onto muslin to transfer image to the cloth. I discovered too late that I should have used my printer ‘mirror’ print option as the image reverses when transferred. I resolved ‘back-to-front’ text issue by stamping angel again onto glittered vellum (Papermania) that I cut to form a frame around image. Painted a heart doily with pearlescent mix. Glittered a punched dove (fiskars) and roses and berries in Distress Dry Glitter. Added edging of venise lace (from The Funkie Junkie Boutique) and May Arts leaf trim.
Triangle 9 - Santa’s Boot

(Stay with me – we’re nearly there!). Background formed from Indian Gold CS and cream crinkled paper with gold stitching. I cut boot shape from burlap and stitched 2 sides together having placed some goodies inside. Top of boot is some cream SEI Velvet paper edged with a Martha Stewart punch and stitched. Some cream pom-pom ribbon is on top edge. I strung beads together for decoration and added red bow. I stamped some swirls with gold ink onto 2 tags. A big thank-you to Vintage Ephemera blogspot for 2 free images that I printed onto Lesley Riley’s Transfer Artist Paper. I then ironed that paper onto muslin to transfer the images to the cloth. I then wrapped the stamped cloth around the inked tags and aged with distress inks. I wrapped a gift for the little boy but he went and opened it while I was wrapping the other gift for the pretty miss! Painted holly charm with green stickles and red gems. Finished with other charm and bows. Added bunting from Melissa Frances (Countdown to Christmas).
Triangle 10 – Dove of Peace

Using a masking technique stamped Stardream navy metallic CS with Antique Map stamp (by Flourishes - SS112) and embossed with Judikins Silver Twinkle EP. Onto white cardstock I stamped the Dove (by Penny Black 3040K) with versamark and clear embossed it to form resist. Inked the image with Distress ink and pewter Metallic Distress Stain mix. Gave it 5 coats of Ranger Utee. Got some vintage glass glitter (Melissa Frances) to stick and gave it a sixth and final coat of Utee. When cool, punched the corners (fiskars). Matted on white cardstock and silver mesh. Added 2 bells, silver mesh bow and May Arts leaf trim.
And Finally – The Pot! (Thank heavens I hear you say!)

Red SEI Velvet Paper. With Versafine I stamped Robin image by Andy Skinner (Simply Angelic ASCSA5010) and Angel image by Stempelglede (Vintage Christmas). Coated both with Ranger Utee, popped whilst still hot into the freezer. After 5 minutes, removed them and made cracks. Stamped Sentiment (Stampabilities IR1038 - Bright with Promise) and embossed with Sparkle n Sprinkle EP (Japanese Lacquer). Threaded through some ribbon. Added stars. Punched holes with Sew Easy and stitched.
That’s it! Thanks once again to Our Creative Corner for initiating and showcasing my project, and to my Mum for having been the inspiration behind it. Thanks so much for stopping by and enjoy the rest of your day. Nicola x
Hi Nicola... just popped over from OCC to say another big WOW! This tree is amazing - a family heirloom in the making. Huge congratulations on your Top Talent slot, the wins and, I'm sure, many more wins to come. I've just signed up for the ride!
ReplyDeleteAlison x
I love that OCC is doing this! WOW!!! Fabulous and creative creation! A real gem to use over and over! So much to see and showcase! I love it all!!! Your mother is quite the inspiration...like mother like daughter!!! Just super gorgeous!
ReplyDeleteWow, that's a breathtaking piece of art, I really love your tree. Thanks for joining us at Vintage Stamping Challenges this month.
ReplyDeleteWonderful detail on a fabulous project Nicola. Stunning work.
ReplyDeleteHugs
Laine
X
Oh wow Nicola this is stunning, it must have taken you hours to create but well worth it and I love your mum's tree too :)
ReplyDeletehugs Mandy xx
Wow! What an absolutely awesome creation Nicola! Your interpretation of your Mum's tree has not only shown your amazing attention to details, but such creativity you possess. Even how you've written your blog post and taken your photos proves that. Well done, thank you for sharing this with us at Eclectic Ellapu's "It's a Vintage Thing" challenge this week.
ReplyDelete:)S
Congratulations....your work is certainly worth spotlighting! What a beautiful tree! Each little part is a gem! (I'm particularly drawn to the beautiful blue one.)
ReplyDeleteWhat a fabulous creation...a real heirloom to be proud of ;)
ReplyDeleteThanks for joining us at The Artistic Stamper this month.
xoxo Sioux
Ummm, you mentioned you made just one of these, BUT...I have a feeling once the family sees this, you might be making MORE! What is so truly special is that is derives from something that your Mother made you and inspired you to make your own. I think it's a most wonderful family tradition and very touching to know that future generations might have yours hanging in their home too! Words can't describle the joy this tree brings and all the reason for the season in each little section. It's truly a StUnNiNg creation Nicola and I'm so thrilled with your debut at OCC.
ReplyDeletehugs to you,
Lisa xx
Amazing project! I'm sure this will be a treasured family heirloom! Thankyou for joining us this month at Crafty Bloggers Network
ReplyDeleteGeraldine M
CBN DT
Oh my WOW! Your project is amazing and what a wonderful tribute! I am speechless!
ReplyDeleteWOW What an amazing piece of work, so much detailing. I love the original by your Mum too.
ReplyDeleteLinbyx
Wow! What wonderful, beautiful and amazing Christmas work! So much detail and time put into your project! Wonderful work! Thanks for joining the Think Christmas Challenge at Southern Girls!
ReplyDeleteKathleen
Blog: Creo by Lady Katutz
http://creobyladykatutz.blogspot.com/
WOW...What a fabulous project!! It deserves to be showcased. Wonderful designs.. Fantastic attention to detail.. Simply Stunning... Thank you so much for your kind comment today... Just had a peek around your Beautiful blog... joined as a follower as to visit again soon... ps Yours Mum's tree is also beautiful.... Hugs May x x x
ReplyDeleteSuperb creation Nicola,, great colours, shape and details, it's fabulous. hope you are enjoying your weekend. Teresa xx
ReplyDeleteOMG, I absolutely adore your Christmas tree! It looks so creative, full of delicious craftyness - I am soooo jealous! Thank you so much for this beautiful inspiration! hugs xx
ReplyDeleteWOW! What an AMAZING projects! Both yours and your Mums! So unique and creative!
ReplyDeleteA totally stunning creation, so much work but so worthwhile.
ReplyDeleteThanks so much for sharing your creativity with us at Craft a Scene challenge this month.
B x
Hi Nicola and WOW, what an amazing creation! A really stunning make and a wonderful take on your Mum's fabulous piece. Chris x
ReplyDeleteWow Nicola this is just stunning, a wonderfully creative and magnificent tree, obviously made with so much love. You have used wonderful materials and colours and the culmination of these and all your hard work has produced a masterpiece. Congratulations.
ReplyDeleteHugs Brenda xxx
Nicola this is stunning! All the details and little bobs and bits are so well thought out!Very cute Christmas/winter idea! Thank you for playing with us on Southern Girls Challenge!
ReplyDeleteCarolyn, DT
Hi Nicola,you made an amzing work,fantastic creation,I love love love it^_^
ReplyDeleteYou are very talented^_^
Fabulous stamped and details^_^
Can you tell me please the name and brand of the wonderful angel stamp ?It's so gorgeous and elegant^_^
Big hug,
Sonia
Just totally blown away with this fabulous creation Nicola love every piece of it.
ReplyDeleteThank you for sharing with us at Vintage Stamping Challenges.
Hugs Shirley x x
WOW, what a fantastic project, thanks for sharing it and thanks for joining us over at the CBN Challenge this month
ReplyDeleteHugs
Ang
Crafty Bloggers Network DT
My Blog: A Crafty Blether
Hi Nicola! Came over to visit you again since you're my newest follower! Spotted this gorgeous creation - I'm out of words, just love it! I'm now your newest follower too!
ReplyDeleteHI
ReplyDeleteWOW this is incredibly impressive. So much work but well worth it for this gorgeous effect.
You have a beautiful collection of festive stamps.
Wishes
Lynne
You really deserved to be a winner over Eclectic Ellapu. So much work went into your project and the result is stunning. Hope to see you joining in alot more. I am now following you to keep an eye on your amazing talent.
ReplyDeleteElaine aka Ellapu x
Stunning. Beautiful idea, executed impeccably. What a lovely tribute to your Mum as well.
ReplyDeleteWOW!!!! What a masterpiece!!! I love your christmas tree with full of gorgeous details!
ReplyDeleteThank you for joining LLC´s November challenge!
Hugs,
Karita
Awesome project, so many wonderful details. It must have been lots of fun and lots of work to make:)Very Original! Thanks for joining us in the LLC Christmas challenge. Hugs, Elizabeth
ReplyDeleteI echo Karita: WOW!!! Amazing project, so many different elements, materials, images, trims, papers, dies....everything brilliantly put together. Must have taken ages to complete, but it was so worth it! Thanks for joining LLC for our Nov challenge and sorry about my late visit.
ReplyDeleteHugz,
Sandy