Monday 27 January 2014

Vintage Sewing Themed Drawer Cabinet

Hello and Thank-You so much for visiting. I'm sorry to have been absent from blogging recently... I'll try to catch up with you all soon.

I smiled when I saw the challenge theme "Shopping Sins" at Our Creative Corner this month; there are three things for sure in my life; death, taxes and overspending!

So having been away from crafting for most of this month I've spent the last few days working on today's piece in my favourite vintage style. I'm mortified to have so many long unused items in my stash - the main contenders here were some Kaisercraft mini drawers, several uninked sewing themed stamp sets and a few untested crackle mediums.


Re wooden part of mini drawers: Painted all the wooden parts first with gesso, then PaperArtsy 'Snowflake', followed by PaperArtsy 'Old Gold'. I had bought some crackle products to try and improve on efforts to date - glad to finally put them to test. I like result from Decoart One Step Crackle (you can see on gold pediment). My first choice however goes to Kroma crackle - you can see its lizardlike results on the front part of cabinet. Some of the more thickly crackled areas are where I have done a double coat of crackle to experiment.

Re little drawers: All the hidden drawers are painted with PaperArtsy 'Ice Blue' followed by a coat of 'Metallic Glaze'. I tied string around each drawer when gluing its sides to keep them together whilst the glue set (rather fiddly). Opened packaging on my Krylon gold pen to gild the edge of each of the drawers - I like result so will use this pen a lot!

Decorative fronts and sides: The lovely papers are from Maja Design 'Vintage Summer Basics' collection. The drawer fronts were all punched out, stamped and gold embossed with several images being double foam mounted. I've added lots of sewing themed paraphernalia. The stamps used throughout piece are from Crafty Individuals CI-328 (first use) and CI-306 (both following Laura's inspiration), Chapel Road Artstamps "Sew Much to Do" and Studio 490 Wendy Vecchi "Art By Hand" (again it's first use).


The left side of cabinet shows a seamstress hard at work.

Feet and Pediments
You'll also have noticed the cabinet feet and pediment. I die cut two layers of chipboard (by 4) for the feet using Sizzix Bigz Ironworks die. Made sure all the fleurs-de-lis were same height and glued each twosome together and then painted with Fresco 'Old Gold' followed by 'One Step Crackle'. I used loctite glue to hold these in place for a fast glue result. They are holding very solidly. The pediments at the top are also diecut from chipboard using Sizzix Bigz On-The-Edge 'Ornate'. The lower white one is Fresco 'Snowflake' coated with Kroma crackle to see how the crackle would look without a gold paint layer below.


The cabinet rear is also stamped and embossed with some machine stitching too. Santa brought me a sewing machine - I'm pleased to be finally trying it out!


The right side of cabinet shows the mannequin in use by this particular sewing establishment - again cut from chipboard using Bigz 'Sewing Room' die, painted as before and dressed in some finery


Finally, a close up of the cabinet top:


A word of thanks too to May, Cathi and Alison who all provided some of the ingredients used in this piece.

Thank-you so much for stopping by and enjoy the rest of your week,
Nicola x


I wish to enter cabinet to the following challenges:

Our Creative Corner - No more shopping sins (Guilty as accused!)
Vintage Udfordring - Use Dies and/or Punch
The Ribbon Girl Challenge - Anything Goes
Allsorts Challenge - Vintage
It's all about the vintage - Embossing
Fussy and Fancy Friday - Vintage
Sugar Creek Hollow - Fibres & Texture
Stamping Sensations - Ribbon, Buttons and Bows
Sweet Stampin - In Stitches
Bunny Zoe's Crafts - Stitching
Inspiration Emporium - Diecuts and Punches

Thursday 9 January 2014

A Shot of Blue

Hi there and welcome! A short post as I'm afraid I'm struggling getting 'into production mode' at the moment.

The current challenge at Simon Says Stamp Monday is "Blues". This brought to mind a card I made last November but haven't posted. I made it for the lovely and talented Anne who you might know had sustained a nasty hip injury.


I was glad to hear from Anne that the crutches and syringe embellies made her chuckle!

Stamp and Stencil: Crafty Individuals (can't recall make of sentiment stamp)
Papers: Maja Design "Vintage Summer Basics"
Dies: Spellbinders and Joy Crafts
Inks: Ranger Distress and Archival Inks
Embellishments: Stampendous Frantage. Silk ribbon by May Arts. Metal charms by Karen Foster and remainder from stash

Thank-you all most sincerely for your kind visits and comments.

Nicola x

I wish to enter card to the following challenge:
Simon Says Stamp Monday - Blues


Thursday 2 January 2014

Unplug and Go Outside

Happy New Year to you - wishing you a 2014 filled with good health and happiness. Many thanks for stopping by.

I'm especially pleased to post today as I've made this project as Guest Designer for one of the most talented and educational blogs around - Frilly and Funkie Challenge. The fabulous F&F team have as their challenge theme this fortnight 'New Year's Resolutions'. My top resolution is to spend less time on pc and smartphone and more time outside.

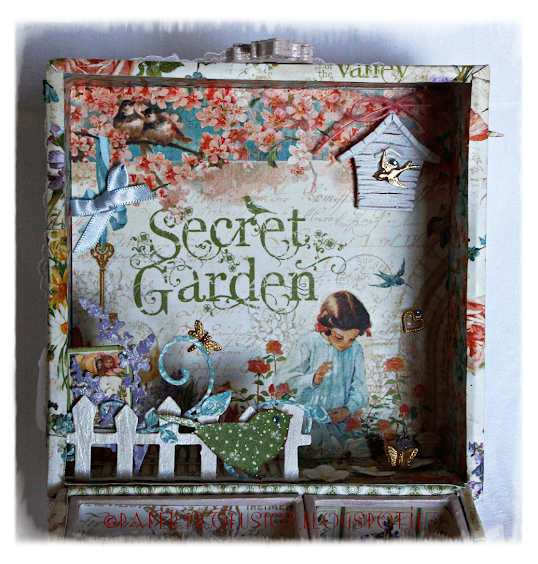
I wanted to created something light and fresh after all the darker coloured Christmas makes. As it is very stormy and wet in these parts recently I also needed something bright and pretty to entice me outdoors. The gorgeous Graphic 45 'Secret Garden' papers seem to meet these requirements imho. (Picture laden post follows!).


I've decorated a Tim Holtz Idea-ology configurations box with a selection of 'Secret Garden' papers. Similar to when I made box using Graphic 45 'A Ladies' Diary' papers I turned the Idea-ology box into a hinged type box with dummy outer and inner lids. In order to keep piece looking light I first painted the box and Idea-ology feet with a coat of Gesso, then two coats of PaperArtsy 'Vintage Lace' paint followed by a top coat of PaperArtsy 'Metallic Glaze' - this adds a lovely pearlescent shimmer.

The top lid has been embellished with lots of diecuts, charms and flowers - most of which I've drenched with 'Clear Rock Candy' distress glitter so that they all look sugary sweet. The two soft blue felt roses are from a prize I was lucky enough to win from the lovely Ivana at Paper Girl Crafts. (Ivana's blog and beautiful creations are well worth checking out). I've also wrapped the lid with pretty venise lace - you can see it here at Linda's Funkie Junkie Boutique. As usual I've managed to also include a bow.


I added a light dusting of Frantage to the papers and then set about doing a whole lot of cutting and pasting.


I can't remember who sent me a freebie of a diecut picket fence ages ago - it came in very handy here to give dimension to the inner lid. Painted fence with a few coats of PaperArtsy 'Snowflake' to give a clean white. Again decorated the little inner scene with glittered flowers, charms, ribbon and a Prima resin birdhouse.


The last time I altered an Idea-ology box I pasted paper to both the inside and outside of the drawers but the added layers made for a very tight fit. This time I painted the outer sides with pearly pale pink as above and just papered the drawer insides.


One of my favourite features of the box is the front 'lock'. First of all I diecut two layers of chipboard using Sizzix Bigz 'Hardware Findings' die. Then also diecut some thin grungepaper. I embossed the grungepaper layer with Sizzix Regal Flourishes folder so that it would have impressions similar to the Idea-ology box feet. Somehow though by the time I had glued the three diecut layers together and painted as above, alas it had mostly lost the embossed impressions - maybe the base coat of gesso was too thick. Added in two little gold brads as faux nails.


Around top and bottom sides I stencilled some Butterflies and Dragonflies using a Crafters Workshop stencil and white texture paste. Whilst wet I sprinkled on more distress glitter in 'Clear Rock Candy' - a girl has gotta add sparkle every chance she gets!

Very many thanks to the always inspirational Frilly and Funkie Challenge Blog for allowing me feature as their Guest Designer today.

Huge thanks in advance for your visits and comments that are all truly appreciated.

Nicola x

I wish to enter box to the following challenges:
Simon Says Wednesday - Something New (New Year Resolution)
Crafts 4 Eternity - Something New (New Year Resolution)
Crafty Creations Challenges - Anything Goes
Little Red Wagon - New Beginnings
Card and Scrap - Bruk blomster / Use Flowers
Natalie & Amy's Challenge - One for the Girlies