Showing posts with label Ranger Archival Ink. Show all posts

Monday, 27 January 2014

Vintage Sewing Themed Drawer Cabinet

Hello and Thank-You so much for visiting. I'm sorry to have been absent from blogging recently... I'll try to catch up with you all soon.

I smiled when I saw the challenge theme "Shopping Sins" at Our Creative Corner this month; there are three things for sure in my life; death, taxes and overspending!

So having been away from crafting for most of this month I've spent the last few days working on today's piece in my favourite vintage style. I'm mortified to have so many long unused items in my stash - the main contenders here were some Kaisercraft mini drawers, several uninked sewing themed stamp sets and a few untested crackle mediums.


Re wooden part of mini drawers: Painted all the wooden parts first with gesso, then PaperArtsy 'Snowflake', followed by PaperArtsy 'Old Gold'. I had bought some crackle products to try and improve on efforts to date - glad to finally put them to test. I like result from Decoart One Step Crackle (you can see on gold pediment). My first choice however goes to Kroma crackle - you can see its lizardlike results on the front part of cabinet. Some of the more thickly crackled areas are where I have done a double coat of crackle to experiment.

Re little drawers: All the hidden drawers are painted with PaperArtsy 'Ice Blue' followed by a coat of 'Metallic Glaze'. I tied string around each drawer when gluing its sides to keep them together whilst the glue set (rather fiddly). Opened packaging on my Krylon gold pen to gild the edge of each of the drawers - I like result so will use this pen a lot!

Decorative fronts and sides: The lovely papers are from Maja Design 'Vintage Summer Basics' collection. The drawer fronts were all punched out, stamped and gold embossed with several images being double foam mounted. I've added lots of sewing themed paraphernalia. The stamps used throughout piece are from Crafty Individuals CI-328 (first use) and CI-306 (both following Laura's inspiration), Chapel Road Artstamps "Sew Much to Do" and Studio 490 Wendy Vecchi "Art By Hand" (again it's first use).


The left side of cabinet shows a seamstress hard at work.

Feet and Pediments
You'll also have noticed the cabinet feet and pediment. I die cut two layers of chipboard (by 4) for the feet using Sizzix Bigz Ironworks die. Made sure all the fleurs-de-lis were same height and glued each twosome together and then painted with Fresco 'Old Gold' followed by 'One Step Crackle'. I used loctite glue to hold these in place for a fast glue result. They are holding very solidly. The pediments at the top are also diecut from chipboard using Sizzix Bigz On-The-Edge 'Ornate'. The lower white one is Fresco 'Snowflake' coated with Kroma crackle to see how the crackle would look without a gold paint layer below.


The cabinet rear is also stamped and embossed with some machine stitching too. Santa brought me a sewing machine - I'm pleased to be finally trying it out!


The right side of cabinet shows the mannequin in use by this particular sewing establishment - again cut from chipboard using Bigz 'Sewing Room' die, painted as before and dressed in some finery


Finally, a close up of the cabinet top:


A word of thanks too to May, Cathi and Alison who all provided some of the ingredients used in this piece.

Thank-you so much for stopping by and enjoy the rest of your week,
Nicola x


I wish to enter cabinet to the following challenges:

Our Creative Corner - No more shopping sins (Guilty as accused!)
Vintage Udfordring - Use Dies and/or Punch
The Ribbon Girl Challenge - Anything Goes
Allsorts Challenge - Vintage
It's all about the vintage - Embossing
Fussy and Fancy Friday - Vintage
Sugar Creek Hollow - Fibres & Texture
Stamping Sensations - Ribbon, Buttons and Bows
Sweet Stampin - In Stitches
Bunny Zoe's Crafts - Stitching
Inspiration Emporium - Diecuts and Punches

Friday, 10 May 2013

Entering Time

Hello Again! Thank-you for stopping by and a warm welcome to new followers.

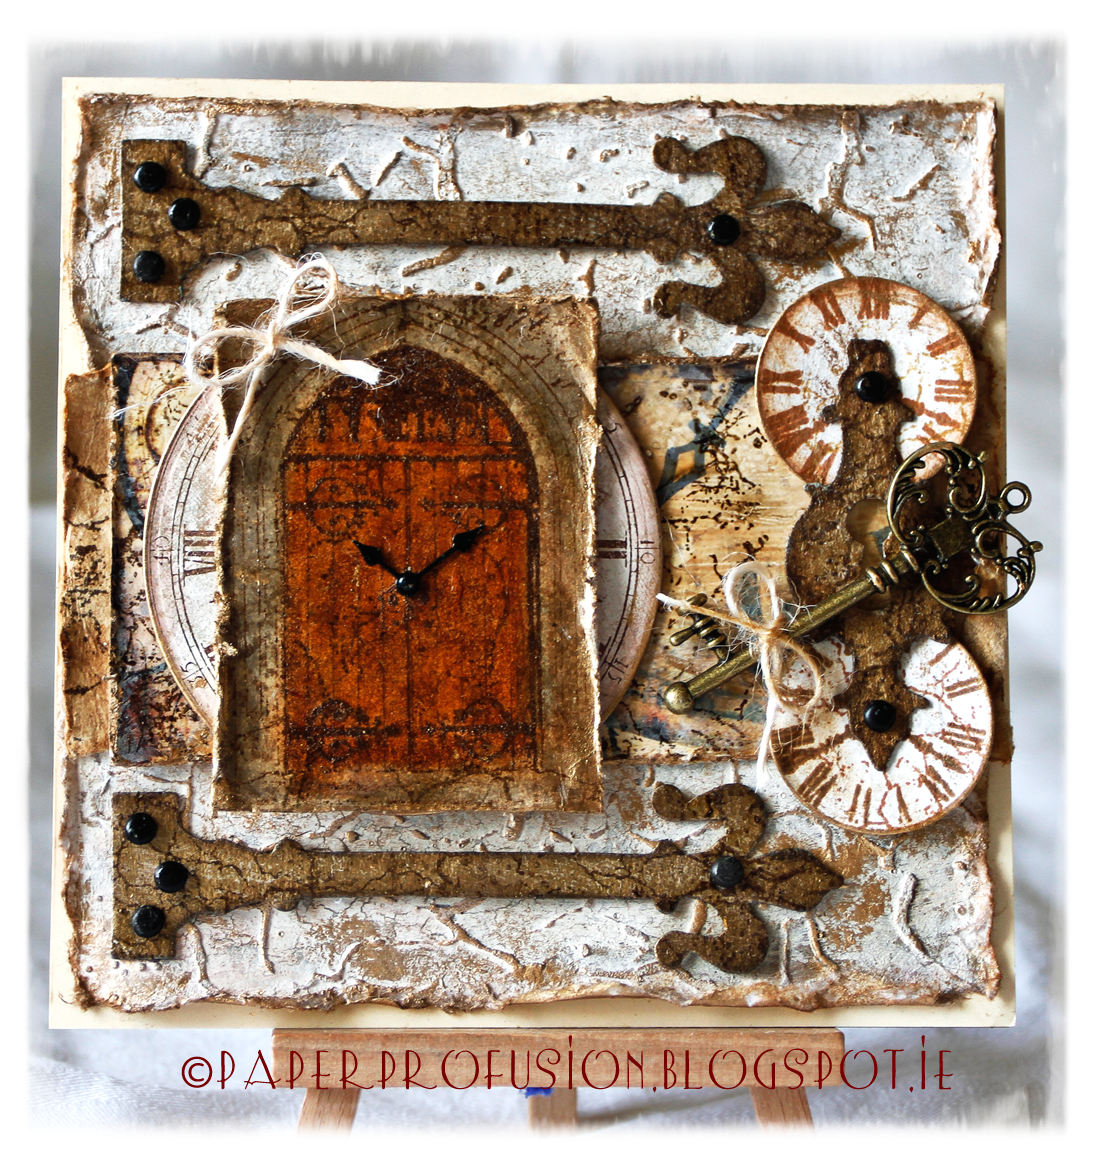
I've made my card today with a number of challenges in mind. The challenge at Frilly and Funkie is 'There's no time to waste'. As this card is for someone who is sitting exams soon that challenge theme is very appropriate (although the young gentleman in question needs no reminder from anyone re his studies). The challenge at Vintage Udfordring is 'Use paint or gesso' - I've used both on my card. The challenge at Simon Says Stamp and Show is 'Inspired By' - well someone I greatly admire is Anita at The Artful Maven Haven. She is one of the most creative people in blogland - please visit her blog for immense inspiration. Anita always signs off her blogposts "I hope your hands get creatively dirty soon!". My hands sure got inky and dirty on this card so I thank Anita for her inspiration. Finally I'd like to enter card to two of my favourite challenge spots Our Creative Corner (newly revamped / 'under new management') and Fashionable Stamping Challenges who both are running 'Anything Goes' at the moment.

So without further ado, here is my card.


The base layer is a cotton handmade paper. First of all I applied embossing paste to it through a Prima 6x6 stencil ('Crackle') and left to dry overnight. I next painted the stenciled paper with Paper Artsy Fresco Finish paint in 'Old Gold'. Once dry I applied a thin layer of Paper Artsy Crackle Glaze. When that was dry I again painted the sheet with Fresco Finish paint in 'Nougat'. By this stage the paper was gorgeously crackled - it's a pity that I had to cover most of it up! I dabbed the raised stenciled parts with distress inks and then some gilding wax to highlight.

Next layer up is a band of cotton paper that I aged with a wet teabag (Twinings!). On top of that is a complimentary sample of glossy card that I kindly received from Crafty Individuals. It looked much too shiny and new for this card so I diluted a little gesso with water and brushed over the card to 'age' it. I then 'aged' further with two useful stamps that I recently bought, both Kaisercraft Clear Stamps 'Crackle' and 'Distress' using Distress Inks.

The main door image is a stamp by Crafty Individuals CI-249 'Gothic Door'. I've stamped with Archival ink and embossed with Ranger Distress EP ('Vintage Photo'). Using my Tim Holtz waterbrush I coloured in the door and stone surround with various DIs. I then painted image with Inkssentials Crackle Glaze to give it a old leathery look. The door image sits atop a clock image. To make the chalky clock, I painted some CS with Paper Artsy Fresco Finish paint in 'Vintage Lace', once dry a layer of Fresco Finish Crackle Glaze and finally, when dry, a layer of Fresco Finish in 'Nougat'. Next stamped the crackled CS using Brilliance Ink with another Crafty Individuals Stamp CI-354 'Clock Face'. I then diecut the clock with a circular Spellbinder die. The clock does have a lovely crackled appearance but once again I ended up covering it up!

Using Sizzix die 'Hardware Findings', I cut some grungeboard. I painted a layer of Paper Artsy Fresco Finish paint in 'Nougat', then FF crackle glaze, then FF 'Old Gold'. Next stamped all with the aforementioned Kaisercraft stamps for further aging effects. I attached with brads that I had coated with Inkssentials Crackle Glaze so as to look a bit worn. The two clocks on the right are stamped with a 7Gypsies stamp from the 'Venice' clear set using Archival and Brilliance inks. They are also 'aged' with DIs and cut to shape with a Spellbinders circular die. I've attached them via the keyhole diecut to fit with 'Time' theme.

Prior to assembling I decorated most edges with gilding wax. The metal clockhands are by Prima and the key is by Maya Road. Finished off with two little twine bows! Phew!

I thank each and every one of you who stop by - your visits and comments are truly appreciated.
Have a lovely weekend.

Nicola x

Thank-you to the hosts, sponsors and DTs at the following challenges that I wish to enter;
Frilly and Funkie - There's No Time To Waste
Vintage Udfording - Use Paint or Gesso
Simon Says Stamp and Show - Inspired By
Our Creative Corner - Anything Goes
Fashionable Stamping Challenge - Anything Goes

Friday, 22 March 2013

Days of yore

Hello again from the deluge that is Dublin! Thank-you for stopping by.


Isn't she lovely?! The central image is a stamp by Chapel Road Artstamps called 'Miranda'. I stamped the image onto Lesley Riley's TAP (transfer artist paper) using Archival ink in Coffee and then ironed the TAP onto cream muslin to transfer the image to the cloth. I then fussy cut her outline. I bought a half-metre of the 'drop-pearl' trim recently in a local haberdashery not knowing what it might work with but am pleased with it as a necklace here. Added water to some Perfect Pearls and painted the dress portion of image for a pearly shimmer.

The base CS is a handmade Indian Gold cardstock. I've done stencil work at the four corners using The Crafter's Workshop stencil (Fancy Frames) and Dreamweaver stencil paste. Next cut the cream frame with Cheery Lynn die 'Mini Pearl French Flair'. Using the same Fancy Frames mask I did more stencilling on the cream frame and then gilded the raised paste with gold gilding wax.

The cream frame is atop a layer of cream silk fibre paper with gold circle embossing. I stamped the paper with Crafty Individuals elegant swirl stamp (CI-182) using gold Delicata ink. Also embossed some of the gold CS using Sizzix Regal Flourishes folder and then cut a Fleur-de-Lis square with a Spellbinders die. I diecut more gold swirls with Sizzix Bigz die 'Elegant Flourishes'. Both cream frame and Fleur-de-Lis square are mounted with foam tape for added dimension.

I added the cream bow having embossed the ribbon with my Regal Flourishes embossing folder. The swirls on the ribbon aren't showing up too well in the photo - but they are there! Sorry but I can't locate the tutorial where I first read about embossing ribbon - it gives a kind of moire silk effect with this flourish folder. I cut the folded end of the embossing folder about an inch wide to allow the ribbon to thread through after embossing each section, in the same way that 'Tim' cuts folders to accomodate the larger size tags.

Added some pearls to finish. I think She is gazing at that pearl in top left corner and planning her next neck adornment!

Thank-you so much for visiting and for any lovely comments you might leave. I hope you have a wonderful weekend.

Nicola x

I wish to enter card to the following challenges;
Fashionable Stamping Challenges - Swirls
Simon Says Stamp and Show - Water
Inspiration Journal - Add a Little P.O.P.
Country View Crafts - Pick and Mix
The Shabby Tea Room - Anything Goes
Crafty Catz - Sparkle with a bow
Kaboodle Doodles - # 163 Bows/Pearls/Anything with frills
Bunny Zoe's Crafts - Girly
Creative Corner Challenges - Layer It Up
Happy Campers - Add Dimension

Saturday, 2 February 2013

Madame Butterfly

Greetings from Dublin. Welcome to my blog and very many thanks to those who have signed up as followers - it is really lovely to have your company.

I seem to be going through a butterfly phase with yet a third butterfly card but with all the challenges about love at the moment how could I possibly leave out Madame Butterfly?


My background is collage stamped with Distress Inks (Spun Sugar, Milled Lavender, Victorian Velvet) using Stampers Anonymous Papillon stamp set. (I recently bought these stamps from The Funkie Junkie Boutique from whom it is a joy to receive a package as Linda wraps everything so prettily and often adds an extra goodie or two. I thus am entering card to The Funkie Junkie: Sunday Share). I next dry embossed the background with Cheery Lynn's embossing plate Petite Hearts - these plates are the width of the Big Shot and so give better size embossing than most folders.

The beautiful Madame Butterfly is by Stampington & Company (P2201 Pucinni's Muse). I stamped her on silk tissue paper using Archival Rose Madder and embossed her with Sparkle n Sprinkle EP (rather fittingly shade is my fave 'Japanese Lacquer'). I cut two different Japanese Chiyogami Papers using Vintage Cabinet Card die. Rubbed each edge as I went along with gold gilding wax for definition. I matted Mme Butterfly onto the darker shaded paper and then framed her with the lighter pattern. Next 'Frantaged' a little using Shabby Pink embossing enamel. Also applied some diecuts that I made with Cheery Lynn dies (Heart Chain Border and Love You More Heart). The way the diecuts isolate her sadly is deliberate. Also placed some gem hearts as her tears. Added more pretty butterflies and hearts. Completed with various charms including a clock - particularly relevant given Madame Butterfly's desperate wait.

Thank-you for visiting - I hope you have a great weekend.

Nicola x

I wish to enter card to the following challenges;
Inspired by Stamping - Colour Challenge # 44
Cheery Lynn Challenge - Tickled Pink
Fashionable Stamping Challenge - Show Some Love
Vintage Stamping Challenge - Vintage
Craft-room Challenge - Monochrome
Anything Goes Challenge Blog - Monochrome
Flutter By Wednesday - Open Challenge
The Sisterhood of Crafters - Only from your heart can you touch the sky
Sugar Creek Hollow - Romantic Love
Crafts and Me - Favourite Embellishment (Butterflies)
Simon Says Stamp - Anything Goes
The Artistic Stamper - Hearts and Flowers

Thursday, 6 December 2012

The Mitten

Hello - You are most welcome to my blog! Thank-you so much to those who have begun to follow and/or posted lovely comments. I appreciate them all very much.

My card today has a lovely warm glow to it that hasn't come across in photo as today in Dublin it is just miserable outside. But never mind, it's cosy indoors!


I hand drew a mitten shape and cut out from SEI Velvet papers. Gave glove a double cuff with Martha Stewart punch along edge. I stitched the glove having marked out with my Seweasy. Then decorated the cuff with ribbons by Melissa Frances and May Arts. Using stamps by Stempelglede (Vintage Christmas) I stamped Angel onto TAP (Transfer Artist Paper by Lesley Riley) using archival ink in sepia. I then ironed the TAP onto white muslin so that the stamped image transferred to the cloth. I also stamped sentiment from same stamp set directly onto cream muslin. (One has to be careful with TAP and text as the ironing process reverses all images). The lovely papers are by Maja Design (It's Christmas Time). I distressed edges of paper and then rubbed paper and mitten edges with gilding wax which I left to dry overnight. Adhered the Angel image with 3D tape and attached the sentiment at top with brads. Punched various snowflakes (Martha Stewart and Woodware) and doubled them up for dimension. The larger ones have rose centres (petal edges gilded) and the smaller snowflakes have pearls as centres. Ribbons and charms from stash to complete.

Stay warm and a big thank-you for stopping by.

Nicola x

I wish to enter card to the following challenges;
Crafty Mess - Vintage Christmas
Twisted Tuesday - Wintery White
Christmas at Sweet Stamping - Anything Goes
Crafting Ireland - 12 Days of Christmas
Sugar Creek Hollow - Distressing
Sparkles Christmas Challenge - Button or Bow
Eclectic Ellapu - Santa paws and/or Snowflakes
Crafty Bloggers - Anything Goes
Simon Says Stamp - Snowflakes
The Crafty Pad - Stitching Real or Faux
Loves Rubberstamps - Anything Goes
Celebrate the Occasion - Christmas - No Red or Green
Alphabet Challenge - V for Vintage
Crimbo Crackers - Wooden

Friday, 30 November 2012

The Maji

Hello again from a very chilly but sunny Dublin. Thank-you for stopping by and welcome to yet another Christmas Card post.


CS is Bazzill. Papers are by Maja Design (having inked/distressed them with various DIs). I stamped and embossed Wisemen Postcard (Stampington and Company C8432)) with black archival ink and black detail EP. Then blended several DIs and Glimmer Mist (Walnut Gold) to create a warm background for the Maji. I coated with Glossy Accents for definition. Next I matted image onto several layers of CS and papers (having distressed and gilded each rectangle's edge). Also used a Martha Stewart edge punch along the base rectangle. With same punch I edged a strip of paper and matted it on CS. Again aged and gilded the edges. Using a holly stamp from Inkadinkado (98398 Christmas Silhouettes) I stamped holly leaves and inked with DI, shimmer mist and applied gilding wax to their edges. Punched the angel wings and bird shapes using Fiskars Squeeze punches and coated with Distress Stain. 'Aged' a Tim Holtz gamespinner and attached to postcard. Added a Brenda Walton metal brad for 'stamp'. Completed with ribbons, bow tied with my boweasy and date (Maja Road). Added crackle accents to embellishments for final vintage effect.

Thank-you so much for visiting and a special thank-you to those who leave comments as they are very much appreciated.

Enjoy your weekend.
Nicola x

Many thanks to the Hosts and Design Teams at the following challenges that I wish to enter;
Sugar Creek Hollow - Vintage Christmas
Sunday Stamper (Ink on my Fingers) - Vintage
Simon Says Stamp - Anything Goes (with Martha Stewart)
Crafty Ribbons - Use at least 2 ribbons
Use Your Stuff - Patterned Paper
Tuesday Throwdown - Lots of Layers
Fussy and Fancy - I Love Christmas
Addicted to Stamps - Christmastime
Glitter n Sparkle - Ribbon and / or Lace
Hooked on Craft - Christmas
Crafting Ireland - 12 Days of Christmas

Sunday, 25 November 2012

Vintage Santa

A warm hello wherever you are, especially those in parts of flood ridden Britain. Thankfully we in Ireland have not been affected by this weather despite being so proximate.

I'm well and truly now in Christmas card production mode.


Background paper is by Swedish brand Maja Design (It's Christmas Time). I have distressed its edges and dabbed with Archival sepia to age and Adirondack paint dabber for snow effect. I won some chipboard ornaments at a raffle a few weeks ago and they are coming in handy! I inked the ornament with various Distress Inks, Metallic Stains and Cosmic Shimmer Mist (Rich Gold). Then stamped Santa (Stampington and Company, St Nicholas, K5545) with Ranger Archival Sepia and embossed with Sparkle n Sprinkle Chocolate EP. I also stamped Holly leaves around Santa (Stampendous SSC1068) but these ended up being mostly covered up. I gave the ornament 5 coats of UTEE and sprinkled in a small amount of glass glitter during coats. I 'aged' two small glassine bags from The Funkie Junkie Boutique with distress inks. Next stamped two 'tickets' using some stamps from Unity Stamp Company (IB-127) - one of these is stamped on canvas tag by Maya Road. I inked the button rims with Archival Sepia and tied through red bows. Added snowflakes and branches with my ubiquitous woodware and Martha Stewart punches using paper by Maya Road and SEI Velvet. Santa's Hat is also decorated with a little metal disc by Nunn Design that says 'Believe'. I painted a metal angel with Gesso and Archival Sepia. Liberally applied Adirondack paint dabber (Snow Cap) to all elements of card. Added ribbons and completed with metal clock hands on angel. Time is absolutely crucial to Santa on the 25th!

Very many thanks for visiting.
Nicola x

I wish to enter card to the following challenges;
Our Creative Corner - ABC Challenge
Sugar Creek Hollow - Vintage Christmas
Stamping Sensations - Traditional Christmas
Vintage Stamping Challenge - Red/Green/Blue/Purple

Monday, 12 November 2012

Christmas Angel with Frills and Lace

Hello and a very warm welcome to my new followers. I have been so grateful to receive such lovely comments to my last post below (A Christmas Tree). It was a great deal of work but your encouragement makes it so worthwhile.

I spent last Saturday at a workshop with CropTarts in Dublin making a Beach House structure designed by the wonderful Dutch artist Lisa de Witte. It was lovely to try out new techniques and to meet new fellow crafters from Ireland.

I feel that I really should begin to build a stock of Christmas cards so here is my card for today;


Base Bazzill CS. Another layer of pink Bazzill is then covered with sparkling flourish vellum by Papermania. The beautiful angel stamp is by Crafty Individuals (C1-211) that has been stamped with Ranger black Archival Ink and matted on Bazzill. The gorgeous Wings from (Andy Skinner ASCSA5010) have been stamped on tissue paper with black Archival Ink and embossed with Judikins Black Diamond EP. I have added Ranger Distress Dry Glitter in Clear Rock Candy to the angel image and particularly built it up on angel's wings. I 'pinned' the frou ribbon by Melissa Frances with brads to stretch it out. Then topped with Venise lace and bows. Added velvet ric-rac across top and crystals to complete.

That's it. Wishing all a lovely week to come.

Nicola x

I wish to enter card to the following challenges;
Crafty Individuals - Festive Sparkle
The Ribbon Girl - Add Sparkle
The Stamp Man - Emboss It
Unique Crafters - Sugar and Spice
52 Christmas Card Showdown - Colour Challenge
Sparkles Christmas Challenge - Contemporary Colour Combo
Glitter and Sparkle - Things with Wings
Loves Rubberstamps - Anything Goes

Sunday, 30 September 2012

Greenfingers

Hello again! Last tuesday I noticed a photo inspiration challenge over at Loves Rubber Stamps . Often when I see an image or buy a new stamp I'll first work out in my head how the card will eventually look (although that then doesn't always work out!) Yesterday I finally got the time to 'put to paper' my interpretation of the lovely photo.


CS is Bazzill. First layer - green CS wrapped in white lace paper. Next layer - white CS edged variously with green stitched ribbons or Martha Stewart edger punch. Because the photo inspiration was so focused on what the little girl was wearing I decided I would stamp on cloth. Image is by La Blanche (#1204 Big Straw Hat) stamped onto white muslin. Ink is Ranger Archival Ink - Viridian. I stitched the muslin to some white CS with markings by SewEasy. (You can likely tell sewing is not my strongpoint!). The exquisite venise lace trimmings come from The Funkie Junkie Boutique. I added Karen Foster metal charms (watering can and garden fork), having first painted them with Antik Metallic Silver paint for shine. (I reckoned that this little girl would only use tools that had some polish!). I punched little flowers (Woodware) and gave them pearl centres (Kaisercraft). To complete, I added little bows and water droplets (Hero Arts).

Thanks for visiting my blog. I hope a great week is in store for you...

Thank-you for the following challenges that I am entering card to:
Loves Rubber Stamps - Photo Inspiration
PaperPlay Challenges - Flowers and Lace
Crafty Catz - Lace and Ribbons
Do You Stack Up - Scallops
GingerLoft Challenge - Stitching real or faux
Joanna Sheen - Down In The Garden
Sweet Stampin' - Vintage
Frilly & Funkie - Sunday Share
Flonzcraft Vintage Stamping Challenge - Anything Goes
Platypus Creek Digitals - Pearls & Lace