Showing posts with label Lefranc and Bourgeois. Show all posts

Friday, 11 April 2014

Un Peu Français (A Little Bit French)

Hello all and thank-you so much for visiting. A warm welcome too to new followers!

Fellow admirers of vintage genre / Tim Holtz will probably be well aware of fabulous new challenge ‘A Vintage Journey’. I was over the moon happy to have won their inaugural challenge for my ‘vintage suitcases’ project. I’m thus thrilled to be Guest Designing at their blog today for their current challenge with theme ‘A Little Bit French’.

As my 'suitcases' project involved the more traditional shabby aging techniques (with lots of shades of battered brown) I challenged myself to make something without any brown ink. Pairing this with the theme of ‘A Little Bit French’ I found myself reminiscing about my four Parisian visits, one of which included a day tour to nearby Palace of Versailles. The main colour that came to mind was GOLD! Lots of it! So I teamed gold with the traditional French red, white and blue and came up with a ornate gilded scene of how the sights of Paris might have looked centuries ago (excuse any time anomalies!)


I’ve altered a Prima ornate metal frame. It came in a shade of blue which I lathered with gesso and coats of white paint. The back of the frame is detachable so that one can decorate its two sides and better place embellishments inside.

Here you can see the background more closely:


Background: Coat of Paper Artsy 'Old Gold', followed by layer of crackle, then painted with coat of 'Snowflake' - this gave lots of lovely golden crackles. Next, stamped an ornate gold chandelier and randomly stamped lots of French text and doo dads in red and blue ink (Archival 'Hydrangea' and 'Red Geranium'). To tone that down then applied Distress Stain 'Picket Fence' and Paper Artsy metallic glaze. Then stencilled lots of lavish flourishes with a Crafters Workshop stencil and texture paste. Next, painted the top of all the stencilled work with Krylon gold leafing pen in two shades.

The Mona Lisa: Stamped Tim Holtz 'Paris Collage' onto cream muslin and embossed with black ep. Then coloured with DIs (Tea Dye, Weathered Wood and Bundled Sage). Heat dried inks. Affixed image into a Melissa Frances resin frame that I've been hoarding for ages. Painted the raised parts and sides of frame with Krylon gold leafing pens and covered Mona with lots of glossy accents to dry overnight. (Actually did this twice - the first attempt was with crackle accents but didn't like the result so re-tried with glossy accents and happy with outcome).

Other Paris landmarks: La Tour Eiffel and L'Arc de Triomphe are stamped on acetate using an Artemio set and embossed with copper ep. I would have loved to have Tim's stamp of the Moulin Rouge but couldn't locate one in time so cheated and printed stamp out on gold card instead. Affixed a gilded cog and metal bit to it also.

Carriage: The gorgeous chipboard carriage came in a giveaway. I coloured the wheels with gold leaf pen and attached 2 of Tim's hitch fasteners and a gilded game spinner. Then inked the top with red distress marker followed by several coats of UTEE to give it a nice gloss. Added some gilded metal bead string for 'reins'.

Other decoration to front: Diecut the pennants from faux leather papers. Stamped / embossed some black text on acetate and affixed around project. I'm dating the scene to the month of April so have gilded some chipboard blossoms and dotted same with white snow pen. Added too a dictionary definition for 'amour' and little golden butterflies.


Inner and outer frame sides.

I took 2 sheets of Neenah cardstock and splattered with lots of gold and copper paints using Liquitex splatter brush. Heat dried. Then embossed sheets with Tim's Eiffel Tower / French Script texture fades.


Applied variously blue and red archival inks to brayer and rolled it over the embossed edges. Heat dried as I went with each colour. Cut into long strips and painted with a pearlescent paint. Once dry, sprayed each strip with water so that it would be roll nicely into place around inner and outer sides.


Finally, a view of the back.


As outlined above achieved gold crackle lines with Paper Artsy paints. Printed out a music sheet of song 'April in Paris'. Also 'cheat' printed one of Tim's letter stamps on gold card. Stamped the Bird Branch once onto tissue and again as if positioned across the music sheet. Pasted the stamped tissue with multi-medium matte glue so that it 'melted' in. Using Tim's new butterflies decorative strip diecut little faux leather butterflies and arranged around bird, together with some flowers. Rubbed gilding wax on metal charms and affixed.

Et, c'est ça!! Thanks again to all at A Vintage Journey - it's been a pleasure to make this little french scene and feature today at your blog.

Thanks to all for visiting - it's been lovely having you drop by.

Have a super weekend,
Nicola x

I wish to enter altered frame to the following challenges:
Simon Says Monday Challenge - Journey
Craft Hoarders Anonymous - Pick a Stamp / Any stamp
Inspiration Journal - A few of my favourite things
Eileen Hull - Art With Heart challenge - April Showers
Vintage Stamping Challenges - Anything Goes
Rhedd's Creative Spirit - Altered Art
The Artistic Stamper - Embossing & Texture
The Kraft Journal - Paris or France

Saturday, 15 June 2013

A Flutter of Butterflies

Hello and welcome!

Last month I was lucky enough to be selected amongst the Top 3 by Country View Crafts for my card here. They then kindly invited me to Guest Design for their challenge this month when the theme is Die Cuts. Do pop over to Country View Crafts Challenge site to see what the rest of the Design Team and fellow 'Top 3' winners have created to inspire you - a new piece is posted every few days for your delectation! I know the team would love to see your 'Die Cuts' in action.

I had a butterfly shaped box that I felt would be perfect for this project. To meet the 'Die Cuts' theme I've used dies in a few different ways. The most obvious of course are the butterflies and wings cut using every butterfly die and punch that I possess.


The raised centre panel has been created by applying texture paste through a lattice diecut.


Some border dies feature too.


I've also used 'on the edge' dies to form a rim around part of the box (with grungeboard in between the paper layers for body).


Butterfly shapes were stencilled with texture paste - then gessoed and gilded. Most are covered up by all the die cuts but you can see the gilded outline of a butterfly hidden in the centre here.


Finally I placed a few grungeboard diecuts on the surface of the box (then again gessoed and gilded). In the centre here you might spot part of a raised golden flourish diecut.


Mixed in with all the die-cutting was a whole lot of buffing and distressing with distress inks, stamping and heat embossing, gilding paste, glass glitter, layers of crackle glaze, gloss, pearl mists and glitzy frantage. I made sure to add a floral corner as all those butterflies need nectar. I also added pearls, flowers and metal charms for thoraxes and lots of other bits and bobs to make all those fluttering wings pretty! Finally I added the sentiment (cut from My Mind's Eye paper) between musical quaver charms.

Do make sure to check out the Country View Crafts Challenge where your die cut projects are very welcome this month!

Thank-you so much for stopping by today. I greatly appreciate each and every one of you in crafty blogland. In case you missed my last post, just a reminder that I have signed up to Bloglovin' - I'd be thrilled silly if you decided to follow me there.

Have a very lovely weekend.
Nicola x

I wish to enter box to the following challenges;
Our Creative Corner: Recipe - Ribbon, Metal, Inks
Craft Room Challenge - Here Comes Summer
Simon Says Stamp - Transport (Butterflies transport Pollen)
The Crafty Bloggers Network - Bright and Breezy
Unruly PaperArts - Art Quest Chabby Chic in 3D
A Creative Romance - Anything Goes

Friday, 10 May 2013

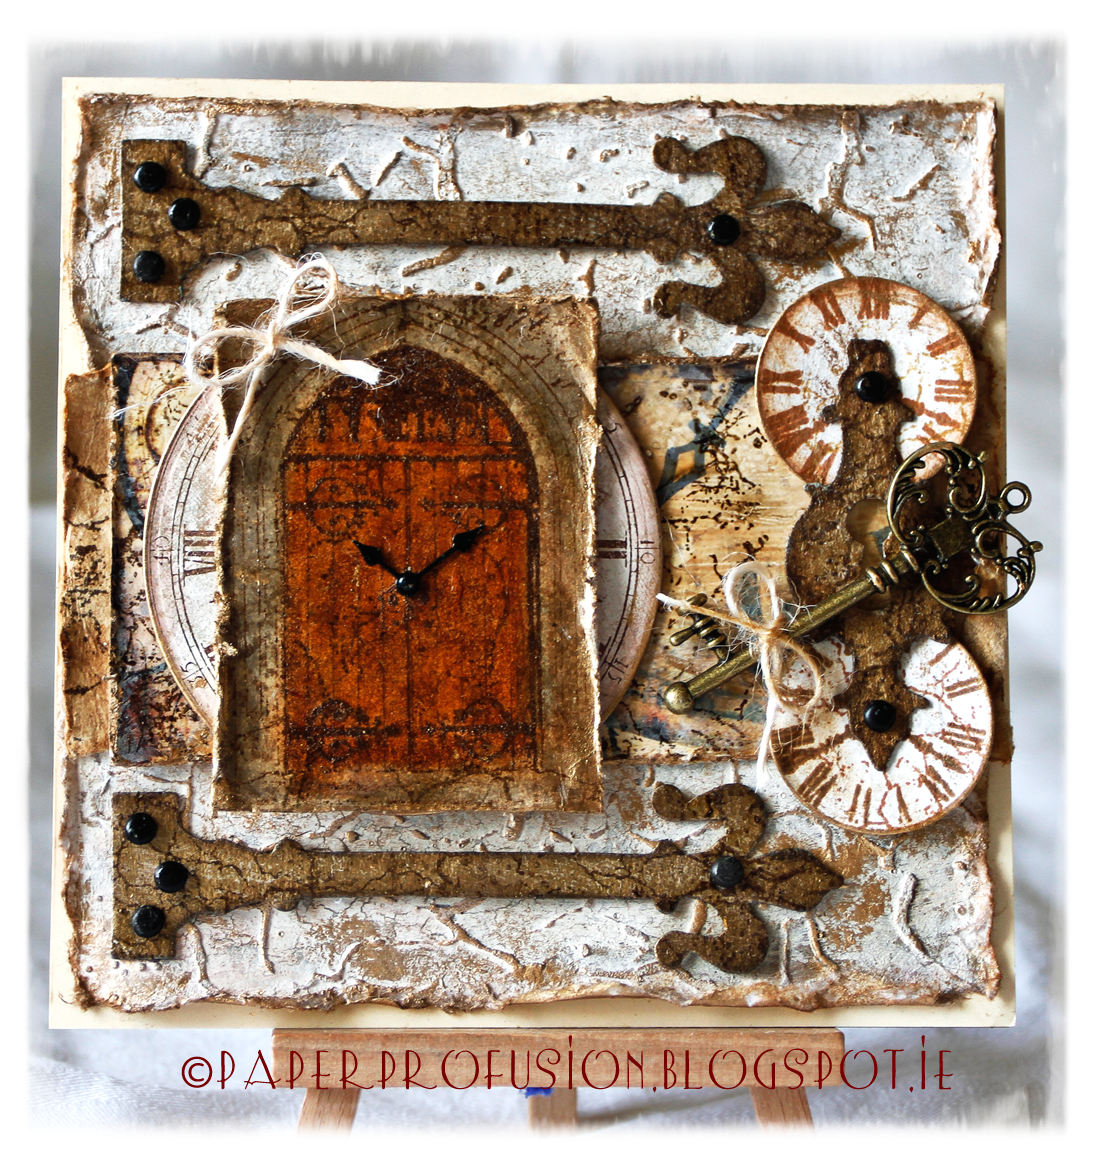
Entering Time

Hello Again! Thank-you for stopping by and a warm welcome to new followers.

I've made my card today with a number of challenges in mind. The challenge at Frilly and Funkie is 'There's no time to waste'. As this card is for someone who is sitting exams soon that challenge theme is very appropriate (although the young gentleman in question needs no reminder from anyone re his studies). The challenge at Vintage Udfordring is 'Use paint or gesso' - I've used both on my card. The challenge at Simon Says Stamp and Show is 'Inspired By' - well someone I greatly admire is Anita at The Artful Maven Haven. She is one of the most creative people in blogland - please visit her blog for immense inspiration. Anita always signs off her blogposts "I hope your hands get creatively dirty soon!". My hands sure got inky and dirty on this card so I thank Anita for her inspiration. Finally I'd like to enter card to two of my favourite challenge spots Our Creative Corner (newly revamped / 'under new management') and Fashionable Stamping Challenges who both are running 'Anything Goes' at the moment.

So without further ado, here is my card.


The base layer is a cotton handmade paper. First of all I applied embossing paste to it through a Prima 6x6 stencil ('Crackle') and left to dry overnight. I next painted the stenciled paper with Paper Artsy Fresco Finish paint in 'Old Gold'. Once dry I applied a thin layer of Paper Artsy Crackle Glaze. When that was dry I again painted the sheet with Fresco Finish paint in 'Nougat'. By this stage the paper was gorgeously crackled - it's a pity that I had to cover most of it up! I dabbed the raised stenciled parts with distress inks and then some gilding wax to highlight.

Next layer up is a band of cotton paper that I aged with a wet teabag (Twinings!). On top of that is a complimentary sample of glossy card that I kindly received from Crafty Individuals. It looked much too shiny and new for this card so I diluted a little gesso with water and brushed over the card to 'age' it. I then 'aged' further with two useful stamps that I recently bought, both Kaisercraft Clear Stamps 'Crackle' and 'Distress' using Distress Inks.

The main door image is a stamp by Crafty Individuals CI-249 'Gothic Door'. I've stamped with Archival ink and embossed with Ranger Distress EP ('Vintage Photo'). Using my Tim Holtz waterbrush I coloured in the door and stone surround with various DIs. I then painted image with Inkssentials Crackle Glaze to give it a old leathery look. The door image sits atop a clock image. To make the chalky clock, I painted some CS with Paper Artsy Fresco Finish paint in 'Vintage Lace', once dry a layer of Fresco Finish Crackle Glaze and finally, when dry, a layer of Fresco Finish in 'Nougat'. Next stamped the crackled CS using Brilliance Ink with another Crafty Individuals Stamp CI-354 'Clock Face'. I then diecut the clock with a circular Spellbinder die. The clock does have a lovely crackled appearance but once again I ended up covering it up!

Using Sizzix die 'Hardware Findings', I cut some grungeboard. I painted a layer of Paper Artsy Fresco Finish paint in 'Nougat', then FF crackle glaze, then FF 'Old Gold'. Next stamped all with the aforementioned Kaisercraft stamps for further aging effects. I attached with brads that I had coated with Inkssentials Crackle Glaze so as to look a bit worn. The two clocks on the right are stamped with a 7Gypsies stamp from the 'Venice' clear set using Archival and Brilliance inks. They are also 'aged' with DIs and cut to shape with a Spellbinders circular die. I've attached them via the keyhole diecut to fit with 'Time' theme.

Prior to assembling I decorated most edges with gilding wax. The metal clockhands are by Prima and the key is by Maya Road. Finished off with two little twine bows! Phew!

I thank each and every one of you who stop by - your visits and comments are truly appreciated.
Have a lovely weekend.

Nicola x

Thank-you to the hosts, sponsors and DTs at the following challenges that I wish to enter;
Frilly and Funkie - There's No Time To Waste
Vintage Udfording - Use Paint or Gesso
Simon Says Stamp and Show - Inspired By
Our Creative Corner - Anything Goes
Fashionable Stamping Challenge - Anything Goes

Tuesday, 30 April 2013

Spring Dressforms

A cheery hello from Dublin. I appreciate your visiting.

This was one of those cards where Plan A didn't work out at all, at all! So I'm very glad that several reconfigurations later I finally have a card to post...


I've used papers from Maja Design (Vintage Summer Basics) and all the stamping is on Ranger Speciality Stamping Paper. I had thought that I would give the dressform wings so that it was like a 'flying dressform' - but no way was this working out!

I cut dressform with Tim Holtz die and mounted on chipboard. Stamped it with Distress Inks using Crafty Individuals stamp set CI-226 'Wild Flowers'. Next stamped and embossed (Ranger Queen's Gold EP) Crafty Individuls stamp CI-357 'Springtime Robin' - I think this stamp is intended as a bookmark but I'm considering it a dress! I've coloured it in with DIs using a Tim Holtz waterbrush. The bird, butterflies and text on the dress are 'paper pieced' and raised on sticky pads.

I also stamped a large sheet with a colourful range of DIs using the CI-226 'Wild Flowers' stamp set and then diecut and punched into lots of butterflies. Then stamped and embossed clothing articles from Crafty Individuals stamp set CI-306 'French Corsets' and coloured them in using Tim Holtz water brush and DIs.

I bought the water brush from The Funkie Junkie Boutique and so wish to enter card to the Frilly and Funkie Sunday Share.

Gilded most edges with gilding wax and left them to dry overnight. All elements of the card are mounted with foam to add dimension. The two circular dies are by Cheery Lynn and Noor Design. I've also embossed the outer circle with a Cheery Lynn circular stitching plate.

That's It - hope you like! Enjoy the rest of your day.

Nicola x


I wish to enter card to the following challenges;
Crafty Individuals - Spring In Fashion
Country View Crafts - Butterflies
Fashionable Stamping Challenges - Sentimental ("Song of Spring")
Simon Says Stamp - Anything Goes
Love To Create - Punches and/or Dies
Dream Valley Challenges - Things With Wings
Sweet Stamping Challenge - Anything but Birthday

Friday, 22 March 2013

Days of yore

Hello again from the deluge that is Dublin! Thank-you for stopping by.


Isn't she lovely?! The central image is a stamp by Chapel Road Artstamps called 'Miranda'. I stamped the image onto Lesley Riley's TAP (transfer artist paper) using Archival ink in Coffee and then ironed the TAP onto cream muslin to transfer the image to the cloth. I then fussy cut her outline. I bought a half-metre of the 'drop-pearl' trim recently in a local haberdashery not knowing what it might work with but am pleased with it as a necklace here. Added water to some Perfect Pearls and painted the dress portion of image for a pearly shimmer.

The base CS is a handmade Indian Gold cardstock. I've done stencil work at the four corners using The Crafter's Workshop stencil (Fancy Frames) and Dreamweaver stencil paste. Next cut the cream frame with Cheery Lynn die 'Mini Pearl French Flair'. Using the same Fancy Frames mask I did more stencilling on the cream frame and then gilded the raised paste with gold gilding wax.

The cream frame is atop a layer of cream silk fibre paper with gold circle embossing. I stamped the paper with Crafty Individuals elegant swirl stamp (CI-182) using gold Delicata ink. Also embossed some of the gold CS using Sizzix Regal Flourishes folder and then cut a Fleur-de-Lis square with a Spellbinders die. I diecut more gold swirls with Sizzix Bigz die 'Elegant Flourishes'. Both cream frame and Fleur-de-Lis square are mounted with foam tape for added dimension.

I added the cream bow having embossed the ribbon with my Regal Flourishes embossing folder. The swirls on the ribbon aren't showing up too well in the photo - but they are there! Sorry but I can't locate the tutorial where I first read about embossing ribbon - it gives a kind of moire silk effect with this flourish folder. I cut the folded end of the embossing folder about an inch wide to allow the ribbon to thread through after embossing each section, in the same way that 'Tim' cuts folders to accomodate the larger size tags.

Added some pearls to finish. I think She is gazing at that pearl in top left corner and planning her next neck adornment!

Thank-you so much for visiting and for any lovely comments you might leave. I hope you have a wonderful weekend.

Nicola x

I wish to enter card to the following challenges;
Fashionable Stamping Challenges - Swirls
Simon Says Stamp and Show - Water
Inspiration Journal - Add a Little P.O.P.
Country View Crafts - Pick and Mix
The Shabby Tea Room - Anything Goes
Crafty Catz - Sparkle with a bow
Kaboodle Doodles - # 163 Bows/Pearls/Anything with frills
Bunny Zoe's Crafts - Girly
Creative Corner Challenges - Layer It Up
Happy Campers - Add Dimension

Thursday, 10 January 2013

Treasure Chests

Welcome to a special post today! As you may know I was previously featured at the stunning blog Our Creative Corner for twice winning their Top Talent Challenge. For that spotlight I crafted 'A Christmas Tree'. I was lucky enough to win again there recently for my 'Vintage Santa' card and was kindly invited to feature once more and make a project to showcase. So I took the term 'showcase' literally!

I very much appreciate Our Creative Corner hosting this spotlight piece. Their design team are a platinum talented group of ladies whose crafting will ALWAYS inspire. Please do pop over Our Creative Corner for more details of my showcase today and a q and a session. My first spotlight interview from last November is here.

I have altered a pair of miniature papier-mâché suitcases to turn them into little vintage Treasure Chests. Apologies for photographs that were tricky earlier this week given Dublin's dark skies.


Firstly I gave each case a coat of Gesso. Next I applied a coat of Paper Artsy's Fresco Finish paint in Nougat. Then painted a thin coat of Fresco Finish Crackle Glaze. Once dry I followed with a coat of Fresco Finish Vintage Lace for one case, Ice Blue for the other. Also painted the corners and leather strap elements with Fresco Finish 'Old Gold'. The resulting crackle effect was super (thanks Alison). I then (for the first time) stencilled using Crafter's Workshop mini damask stencil together with Dreamweaver embossing paste in white. It wasn't possible to tape the stencil down flat given the raised 'leather straps' either side so the stencils aren't as clean as could be if they had been entirely flat. I sponged Distress Inks liberally over both cases.

Next stamped a mix of script and scroll stamps using Archival Rose Madder and gold inks. I then painted a coat of Fresco Finish Metallic Glaze - resulting in a gorgeous pearlescent sheen. However given that I had used pale colours at the crackling stage I lost some of the detail of the crackle and paler stamping as I applied the glaze. Paper Artsy's site does explain that the metallic glaze can be mixed with Satin Glaze to lessen the pearlescent sheen and I will follow their advice next time. I re-sponged a mix of Distress Inks for layering effect.

I 'recrackled' the leather handles and straps to 'age' and nubble further. Using my finger I applied a gilding wax (LeFranc & Bourgeois Pale Gold) over the damask stencilling and left to dry overnight. The next day I did a second stencil layer with the embossing paste to heighten. Again it wasn't possible to lay stencil flat but the second layer gave the pattern a better definition. I then did my gilding wax trick again. (Whole project done over several days).

Given the wonderful results achieved by Joanna and others and tip from Anne I just had to try out some Stampendous Frantage. For the pink chest I used Stampendous Shabby Pink embossing enamel speckled with Melissa Frances pink glass glitter. On the blue chest I scattered Aged Ivory embossing enamel flecked with gold glass glitter. I ended up covering some stamping again but I loved the jewel encrusted texture so much that I didn't mind! I also embossed edges of cases with Ranger Queen's Gold EP. Added the little pearls to the case corners and handles with Viva Decor pearl pen.

I die cut the tags with a mix of Cheery Lynn and Spellbinders dies and some Brenda Walton tag and Nunn Design embellishments and charms from stash. I gave them the same paint, glaze and frantage treatment and attached with gold cord.

I 'aged and gilded' the crown charm and Melissa Frances resin bird and fixed to the pink chest. Similarly decorated the blue chest with bird charm and butterfly by Brenda Walton.


During the early stage of the project I also made 'linings' for the cases using silk fibre tissue with petals. I stamped the tissue and then fixed inside with modge podge. Inside the pink case is a sentiment by Paper Bag Studios (PBS-038-C Beauty) and Justrite Stamps (Damask Background) - stamped with Worn Lipstick DI. The blue case has Flourishes Stamp (Antique Map) and the very lovely Crafty Individuals Stamp (CI-101). Stamped with Chipped Sapphire and Broken China DIs. Also stamped mini flowers, fleur de lis and butterflies and dabbed with DIs.


Very many thanks once again to all at Our Creative Corner for giving me the opportunity to shine. Being invited to produce a special project inspired me to push my boundaries. This is my first 'altered item' - I have learnt a lot in the process and had fun along the way!

Thank-you so much for spending time at my blog. Your visits and comments mean a great deal!

Nicola x

I wish to enter my Treasure Chests to the following challenges;
Fashionable Stamping Challenges - Surprise Us
Vintage Stamping Challenges - Vintage
Simon Says Stamp and Show - Embrace The Old
Crafty-emblies - Toy Box or Toy or Box
Flourishes Timeless Tuesday - #202 New (with flourishes stamp)
Live & Love Crafts - Something Old
Craft Your Passion - Vintage / Shabby Chic
Kaboodle Doodles - Vintage
Crafty Creations Challenges - Something New - new stencil
Little Red Wagon - Bring On The Bling

Thursday, 6 December 2012

The Mitten

Hello - You are most welcome to my blog! Thank-you so much to those who have begun to follow and/or posted lovely comments. I appreciate them all very much.

My card today has a lovely warm glow to it that hasn't come across in photo as today in Dublin it is just miserable outside. But never mind, it's cosy indoors!


I hand drew a mitten shape and cut out from SEI Velvet papers. Gave glove a double cuff with Martha Stewart punch along edge. I stitched the glove having marked out with my Seweasy. Then decorated the cuff with ribbons by Melissa Frances and May Arts. Using stamps by Stempelglede (Vintage Christmas) I stamped Angel onto TAP (Transfer Artist Paper by Lesley Riley) using archival ink in sepia. I then ironed the TAP onto white muslin so that the stamped image transferred to the cloth. I also stamped sentiment from same stamp set directly onto cream muslin. (One has to be careful with TAP and text as the ironing process reverses all images). The lovely papers are by Maja Design (It's Christmas Time). I distressed edges of paper and then rubbed paper and mitten edges with gilding wax which I left to dry overnight. Adhered the Angel image with 3D tape and attached the sentiment at top with brads. Punched various snowflakes (Martha Stewart and Woodware) and doubled them up for dimension. The larger ones have rose centres (petal edges gilded) and the smaller snowflakes have pearls as centres. Ribbons and charms from stash to complete.

Stay warm and a big thank-you for stopping by.

Nicola x

I wish to enter card to the following challenges;
Crafty Mess - Vintage Christmas
Twisted Tuesday - Wintery White
Christmas at Sweet Stamping - Anything Goes
Crafting Ireland - 12 Days of Christmas
Sugar Creek Hollow - Distressing
Sparkles Christmas Challenge - Button or Bow
Eclectic Ellapu - Santa paws and/or Snowflakes
Crafty Bloggers - Anything Goes
Simon Says Stamp - Snowflakes
The Crafty Pad - Stitching Real or Faux
Loves Rubberstamps - Anything Goes
Celebrate the Occasion - Christmas - No Red or Green
Alphabet Challenge - V for Vintage
Crimbo Crackers - Wooden

Friday, 30 November 2012

The Maji

Hello again from a very chilly but sunny Dublin. Thank-you for stopping by and welcome to yet another Christmas Card post.


CS is Bazzill. Papers are by Maja Design (having inked/distressed them with various DIs). I stamped and embossed Wisemen Postcard (Stampington and Company C8432)) with black archival ink and black detail EP. Then blended several DIs and Glimmer Mist (Walnut Gold) to create a warm background for the Maji. I coated with Glossy Accents for definition. Next I matted image onto several layers of CS and papers (having distressed and gilded each rectangle's edge). Also used a Martha Stewart edge punch along the base rectangle. With same punch I edged a strip of paper and matted it on CS. Again aged and gilded the edges. Using a holly stamp from Inkadinkado (98398 Christmas Silhouettes) I stamped holly leaves and inked with DI, shimmer mist and applied gilding wax to their edges. Punched the angel wings and bird shapes using Fiskars Squeeze punches and coated with Distress Stain. 'Aged' a Tim Holtz gamespinner and attached to postcard. Added a Brenda Walton metal brad for 'stamp'. Completed with ribbons, bow tied with my boweasy and date (Maja Road). Added crackle accents to embellishments for final vintage effect.

Thank-you so much for visiting and a special thank-you to those who leave comments as they are very much appreciated.

Enjoy your weekend.
Nicola x

Many thanks to the Hosts and Design Teams at the following challenges that I wish to enter;
Sugar Creek Hollow - Vintage Christmas
Sunday Stamper (Ink on my Fingers) - Vintage
Simon Says Stamp - Anything Goes (with Martha Stewart)
Crafty Ribbons - Use at least 2 ribbons
Use Your Stuff - Patterned Paper
Tuesday Throwdown - Lots of Layers
Fussy and Fancy - I Love Christmas
Addicted to Stamps - Christmastime
Glitter n Sparkle - Ribbon and / or Lace
Hooked on Craft - Christmas
Crafting Ireland - 12 Days of Christmas

Monday, 24 September 2012

Autumn Leaf

Hello. Dublin today was Wet! Wet! Wet! (but no Marti Pellow alas!) Speaking of the weather outside - here is my take on autumn;


Base CS by Bazzill. Next vellum layer by Laura Ashley. Next layer Stardream. I then printed a leaf shape from photoshop for outline. I inked up a melange of cardstock and vellum with a mix of Ranger Distress Inks and gilding wax (Lefranc & Bourgeois) to achieve varying autumnal hues (both sides of papers). Also painted some jute ribbon with inks. I then scrunched up the paper (the vellum lended itself really well to this). Next, I punched (a lot) of leaves with Woodware punch. I glued the leaves building for 3D effect. Also backed printout with 5 skeleton leaves (Anitas) to give it some definition. Dabbed the leaves randomly with some Ranger Distress Crackle Paint and Inkssentials Glossy Accents. Left it overnight to dry. I 'distressed' some cheesecloth with Ranger Distress EP Vintage Photo. Also, painted a Prima wooden timepiece with Distress Crackle Paint. Ditto to a Tim Holtz Ideology Gamespinner to age it. Added jute ribbon, crushed velvet ribbon and twine.

Hope my leaf card brings you warm and happy thoughts. Thanks for visiting.

I'm entering card to the following challenges;
4 Crafty Chicks - Leaves
Papertake Weekly Challenge - A Hazy Shade of Autumn
Divas by Design - Lovely layers
My Craft Spot - Falling Leaves
Frilly and Funkie - Fall into Fall
Creative Inspirations Paint - Fall Colors
Just Some Lines - Lets Celebrate Fall
Alota Rubber Stamps - 3D Fall
Really Reasonable Ribbon - Autumn Colors and Ribbon
Clearly Inspired - Fall into Fall

Sunday, 16 September 2012

Loving Wedding Wishes

Hello again. Thanks to all for very welcome comments on my creations so far. Today I'd like to share a wedding card I've made.


I've used a cream Bazzill cardstock as base. I cut a rectangle of SEI Velvet Paper (Coconut)and shaped the top two corners with Fiskars punch. I also used a Martha Stewart edge punch and threaded organza ribbon thru the punched paper. I cut another rectangle of SEI Velvet Paper (Porcelain) and attached vintage lace to it using Basic Grey brads. Added a cream skeleton leaf that I had rubbed with gold gilding paste by Lefranc and Bourgeois. Then, I wrapped a tag with a luscious silk based paper that is gold embossed with wedding rings theme, this paper feels like fabric. I wound two different types of lace across centre and base of tag. Added a little bouquet of white roses with cream satin ribbon wound around stems. I painted three Making Memories wedding 'metal word fetti' with a pearlescent mix I made from Perfect Pearls. Used a narrower satin ribbon to hold the 'word fetti' together. Again used the gold gilding paste to age the 7 Gypsies 'French Enamel' - Je t'aime. Made a bow with my Boweasy using May Arts Silk ribbon and topped that off with a Prima white cameo rose. Added more little bows and crystals to top corners. Finally punched two velvet hearts and decorated them with pearls.

I'm entering this card to the following challenges;
Sir Stampalot Challenge - September - Photo Inspiration
http://sirstampalotchallenge.blogspot.ie/
Southern Girls Challenge - Bling Bling
http://www.southerngirlschallenge.blogspot.in/
The Pink Elephant - Wedding/Anniversary
http://thepinkelephantchallenge.blogspot.ie/
Creative Harmony Blogspot - Almost White
http://creativeharmony.blogspot.ie/
Live and Love Crafts Blogspot= Lovely lace, terrific trim
http://liveandlovecrafts.blogspot.co.uk/2012/09/challenge-3-lovely-lace-terrific-trim.html
The Pretty Little Ribbon Shop - Lace and Pearls

Hope you have a sunny day to complete a happy weekend!


Wednesday, 12 September 2012

Frilly Flight

Hi there. We have sunshine and showers today in Dublin (less showers thankfully). The weather made me think of today's card with its mixture of distress for autumn yet butterflies for sun.


I started off with a buff colour Bazzill cardstock for base. (I usually make cards 6" x 6"). I then distressed the white CS edges with Tim Holtz distress tool and Vintage Photo Distress Ink. I stamped a script stamp (La Blanche 1174) with a faint amount of Distress Ink in Antique Linen. Over that I stamped the lovely bird and branch (Tim Holtz Stamp P2-1431) using Versafine Vintage Sepia. I distressed the edges of a manila tag and again 'weathered' it using DI Vintage Photo. I stamped a music stamp (Anna Griffin 580K21) on tag and then liberally rubbed the tag with gilding wax around its edges and across the white CS too. The gilding wax is by Lefranc & Bourgeois - a little of it goes a long way! I again stamped the TH bird stamp - this time onto the tag. I also (crookedly) stamped and gold embossed the tag end with an Anna Griffin edge stamp. Using the Sew Easy to puncture holes I stitched some cream embroidery thread across the white CS. I put all the ingredients together and added skeleton leaf (smeared with gilding wax), punched branches (using Martha Stewart punch), ribbons, twine, charms, pearls and wooden ladybirds.

I've entered this card to to the following challenges:
Bunny Zoe's Crafts - Distressed
http://bunnyzoescrafts.blogspot.co.uk/
Cupcake Craft Challenges - In Stitches
http://cupcakecraftchallenges.blogspot.co.uk/

Gosh it all sounds like an awful lot of work when one puts it in writing! Thanks for looking and enjoy the rest of your day.