Showing posts with label Distress Ink. Show all posts

Friday, 10 May 2013

Entering Time

Hello Again! Thank-you for stopping by and a warm welcome to new followers.

I've made my card today with a number of challenges in mind. The challenge at Frilly and Funkie is 'There's no time to waste'. As this card is for someone who is sitting exams soon that challenge theme is very appropriate (although the young gentleman in question needs no reminder from anyone re his studies). The challenge at Vintage Udfordring is 'Use paint or gesso' - I've used both on my card. The challenge at Simon Says Stamp and Show is 'Inspired By' - well someone I greatly admire is Anita at The Artful Maven Haven. She is one of the most creative people in blogland - please visit her blog for immense inspiration. Anita always signs off her blogposts "I hope your hands get creatively dirty soon!". My hands sure got inky and dirty on this card so I thank Anita for her inspiration. Finally I'd like to enter card to two of my favourite challenge spots Our Creative Corner (newly revamped / 'under new management') and Fashionable Stamping Challenges who both are running 'Anything Goes' at the moment.

So without further ado, here is my card.
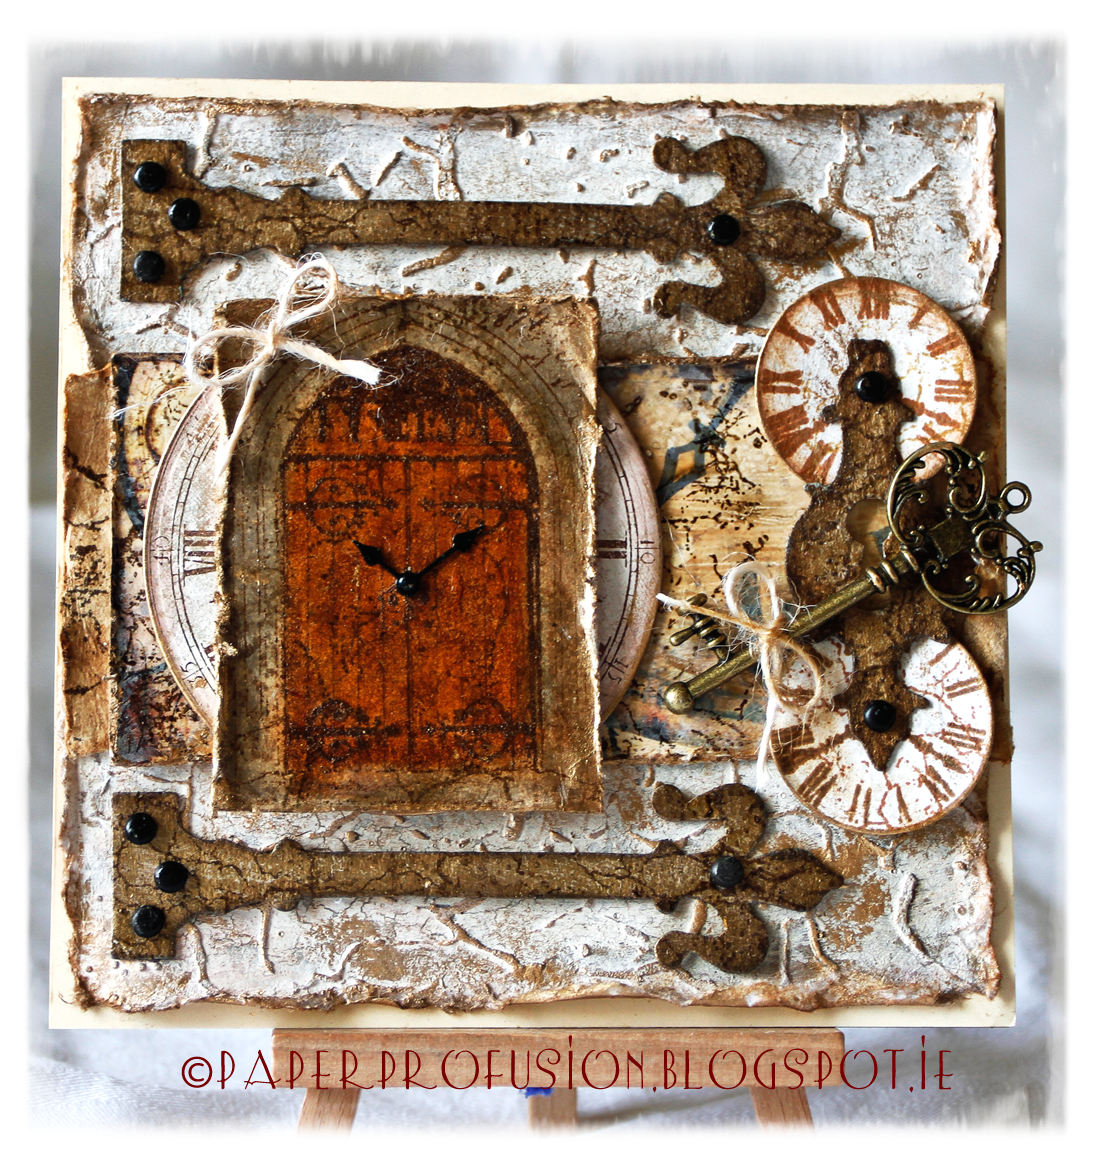


The base layer is a cotton handmade paper. First of all I applied embossing paste to it through a Prima 6x6 stencil ('Crackle') and left to dry overnight. I next painted the stenciled paper with Paper Artsy Fresco Finish paint in 'Old Gold'. Once dry I applied a thin layer of Paper Artsy Crackle Glaze. When that was dry I again painted the sheet with Fresco Finish paint in 'Nougat'. By this stage the paper was gorgeously crackled - it's a pity that I had to cover most of it up! I dabbed the raised stenciled parts with distress inks and then some gilding wax to highlight.

Next layer up is a band of cotton paper that I aged with a wet teabag (Twinings!). On top of that is a complimentary sample of glossy card that I kindly received from Crafty Individuals. It looked much too shiny and new for this card so I diluted a little gesso with water and brushed over the card to 'age' it. I then 'aged' further with two useful stamps that I recently bought, both Kaisercraft Clear Stamps 'Crackle' and 'Distress' using Distress Inks.

The main door image is a stamp by Crafty Individuals CI-249 'Gothic Door'. I've stamped with Archival ink and embossed with Ranger Distress EP ('Vintage Photo'). Using my Tim Holtz waterbrush I coloured in the door and stone surround with various DIs. I then painted image with Inkssentials Crackle Glaze to give it a old leathery look. The door image sits atop a clock image. To make the chalky clock, I painted some CS with Paper Artsy Fresco Finish paint in 'Vintage Lace', once dry a layer of Fresco Finish Crackle Glaze and finally, when dry, a layer of Fresco Finish in 'Nougat'. Next stamped the crackled CS using Brilliance Ink with another Crafty Individuals Stamp CI-354 'Clock Face'. I then diecut the clock with a circular Spellbinder die. The clock does have a lovely crackled appearance but once again I ended up covering it up!

Using Sizzix die 'Hardware Findings', I cut some grungeboard. I painted a layer of Paper Artsy Fresco Finish paint in 'Nougat', then FF crackle glaze, then FF 'Old Gold'. Next stamped all with the aforementioned Kaisercraft stamps for further aging effects. I attached with brads that I had coated with Inkssentials Crackle Glaze so as to look a bit worn. The two clocks on the right are stamped with a 7Gypsies stamp from the 'Venice' clear set using Archival and Brilliance inks. They are also 'aged' with DIs and cut to shape with a Spellbinders circular die. I've attached them via the keyhole diecut to fit with 'Time' theme.

Prior to assembling I decorated most edges with gilding wax. The metal clockhands are by Prima and the key is by Maya Road. Finished off with two little twine bows! Phew!

I thank each and every one of you who stop by - your visits and comments are truly appreciated.
Have a lovely weekend.

Nicola x

Thank-you to the hosts, sponsors and DTs at the following challenges that I wish to enter;
Frilly and Funkie - There's No Time To Waste
Vintage Udfording - Use Paint or Gesso
Simon Says Stamp and Show - Inspired By
Our Creative Corner - Anything Goes
Fashionable Stamping Challenge - Anything Goes

Monday, 4 March 2013

For A Lady

Greetings from Dublin. Firstly, heartfelt thanks to everyone who left such lovely comments on my last post - you ladies are warm rays of sunshine and your kindness means a great deal to me. Secondly, I've missed my magical mystery tours around your blogs and I'm hoping to venture back as much as possible.

Last Sunday I was lucky enough to attend a class hosted by the lovely Eve who taught us to alter a Tim Holtz configurations box using the delectable Graphic 45 'A Ladies' Diary' papers, together with a matching mini album. Thank-you Eve for hosting such a friendly, fun filled day - looking forward to more. It was great to finally meet the wonderful Shirley and other crafty ladies too.

Eve's box had a clear top lid so that the lovely lined drawers could be seen below with the album hidden beneath them. She showed us how to 'hinge' the top and bottom parts in order to double the box height. I've arranged my box a little differently though and made it with a paper covered lid. Here is my version;


Back at home I covered all sides of box and drawers (inner and outer) with the beautiful A Ladies' Diary papers. Also painted the drawers with Paper Artsy's fresco finish in Nougat. The lid is simply made from a square of Ladies' Diary paper on top of a square of cardstock. I sealed the papers with Claudine Hellmuth multi medium matte and found this product super as it forms an invisible seal with no visible brushstrokes. I then edged the lid with lace and decorated with lots of Ladies' Diary images, roses by Prima and Jeans (available here), silk ribbon (tied using Boweasy), pearls and charms. (A little inking is also in the mixture using Distress Inks). Also added Tim Holtz game spinners to clocks on two sides.


For the inside of the box I've used the space in the top lid to create a little stamped scene showing a seamstress busy creating all those fashions modelled on the outside. The stamped square is backed by a square of cardstock for reinforcement. I've used stamps from the gorgeous set 'Sew Much To Do' by Chapel Road Artstamps. You can see I've also used some 'A Ladies' Diary' cutouts to form the scene as well as lace, stitched buttons, sewn ribbon, wound spools, pearl string, roses, seam binding, ribbon measuring tape and I stamped the Magnolia die cut tag for the shop sign.


I recently bought the Tim Holtz dressform die and cut some spools from chipboard and used one as the box 'closure'. I decorated it with seam binding and a really fabulous scissors charm that I bought from The Funkie Junkie Boutique. Eve's kit also included the Tim Holtz Foundations 'feet' that really finish off the box wonderfully.


I'll be giving this box to my Darling Mum next Sunday for Mother's Day.

I wish you all a lovely week and thank everyone most sincerely for visiting. It's great to have you along!

Nicola x


I wish to enter box to the following challenges;
Sugar Creek Hollow - #51 Lovely Lace
Simon Says Stamp and Show - By The Numbers (clocks, dates,tape)
Country View Crafts - Pick and Mix
Stampin For The Weekend - Lace
Vintage Udfordring - #55 Decorate with Flowers
Joanna Sheen - Layer It Up
Moving Along With The Times - Lovely Ladies
Glitter n Sparkle Challenge Blog - Mother's Day
Sunday Stamper - Oh You Pretty Things
Allsorts Challenge - For A Lady
Inspiration Emporium - Add A Little P.O.P.

Wednesday, 12 September 2012

Frilly Flight

Hi there. We have sunshine and showers today in Dublin (less showers thankfully). The weather made me think of today's card with its mixture of distress for autumn yet butterflies for sun.


I started off with a buff colour Bazzill cardstock for base. (I usually make cards 6" x 6"). I then distressed the white CS edges with Tim Holtz distress tool and Vintage Photo Distress Ink. I stamped a script stamp (La Blanche 1174) with a faint amount of Distress Ink in Antique Linen. Over that I stamped the lovely bird and branch (Tim Holtz Stamp P2-1431) using Versafine Vintage Sepia. I distressed the edges of a manila tag and again 'weathered' it using DI Vintage Photo. I stamped a music stamp (Anna Griffin 580K21) on tag and then liberally rubbed the tag with gilding wax around its edges and across the white CS too. The gilding wax is by Lefranc & Bourgeois - a little of it goes a long way! I again stamped the TH bird stamp - this time onto the tag. I also (crookedly) stamped and gold embossed the tag end with an Anna Griffin edge stamp. Using the Sew Easy to puncture holes I stitched some cream embroidery thread across the white CS. I put all the ingredients together and added skeleton leaf (smeared with gilding wax), punched branches (using Martha Stewart punch), ribbons, twine, charms, pearls and wooden ladybirds.

I've entered this card to to the following challenges:
Bunny Zoe's Crafts - Distressed
http://bunnyzoescrafts.blogspot.co.uk/
Cupcake Craft Challenges - In Stitches
http://cupcakecraftchallenges.blogspot.co.uk/

Gosh it all sounds like an awful lot of work when one puts it in writing! Thanks for looking and enjoy the rest of your day.