Showing posts with label Tim Holtz. Show all posts

Friday, 11 April 2014

Un Peu Français (A Little Bit French)

Hello all and thank-you so much for visiting. A warm welcome too to new followers!

Fellow admirers of vintage genre / Tim Holtz will probably be well aware of fabulous new challenge ‘A Vintage Journey’. I was over the moon happy to have won their inaugural challenge for my ‘vintage suitcases’ project. I’m thus thrilled to be Guest Designing at their blog today for their current challenge with theme ‘A Little Bit French’.

As my 'suitcases' project involved the more traditional shabby aging techniques (with lots of shades of battered brown) I challenged myself to make something without any brown ink. Pairing this with the theme of ‘A Little Bit French’ I found myself reminiscing about my four Parisian visits, one of which included a day tour to nearby Palace of Versailles. The main colour that came to mind was GOLD! Lots of it! So I teamed gold with the traditional French red, white and blue and came up with a ornate gilded scene of how the sights of Paris might have looked centuries ago (excuse any time anomalies!)


I’ve altered a Prima ornate metal frame. It came in a shade of blue which I lathered with gesso and coats of white paint. The back of the frame is detachable so that one can decorate its two sides and better place embellishments inside.

Here you can see the background more closely:


Background: Coat of Paper Artsy 'Old Gold', followed by layer of crackle, then painted with coat of 'Snowflake' - this gave lots of lovely golden crackles. Next, stamped an ornate gold chandelier and randomly stamped lots of French text and doo dads in red and blue ink (Archival 'Hydrangea' and 'Red Geranium'). To tone that down then applied Distress Stain 'Picket Fence' and Paper Artsy metallic glaze. Then stencilled lots of lavish flourishes with a Crafters Workshop stencil and texture paste. Next, painted the top of all the stencilled work with Krylon gold leafing pen in two shades.

The Mona Lisa: Stamped Tim Holtz 'Paris Collage' onto cream muslin and embossed with black ep. Then coloured with DIs (Tea Dye, Weathered Wood and Bundled Sage). Heat dried inks. Affixed image into a Melissa Frances resin frame that I've been hoarding for ages. Painted the raised parts and sides of frame with Krylon gold leafing pens and covered Mona with lots of glossy accents to dry overnight. (Actually did this twice - the first attempt was with crackle accents but didn't like the result so re-tried with glossy accents and happy with outcome).

Other Paris landmarks: La Tour Eiffel and L'Arc de Triomphe are stamped on acetate using an Artemio set and embossed with copper ep. I would have loved to have Tim's stamp of the Moulin Rouge but couldn't locate one in time so cheated and printed stamp out on gold card instead. Affixed a gilded cog and metal bit to it also.

Carriage: The gorgeous chipboard carriage came in a giveaway. I coloured the wheels with gold leaf pen and attached 2 of Tim's hitch fasteners and a gilded game spinner. Then inked the top with red distress marker followed by several coats of UTEE to give it a nice gloss. Added some gilded metal bead string for 'reins'.

Other decoration to front: Diecut the pennants from faux leather papers. Stamped / embossed some black text on acetate and affixed around project. I'm dating the scene to the month of April so have gilded some chipboard blossoms and dotted same with white snow pen. Added too a dictionary definition for 'amour' and little golden butterflies.


Inner and outer frame sides.

I took 2 sheets of Neenah cardstock and splattered with lots of gold and copper paints using Liquitex splatter brush. Heat dried. Then embossed sheets with Tim's Eiffel Tower / French Script texture fades.


Applied variously blue and red archival inks to brayer and rolled it over the embossed edges. Heat dried as I went with each colour. Cut into long strips and painted with a pearlescent paint. Once dry, sprayed each strip with water so that it would be roll nicely into place around inner and outer sides.


Finally, a view of the back.


As outlined above achieved gold crackle lines with Paper Artsy paints. Printed out a music sheet of song 'April in Paris'. Also 'cheat' printed one of Tim's letter stamps on gold card. Stamped the Bird Branch once onto tissue and again as if positioned across the music sheet. Pasted the stamped tissue with multi-medium matte glue so that it 'melted' in. Using Tim's new butterflies decorative strip diecut little faux leather butterflies and arranged around bird, together with some flowers. Rubbed gilding wax on metal charms and affixed.

Et, c'est ça!! Thanks again to all at A Vintage Journey - it's been a pleasure to make this little french scene and feature today at your blog.

Thanks to all for visiting - it's been lovely having you drop by.

Have a super weekend,
Nicola x

I wish to enter altered frame to the following challenges:
Simon Says Monday Challenge - Journey
Craft Hoarders Anonymous - Pick a Stamp / Any stamp
Inspiration Journal - A few of my favourite things
Eileen Hull - Art With Heart challenge - April Showers
Vintage Stamping Challenges - Anything Goes
Rhedd's Creative Spirit - Altered Art
The Artistic Stamper - Embossing & Texture
The Kraft Journal - Paris or France

Sunday, 16 March 2014

Goin' on a trip? Pack your bags!

Hello and thank-you for your visit. A warm welcome too to new followers.

As you might know my favourite style is vintage, usually done with some prettiness. The challenge at exciting new blog A Vintage Journey requests anything vintage with a strong hint of Maestro Tim Holtz (TH). As the mega talented DT sets forth on their journey I thought it appropriate to alter some suitcases for them. So for a change ... here's some grunge and a warning for a verrry long post...


I started off with some papier mache suitcases. Ages ago the lovely Alison sent me a package all beautifully wrapped up in TH's tissue wrap. I've collaged this tissue wrap all over each case. There then followed a brown and black marathon using TH distress inks, stains, paints, stencils and stamps. I particularly had fun using the splatter brush (by Liquitex) that TH has used in recent videos. It wasn't so much fun though cleaning up afterwards! When I decided that enough layers of ink etc. were on I added a crackle layer to make sure that cases looked even more battered.


I love the Idea-ology pieces that TH has designed. On the outside of the cases I've used TH box corners, hitch fasteners and ring fasteners. The larger suitcase has a TH ornate plate on the front. I recently won an amazing Maja Design giveaway from the lovely Jenny and I've cut out some words from one sheet to go inside the plate that is then topped up with glossy accents.


I know it's an anachronism but given that TH designed pulley wheels I thought it would be fun to have wheels on the cases. I didn't have ones by TH so I've devised my own. They are made from miniature wooden spools. Painted the inner areas black/brown and the 'wheels' copper. I rummaged through some of my late Dad's old toolkits and found screws, nuts and other metal bits that I don't know the name of but once I had 'rusted them up' with Adirondack alcohol ink and distress EP they looked perfect for the cases.


TH box corners come in a worn sort of pewter colour. I needed to change them to an aged copper so I inked them with versamark and added variously copper and black EPs. To achieve the greeny patina I dabbed Pearl-ex blue/green powder into the melting EP mixture. (This 'aging' has been applied to all the metal elements).


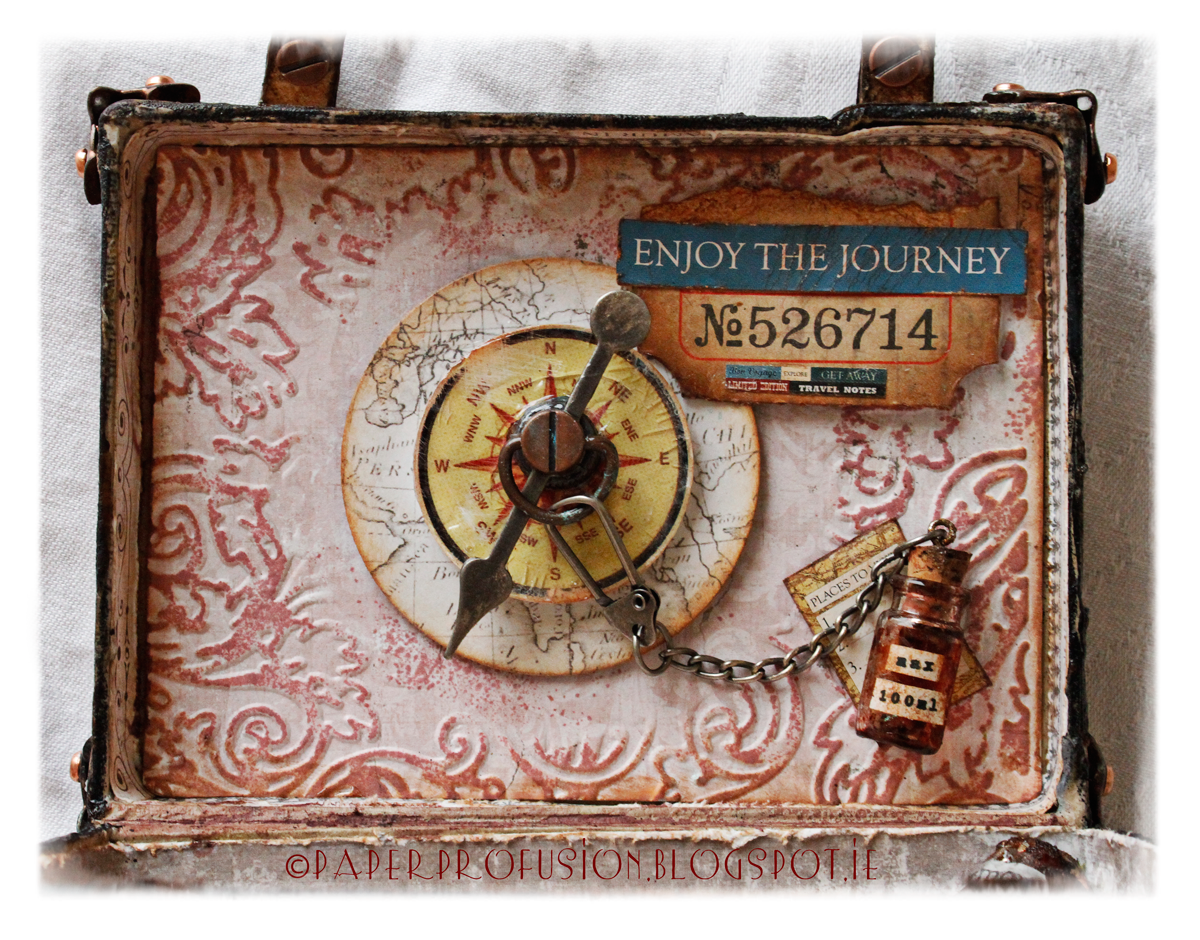
Some welcome relief from the dark hues comes inside each case. I've lined the insides with some of the gorgeous Maja Design papers and borders that come at the end of each 12 x 12 sheet. As I'd already used lots of TH stamps on the outside I decided to use one of his texture fades to emboss the inside lid and finally made use of the TH circular embossing diffuser to 'frame' my globe and compass. Then brayered over some DI for emphasis. A TH game spinner, ticket and a hitch fastener are also used. I spent a lot of time making that water bottle grimey! I've labelled it to remind owner of the current airline restriction levels for liquids in carry-ons!


Now you all know TH is famous for his tags and brilliantly educational monthly tag challenges. So I just had to include a tag! The thing is, I've never done a TH 'monthly tag'. I thought I should remedy this and so have included my take on TH's March tag inside the larger case. I hope this format (and resized tag) is ok to enter to his challenge. I don't yet have the really fab nest stamp set or the spritzer tool so I've improvised. Thank-you to generous Geraldine for her beautiful gifts last week including the TH bird branch stamp and some other items included in project.

The egg is from a M&S candy & chocolate eggs packet. I set aside a green egg and as I crafted I ate the rest of the packet. Next thing was I had a brainwave that I should add more speckle to the egg so I proceeded to splat brown paint at it. It looked great! I needed to dry one side so that I could splatter the rest of the egg, so I began to dry the egg with my heat gun. All of a nano-second the poor egg suffered a catastrophe ... the chocolate turned to liquid and the candy disintegrated into a pooled mess! The next day I had to dash to M&S for another packet of eggs ... no splats this time!! I thought that the TH light bulb would co-ordinate well with his rays stencil. Same stencil is also used on outside of top lid of case. I've made nest with dried moss and shredded paper. I cut a small circle in the tag and inset the little nest into it. (For info: the nest is mostly inked with one of Wendy Vecchi's new ink shades - 'Tree Branch').


The label plate on the smaller suitcase is by Artemio with insert a cutout from Maja Design. I tried out black brads in the metal elements but considered them too dark so have put in shiny copper ones instead. By the way, if you look at left hand corner of luggage tag below you can see the initials of the owner!


For the 'leather' straps I used SEI velvet paper that I fairly well battered, smudged and sprayed to get it worn looking. I also machine stitched along the centre of each strap for further texture.


I attached a luggage tag and charms to each case with TH swivel clasps. Collaged each tag with cutouts from G45 / Echo Park 'Photo Freedom' kit, then sanded and aged with DIs before coating with crackle.


For the inside of the smaller case I've used TH's new decorative strip 'Butterfly Frenzy'. The lid part is decorated with the little die cutouts along with some balloon cutouts from beautiful Maja Design papers. I painted and glittered (Clear Rock) some chipboard letters too. I've followed the very creative Candy who often uses 'Mercury Glass' stickles for edging. (Sorry for photo quality but I couldn't hold open and snap the small case sufficiently to get a decent photo).


I've used the remaining part of 'Butterfly Frenzy' on the lower portion of case. Also stamped TH stamp on paper using Wendy Vecchi new 'Hydrangea' colour in case you are interested in shades.


Finally, here is a rear view to show you those lovely TH hinges that I've given the aged copper treatment to.


Thank-you so much if you've read through all this lengthy post. I've spent ages on this piece through the week so apologies for not visiting as much. I hope to catch up tomorrow.

Have a lovely week,
Nicola x

I wish to enter cases to the following challenges:
A Vintage Journey - Anything Tim
Simon Monday Challenge - D is for Distress
Craft Hoarders Anonymous - Vintage or Retro
Tim Holtz - 12 Tags of 2014 - March
Vintage Udfordring - Sewing (Machine stitching is on 'leather' straps)
Inspiration Journal - A Splash of Colour
Rhedd and Rosie Challenge - Aged / Distressed
Rhedd's Creative Spirit - Altered Art March
Country View Challenges - Paper Chase
Art With Heart Challenge - New Beginnings (for AVJ)

Friday, 7 March 2014

Like my hat?

Hello and welcome.

I needed to make a 'male' card (which like most of you I always dread) but resisted temptation to purchase and wondered how I might make it more easily. I've never made a card according to a sketch challenge so decided to follow the layout at Sketchy Colours to see how it might go.


I like the end result and enjoyed having to 'think less' re layout so will definitely follow a sketch route again.

Papers: Prima 'Printery' and 'Engraver'. Pion Design 'For Father'. All stitched on my little Ikea sewing machine.

Other Paper: Embellishments and centre image by Kaisercraft 'Sears & Son'.

Stamping: Some random stamping/embossing of clock and numerals using Crafty Individuals CI-354 not showing up too well as embossing done with Antiquities 'Weathered white' similar to paper shades.

Inks / Mediums: DIs 'Tea Dye', 'Vintage Photo' and 'Walnut Stain'. I painted hat portion, ties and moustaches with Decoart One Step Crackle. Used Stampendous 'Aged Ivory' for frantage effects. The clock is well coated with glossy accents.

Other Embellishments: Tim Holtz 'Ring Fastener'. Prima wood clock face. Brads and ribbon from stash.

Many thanks for stopping by and special thanks to new followers who signed on recently. It's lovely to have your company in blogland.

Nicola x

I wish to enter card to the following challenges:
Sketchy Colours: Challenge #200
Vintage Udfording - Monochromatic
Simon Says Stamp Monday - Tick Tock
Craft Hoarders Anonymous Challenge - Vintage or Retro
Inky Chicks - Monochromatic
Divas by Design - Let's hear it for the boys
Country View Crafts Challenge - Paper Chase

Thursday, 27 February 2014

Lovebirds

Hello. Thanks so much for visiting!

Today's card is in keeping with February's 'romantic' theme and incorporates words, texture, stenciling, paste and lots more and so fits well with a number of my favourite challenges.


This is another of my cards where I put lots of work into underlying layers and then went and covered them up!

Papers: Mixture of french book text and Prima papers that have been variously stitched, torn and aged using several DIs and Prima chalk inks. Lace has been added to fill in torn gaps and the papers were also splattered with gold calligraphy ink.

Stenciling: Papers and heart stencilled using Wendi Vecchi texture paste. Stencils from Heidi Swapp (Hearts) and The Crafters Workshop (Art Is).

Frame and heart: Both were treated to Kroma Crackle medium for leathery crackle effect. Used DIs and pearlescent sprays to colour and topped with Treasure Gold for the frame and gold stamped script on the heart. Both cut from Tim Holtz grungepaper with Sizzix Bigz dies.

Lovebirds: Using multi matte medium I glued some burlap and some cotton cloth to grungepaper. When dry I diecut the 'fabric' birds using Sizzix Bigz die. Frantaged both with Stampendous 'Aged Ivory' though it doesn't show too well on the burlap. Also stamped gold script on the cotton bird. Rubbed gilding paste on both wings. Ran Prima chalk ink around their rims for definition. Mounted each onto some muslin with gave them perches of pleated ribbon / tulle.

Other embellishments: The 'Je t'aime' is from 7 Gypsies 'French Enamels' that I have dabbed with DIs and sealed. Ribbon, pearls, pins and flowers from stash. Finally a little Snow-tex has been dabbed on the flowers.

Thank-you for all the lovely comments and visits that you make - I truly appreciate each and every one.

Nicola x

I wish to enter card to the following challenges:
Inspiration Journal - Show It With Words
Simon Says Stamp Monday - Paste
Frilly and Funkie - Stencils and Texture
Craft for the Craic - Heart
Simon Says Wednesday - Anything Goes with Pearls
City Crafter Challenge - Do You Speak English?
Stamping Fantasies 5th Blogaverary Celebration - Favourite Item - mine is the Sizzix 'Caged Bird' die
We Love Vintage - Use favourite mold/pons (die/punch) - mine is Sizzix Bird die
It's All About The Vintage & Beauty - Use Lace

Monday, 25 November 2013

Let The Bells Ring - Spotlight at 'Crafts-Too Challenge You'

Hello and Welcome!

Recently I was thrilled to be selected in the Top 3 over at 'Crafts-Too Challenge You' blog and am delighted to accept their kind invitation to feature today in their Spotlight post.

Their challenge theme this month is 'Vintage Christmas' with the current twist being 'polychromatic' - meaning multi-coloured. I've adapted a Melissa Frances chipboard 'large church/house' for my spotlight piece. Here it is:


My three main colours are gold, blue and red. I've used all Scandinavian papers (By Inkido, Pion Design and Maja Design) as they have the perfect vintage look. The lacy roof is made using a Cheery Lynn die and the roof papers are sprayed with a Perfect Pearls mist for a frosty look. The little windows are painted with PaperArtsy 'Nougat'. The whole project has been liberally treated with Melissa Frances crushed glass glitter, Snow-tex and Mica Flakes. The eaves are painted with PaperArtsy 'Old Gold' before being wrapped in paper and speckled with glitter.


The surrounding fence has also being painted and then stenciled using Crafty Individuals mask and Dreamweaver paste. When dry I coated the fence with multi-matte medium, somehow the chemical interactions have produced a greenish tinge in parts - but doesn't that all add to the vintage feel! All the church/house edges were inked with Versamark and then embossed using my favourite Ranger's 'Queen's Gold' EP. I've hung some bells in the belfry so that they can ring out on Christmas morning! The spire was stencilled using a Crafter's Workshop 'damask' stencil, painted and then gold embossed. The same stencil was used on the doors - can you see Santa peeking out from one door? Idea-ology ring fasteners make really cute door knockers too.


I gilded a cocktail stick and attached a Moon diecut (Sizzix / Tim Holtz) and stamped/embossed sentiment (Artistic Outpost). There's also a lot of script type stamping on the 'ground' area but as usual I've gone and covered most of it up! I also ran a ribbon trim around the 'ground' edge. The little Christmas Tree has been gilded and frantaged (thank-heavens I noticed the smoke before it turned to flame!) and dotted with pearls.

It took a lot of careful training to coax those dashing reindeer to slow-down and stand 'unaided'! Added a selection of embellishments, tossed on even more glitter and stickles for good measure and afixed to the Idea-ology box feet that I had rubbed with some Treasure Gold to warm up. The whole piece sparkles fabulously in artificial light so I'm looking forward to seeing it on display at Christmas!

Very many thanks to 'Crafts-Too Challenge You' for generously allowing me feature - why don't you pop over and join in with their fantastic challenge blog.

Thanks so much for stopping by,
Have a lovely week,
Nicola x

Thank-you to the hosts, sponsors and design teams at the following challenges that I wish to enter:
Frilly and Funkie - Christmas Preparations
Vintage Udfordring - Christmas
Fashionable Stamping Challenges - Shabby Chic Christmas
Rhedd and Rosie Challenge - Christmas Is Coming (with key items)
Stamping Sensations - Christmas
A Creative Romance - Vintage Style
Allsorts Challenge - Bring On The Bling
Crafty Hands Challenge Blog - Sparkle and Bling
Vintage Stamping Challenges - Traditional Christmas
Bunny Zoe's Crafts Challenge - Shabby Chic / Vintage

Wednesday, 30 October 2013

Joyeux Noël

Hello and welcome! I'm well and truly into Christmas production mode now - they certainly are my favourites to do.


Stamps: Artistic Outpost 'Snowy Woods' set

Papers: Maja Design, Pion Design and French book text

Dies: Mini trees and deer by Tim Holtz / Sizzix. Postage Stamp by MFT Dienamics. (The stamp 'frame' is triple layered for dimension).

Inking: Distress Inks ('Vintage Photo', 'Tea Dye', 'Walnut Stain', 'Brushed Corduroy'). Prima chalk edger 'Branch Bark'. Ranger Archival Ink 'Coffee' and 'Red Geranium'. Versamark. Stuart Gill Clear EP. Embossing Antiquities 'Weathered White' EP. Frantage 'Aged Ivory' embossing enamel. Glossy Accents. Crackle Accents. Gesso. Snow-Tex. Inkssentials white pen.

Punch: Woodware

Embellishments: from stash

I hope this post finds you all well and warm. I'm sending a special Get Well wish to dear Anne. May my pals in UK not have suffered too many ill effects of storm.

Thank-you so much for your visit - it's a pleasure to have you stop by.

Nicola x

I wish to enter card to the following challenges:

Artistic Outpost - October Referral Programme
Simon Says Monday Challenge - Anything Goes
Simon Says Wednesday Challenge - Anything Goes
Christmas Card Challenges - Bows
Christmas at Sweet Stamping Challenge - Cards for Men
It's All About The Vintage - Use at least 3 stamps
Flourishes Tuesday - Plaid/Houndstooth (on one of trees)
ABC Christmas Challenge - V for Vixen (Reindeer)
Rhedd and Rosie Challenge - Anything Goes

Tuesday, 15 October 2013

Angel Rays

Hi there! Thank-you for stopping by and a warm welcome to new followers. Well I just can't put away all the Christmassy sparkle and glitter...


Stamps: Tim Holtz 'Joyful Song', Various script, music and map stamps for background paper. Sentiment by Crafty Individuals.
Stenciling: Tim Holtz 'Rays'. Wendy Vecchi Metallic Gold embossing paste. Stampendous Gold crushed glass glitter.
Inky stuff: Gloss paper inked with a mix of DIs 'Weathered Wood', Broken China' and 'Tumbled Glass'. Stampendous Frantage in 'Shabby Blue'. Delicata 'Golden Glitz'.
Embossing folder: Tim Holtz 'Snow Flurries' texture fade. Embossed areas inked with Versamark using brayer and then heat embossed randomly with embossing powders (Ranger 'Queen's Gold' and WOW 'Opaque Bright White').
Embellishments: Metal snowflake by Nunn Design, Silk ribbon by May Arts tied with 'BowEasy' and little stars from stash.

Today's post has to be short and sweet!

Many thanks again for your visit - I appreciate each and every one!
Nicola x

I wish to enter card to the following challenges;
Fashionable Stamping Challenges - Use a mask or stencil
The Cheerful Stamp Pad - Let's Stencil
Simon Says Stamp Wednesday - Use a stamp
Bunny Zoe's October Challenge - Ribbon

Friday, 11 October 2013

Miles to go ...

Hello All and thank-you for your visit.

I'm really on a Christmas card roll as here's another:


Stamps: Artistic Outpost (Snowy Woods), Crafty Individuals (Clock and numerals CI-354)
Papers: Pion Design 'Wintertime in Swedish Lapland' and cotton fabric for top edge
Dies: Memory Box 'Lantern', Memory Box 'Branch' and Bigz Snowflake On The Edge
Inks: Gesso, Distress glitter in 'Clear Rock Candy' (lots!) and 'Old Paper', UTEE, Adirondack Alcohol ink 'Rust', Brilliance 'Pearlescent Rust' and 'Pearlescent Chocolate', DI 'Tea Dye' and 'Vintage Photo', Prima Chalk 'Rust', Distress Stain 'Antique Bronze', Archival 'Coffee', Copper EP, 'Vintage Photo' EP, Frantage in 'Shabby White', Stickles 'Mercury Glass', 'White Fire' gilding wax, Glossy Accents, Dreamweaver paste. Paper Artsy Fresco paint 'Snowflake'
Stencil: Crafter's Workshop 'Art Is'
Punch: Woodware
Embellishments: Tim Holtz Ice Skates, bark heart, twine, pearls and clock charm from stash

Little details:

The adorable ideaology Ice Skates are 'aged' using the brilliant Tammy Tutterow's technique 'Distress stain on metal'. For the skates I used lots of rusty inks and metallic distress stain in 'antique bronze'. I opted to coat with UTEE instead of clear EP. Gesso is also on the blades.

The lantern has been aged to be 'Faux Rusted Copper' by adapting the always awesome Shelly Hickox technique for 'Faux Tarnished Silver' but instead using copper EP before the UTEE heat blast.

Before stamping the main image I painted the paper with Paper Artsy Fresco Finish paint in 'Snowflake' to have a matt 'snowy' base to stamp on once dry. The raised snow on the main image is done by sprinkling frantage onto wet gesso and drying with heat gun to puff nicely. All the 'snowy' edges are done with gesso and distress glitter.

To cut the cotton for the top edge I first needed to stiffen it ... so painted fabric with a coat of gesso and heat dried and then randomly dabbed chocolate ink. Once dry and stiff it was cut with the on the edge die.

I'm sorry I've not been blog visiting but I'm not too well this week. I hope to be properly back in action in a few days time.

Wishing everyone a warm and happy weekend,
Nicola x

I wish to enter card to the following challenges;
Simon Says Stamp Monday - Inspired by Tammy Tutterow
Crafts Too Challenge You - Christmas Festivities 'Scene'
Vintage Udfordring - Vintage card for a male with charm and twine
Vintage Card Cafe - Brown/Beige Colour Marathon
Artistic Outpost - October Referral Programme - Anything Goes
Fashionable Stamping Challenge - Use a mask or stencil
Deep Ocean Challenge - Christmas is round the corner
Try It On Tuesdays - Texture
Christmas at Sweet Stampin - Cards for Men
Simon Says Stamp - Use a rubber or clear stamp
Crafty Individuals - October - getting ready for Christmas

Sunday, 26 May 2013

Vintage Bridal Veil

Hello all you lovely readers - welcome to another post. There are lots of wedding related challenges at the moment so here is my vintage wedding card.


Please click on photo to enlarge as the tulle to the right of card becomes clearer.

Firstly I layered silver cardstock onto white CS base. The next layer of pink paper is made by my own fair hands - talk about hand crafted! (I attended a workshop last year as to how to make paper from pulp and fibres - this is the result - any little flecks are part of the organic process). I've embossed the pink layer with Cheery Lynn's 'Petite Hearts' embossing plate.

The photograph is a free image (sorry did not note source) that I adjusted to faded black and white. Printed this on handmade paper (not by me) in keeping with the vintage look. I cut the photo frame using Tim Holtz baroque and mini baroque dies and then ran it through my Tim Holtz damask embossing folder. I then followed the steps in Shelly Hickox's fab tutorial on 'Faux Tarnished Metal' - take a peek here for details. I previously used the technique in my post here, it's very effective and done with ink, embossing powder and Utee.

Stitched some lace that I had been saving for a wedding card to form a veil having made a little head-dress of pearls and roses. I was so pleased it worked as a veil as it is scalloped on both edges. Decorated veil further with a pearl flourish to the base/train. I wanted to do something different for a bouquet so decided to go with a message in a bottle! I printed out 'Sealed with a kiss' on handmade paper and placed it and some flowers into the little vial - leftover from a workshop. The cork stopper looked wrong (plus Frilly and Funkie have limited colours in their challenge) so I gave it a few coats of Metallic Distress Stain in Brushed Pewter. Added a little lace bow and heart charm and mounted on some tulle and 2 hearts that I cut using Sizzix Bigz Primitive Hearts die. Covered hearts with pink CS and translucent patterned paper.

Finally I scrunched some tulle and attached underneath the cardstock to right of card. Completed with pink ribbon along top and bottom of card that I adorned with pearls .

Thank-you for visiting my blog, your visits and comments are genuinely appreciated. I won't be present in blogland too much over the coming week but I will do my best to maintain visits. Have a lovely Sunday.

Nicola x

I wish to enter card to the following challenges:
Frilly and Funkie - A Time for Weddings
It's All about the Vintage - Spring Romances / Weddings
Vintage Udfordring - Wedding
Simon Says Stamp - Take A Picture
Sugar Creek Hollow - Clean It Out

Friday, 10 May 2013

Entering Time

Hello Again! Thank-you for stopping by and a warm welcome to new followers.

I've made my card today with a number of challenges in mind. The challenge at Frilly and Funkie is 'There's no time to waste'. As this card is for someone who is sitting exams soon that challenge theme is very appropriate (although the young gentleman in question needs no reminder from anyone re his studies). The challenge at Vintage Udfordring is 'Use paint or gesso' - I've used both on my card. The challenge at Simon Says Stamp and Show is 'Inspired By' - well someone I greatly admire is Anita at The Artful Maven Haven. She is one of the most creative people in blogland - please visit her blog for immense inspiration. Anita always signs off her blogposts "I hope your hands get creatively dirty soon!". My hands sure got inky and dirty on this card so I thank Anita for her inspiration. Finally I'd like to enter card to two of my favourite challenge spots Our Creative Corner (newly revamped / 'under new management') and Fashionable Stamping Challenges who both are running 'Anything Goes' at the moment.

So without further ado, here is my card.


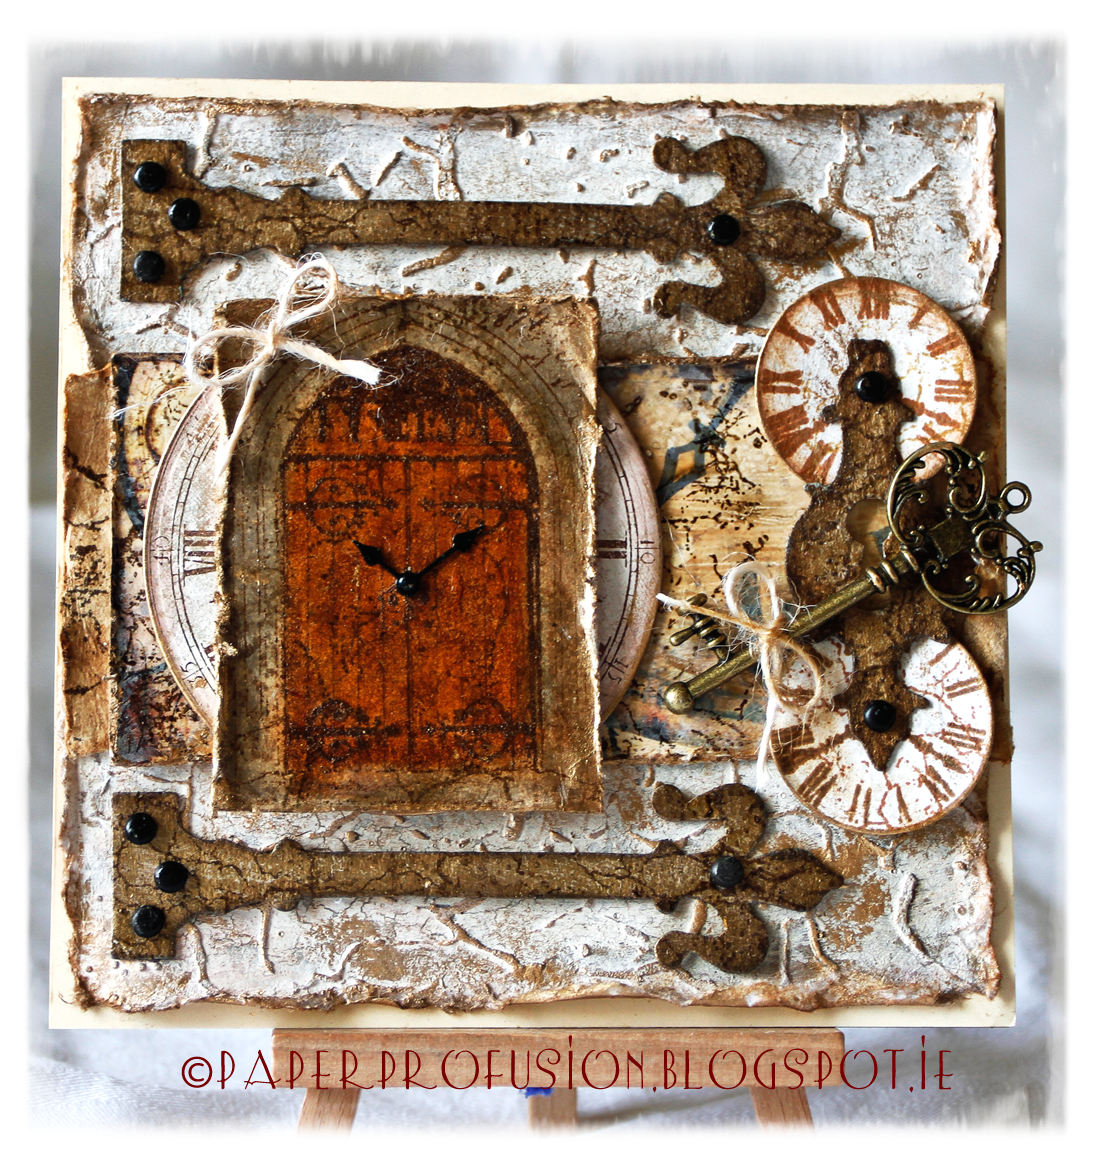
The base layer is a cotton handmade paper. First of all I applied embossing paste to it through a Prima 6x6 stencil ('Crackle') and left to dry overnight. I next painted the stenciled paper with Paper Artsy Fresco Finish paint in 'Old Gold'. Once dry I applied a thin layer of Paper Artsy Crackle Glaze. When that was dry I again painted the sheet with Fresco Finish paint in 'Nougat'. By this stage the paper was gorgeously crackled - it's a pity that I had to cover most of it up! I dabbed the raised stenciled parts with distress inks and then some gilding wax to highlight.

Next layer up is a band of cotton paper that I aged with a wet teabag (Twinings!). On top of that is a complimentary sample of glossy card that I kindly received from Crafty Individuals. It looked much too shiny and new for this card so I diluted a little gesso with water and brushed over the card to 'age' it. I then 'aged' further with two useful stamps that I recently bought, both Kaisercraft Clear Stamps 'Crackle' and 'Distress' using Distress Inks.

The main door image is a stamp by Crafty Individuals CI-249 'Gothic Door'. I've stamped with Archival ink and embossed with Ranger Distress EP ('Vintage Photo'). Using my Tim Holtz waterbrush I coloured in the door and stone surround with various DIs. I then painted image with Inkssentials Crackle Glaze to give it a old leathery look. The door image sits atop a clock image. To make the chalky clock, I painted some CS with Paper Artsy Fresco Finish paint in 'Vintage Lace', once dry a layer of Fresco Finish Crackle Glaze and finally, when dry, a layer of Fresco Finish in 'Nougat'. Next stamped the crackled CS using Brilliance Ink with another Crafty Individuals Stamp CI-354 'Clock Face'. I then diecut the clock with a circular Spellbinder die. The clock does have a lovely crackled appearance but once again I ended up covering it up!

Using Sizzix die 'Hardware Findings', I cut some grungeboard. I painted a layer of Paper Artsy Fresco Finish paint in 'Nougat', then FF crackle glaze, then FF 'Old Gold'. Next stamped all with the aforementioned Kaisercraft stamps for further aging effects. I attached with brads that I had coated with Inkssentials Crackle Glaze so as to look a bit worn. The two clocks on the right are stamped with a 7Gypsies stamp from the 'Venice' clear set using Archival and Brilliance inks. They are also 'aged' with DIs and cut to shape with a Spellbinders circular die. I've attached them via the keyhole diecut to fit with 'Time' theme.

Prior to assembling I decorated most edges with gilding wax. The metal clockhands are by Prima and the key is by Maya Road. Finished off with two little twine bows! Phew!

I thank each and every one of you who stop by - your visits and comments are truly appreciated.
Have a lovely weekend.

Nicola x

Thank-you to the hosts, sponsors and DTs at the following challenges that I wish to enter;
Frilly and Funkie - There's No Time To Waste
Vintage Udfording - Use Paint or Gesso
Simon Says Stamp and Show - Inspired By
Our Creative Corner - Anything Goes
Fashionable Stamping Challenge - Anything Goes

Tuesday, 30 April 2013

Spring Dressforms

A cheery hello from Dublin. I appreciate your visiting.

This was one of those cards where Plan A didn't work out at all, at all! So I'm very glad that several reconfigurations later I finally have a card to post...


I've used papers from Maja Design (Vintage Summer Basics) and all the stamping is on Ranger Speciality Stamping Paper. I had thought that I would give the dressform wings so that it was like a 'flying dressform' - but no way was this working out!

I cut dressform with Tim Holtz die and mounted on chipboard. Stamped it with Distress Inks using Crafty Individuals stamp set CI-226 'Wild Flowers'. Next stamped and embossed (Ranger Queen's Gold EP) Crafty Individuls stamp CI-357 'Springtime Robin' - I think this stamp is intended as a bookmark but I'm considering it a dress! I've coloured it in with DIs using a Tim Holtz waterbrush. The bird, butterflies and text on the dress are 'paper pieced' and raised on sticky pads.

I also stamped a large sheet with a colourful range of DIs using the CI-226 'Wild Flowers' stamp set and then diecut and punched into lots of butterflies. Then stamped and embossed clothing articles from Crafty Individuals stamp set CI-306 'French Corsets' and coloured them in using Tim Holtz water brush and DIs.

I bought the water brush from The Funkie Junkie Boutique and so wish to enter card to the Frilly and Funkie Sunday Share.

Gilded most edges with gilding wax and left them to dry overnight. All elements of the card are mounted with foam to add dimension. The two circular dies are by Cheery Lynn and Noor Design. I've also embossed the outer circle with a Cheery Lynn circular stitching plate.

That's It - hope you like! Enjoy the rest of your day.

Nicola x


I wish to enter card to the following challenges;
Crafty Individuals - Spring In Fashion
Country View Crafts - Butterflies
Fashionable Stamping Challenges - Sentimental ("Song of Spring")
Simon Says Stamp - Anything Goes
Love To Create - Punches and/or Dies
Dream Valley Challenges - Things With Wings
Sweet Stamping Challenge - Anything but Birthday

Thursday, 25 April 2013

Springtime Birdie

Greetings from Dublin! So glad to have a card once more to share. Thank-you all for your kind good wishes on my last post - my Mum is improving as each day passes. I hope to catch up with more of your blogs over the coming days.

I made this card for someone who is starting exams - hence the wise owl on the little tag. I've kept it very muted in a vintage style.


Papers: Maja Design (Vintage Summer Basics collection)
Inks: DI Victorian Velvet. May Arts white leaf trim inked with DI Bundled Sage
Dies: Sizzix Bigz - Bird Scroll (I think my favourite die so far!), Sizzix Framelits 'Majestic Labels', Magnolia 'Old Swedish Lace'. (I also diecut the bird in chipboard to have a chunky birdie)
Embellishments: Kaisercraft, Wild Orchid Crafts, Prima, Tim Holtz. Plus cheesecloth, doily, charm and twine from stash


Thanks so much for visiting,
Nicola x

I wish to enter card to the following challenges;
Live & Love Crafts - Bingo (Cheesecloth, Vintage, Flowers)
By The Cute And Girly - Vintage
Wild Orchid Challenges - Twine
Die Cuttin Divas - Flowers
Kaboodle Doodles - Spring
Creative Moments - Challenge 15 Spring
Simon Says Stamp and Show - Color
Simon Says Stamp - Anything Goes

Sunday, 17 March 2013

Frills!

Beannachtaí na Féile Pádraig oraibh (Happy St. Patrick's Day) and welcome to my blog! It's lovely having you visit Ireland today.

I've created today's card with a few challenges in mind but foremost inspiration comes from the photo challenge at The Shabby Tea Room this week - see picture inspiration here.

As per usual I tried out card with various layouts and degrees of embellishment but the dress is just so frilly that this card didn't want to wear much else!


Dressform: Chipboard cut using die by Tim Holtz (Sewing Room). Paper by Graphic 45 (A Ladies' Diary) painted with Paper Artsy Gloss Glaze. Dress by Melissa Frances Organza Pouf Ribbon (cream and pink). I bought pouf ribbon at The Funkie Junkie Boutique and so am entering card to the Frilly and Funkie Sunday Share

Butterflies: Die by Tim Holtz (Mini Butterflies). Each butterfly built using corrugated cardstock, 2 x Bazzill CS and 8 x tulle butterfly diecuts (all stitched together). Decorated with Memory Box (Corner Bow) diecut

Background Paper: Melissa Frances (5th Avenue Collection)
Pearls: Kaisercraft
Ink: Antique Linen DI
Doily, roses and trim from stash

Thank-you for stopping by. Now I must dash off to a parade .... where's my shamrock???

Nicola x

I wish to enter card to the following challenges:
The Shabby Tea Room - Oh So Pretty In Pink
Simon Says Stamp and Show - Chic To Be Shabby
Inspiration Emporium - Add A Little POP
Happy Campers Challenge - Flutterby Butterfly
Flutterby Wednesday - Any Winged Creature
Anything Goes Challenge - Seeing Double
Heck Of A Challenge - Spring / Butterflies and Pearls
By The Cute And Girly - Favourite Things (Butterflies)

Monday, 4 March 2013

For A Lady

Greetings from Dublin. Firstly, heartfelt thanks to everyone who left such lovely comments on my last post - you ladies are warm rays of sunshine and your kindness means a great deal to me. Secondly, I've missed my magical mystery tours around your blogs and I'm hoping to venture back as much as possible.

Last Sunday I was lucky enough to attend a class hosted by the lovely Eve who taught us to alter a Tim Holtz configurations box using the delectable Graphic 45 'A Ladies' Diary' papers, together with a matching mini album. Thank-you Eve for hosting such a friendly, fun filled day - looking forward to more. It was great to finally meet the wonderful Shirley and other crafty ladies too.

Eve's box had a clear top lid so that the lovely lined drawers could be seen below with the album hidden beneath them. She showed us how to 'hinge' the top and bottom parts in order to double the box height. I've arranged my box a little differently though and made it with a paper covered lid. Here is my version;


Back at home I covered all sides of box and drawers (inner and outer) with the beautiful A Ladies' Diary papers. Also painted the drawers with Paper Artsy's fresco finish in Nougat. The lid is simply made from a square of Ladies' Diary paper on top of a square of cardstock. I sealed the papers with Claudine Hellmuth multi medium matte and found this product super as it forms an invisible seal with no visible brushstrokes. I then edged the lid with lace and decorated with lots of Ladies' Diary images, roses by Prima and Jeans (available here), silk ribbon (tied using Boweasy), pearls and charms. (A little inking is also in the mixture using Distress Inks). Also added Tim Holtz game spinners to clocks on two sides.


For the inside of the box I've used the space in the top lid to create a little stamped scene showing a seamstress busy creating all those fashions modelled on the outside. The stamped square is backed by a square of cardstock for reinforcement. I've used stamps from the gorgeous set 'Sew Much To Do' by Chapel Road Artstamps. You can see I've also used some 'A Ladies' Diary' cutouts to form the scene as well as lace, stitched buttons, sewn ribbon, wound spools, pearl string, roses, seam binding, ribbon measuring tape and I stamped the Magnolia die cut tag for the shop sign.


I recently bought the Tim Holtz dressform die and cut some spools from chipboard and used one as the box 'closure'. I decorated it with seam binding and a really fabulous scissors charm that I bought from The Funkie Junkie Boutique. Eve's kit also included the Tim Holtz Foundations 'feet' that really finish off the box wonderfully.


I'll be giving this box to my Darling Mum next Sunday for Mother's Day.

I wish you all a lovely week and thank everyone most sincerely for visiting. It's great to have you along!

Nicola x


I wish to enter box to the following challenges;
Sugar Creek Hollow - #51 Lovely Lace
Simon Says Stamp and Show - By The Numbers (clocks, dates,tape)
Country View Crafts - Pick and Mix
Stampin For The Weekend - Lace
Vintage Udfordring - #55 Decorate with Flowers
Joanna Sheen - Layer It Up
Moving Along With The Times - Lovely Ladies
Glitter n Sparkle Challenge Blog - Mother's Day
Sunday Stamper - Oh You Pretty Things
Allsorts Challenge - For A Lady
Inspiration Emporium - Add A Little P.O.P.