Showing posts with label Crafty Individuals. Show all posts

Saturday, 12 April 2014

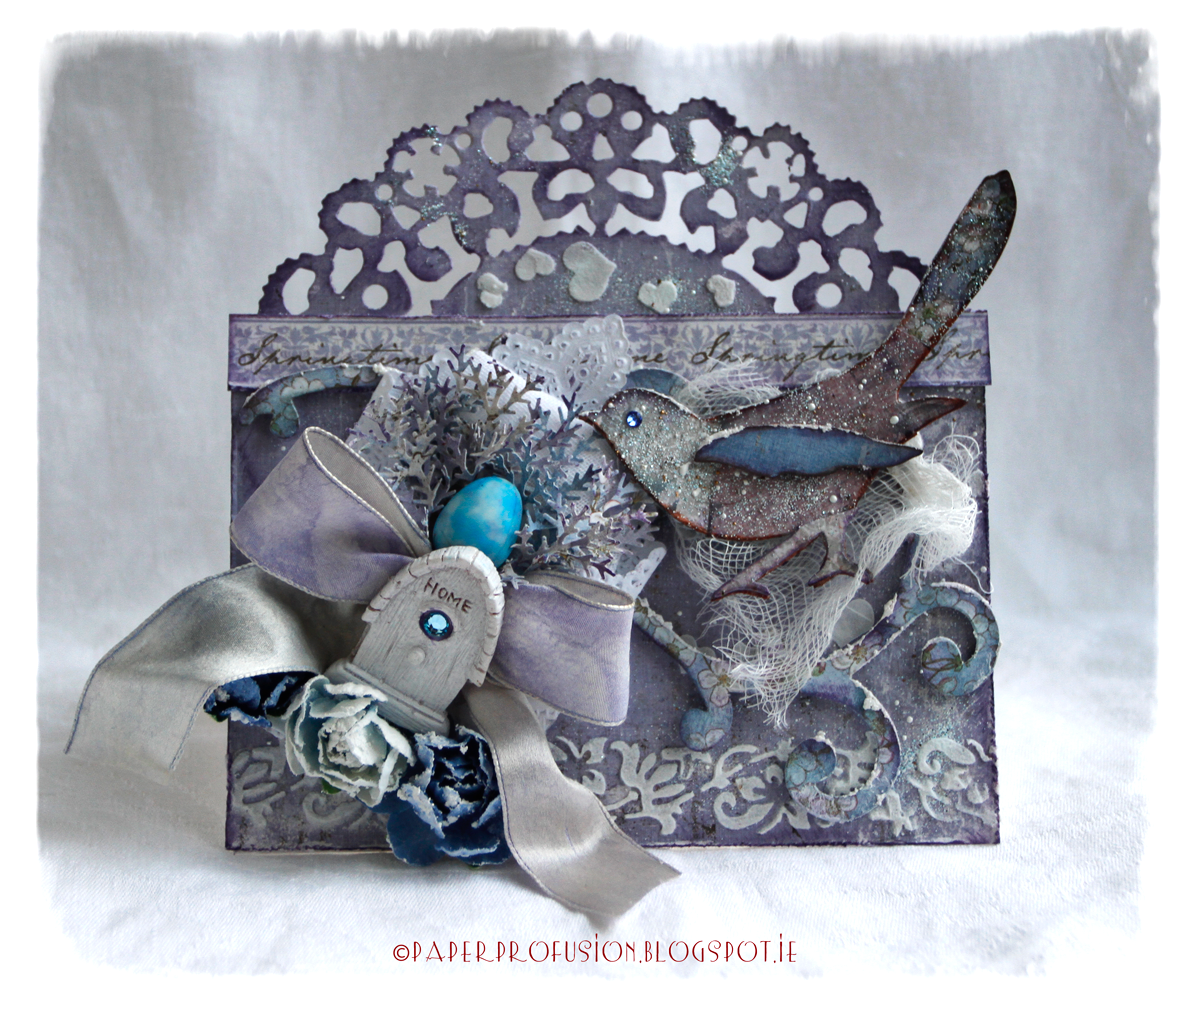
A Little Blue Egg

Hi there! It’s a record for me - three posts in three days so thank-you so much for popping by again! I certainly have been busy and it has been a great compliment to be invited to do so many Guest Design slots.

Today I’m really happy to have been selected to enjoy the guest design limelight at one of my favourite challenges - the always pretty Sugar Creek Hollow. Their current challenge theme is ‘Easter’. I was going to go with traditional yellow shades but just couldn’t put down these gorgeous lilac and blue papers so have ended up with more of a gentle lavender Easter! I think that blue egg is going to hatch any day now!


Papers: Maja Design ‘Vintage Spring’ collection

Dies: Sizzix Bigz ‘Bird Scroll’ and On-the-edge ‘Vintage Doily’

Stencilling: Crafty Individuals and Heidi Swapp stencils using Wendy Vecchi texture paste

Distress Inks: ‘Weathered Wood’, 'Dusty Concord'

Other: Frantage ‘Shabby Blue’, paper doily, cheesecloth, gems, Prima resin bird-house, flowers, punched branches and hand dyed silk ribbon

Sincere thanks to all at Sugar Creek Hollow for kindly inviting me to Guest Design. Be sure to check out their challenge for some of the very best vintage / shabby chic talents in blogland.

Thank-you so much for visiting and taking the time,
Enjoy the rest of your weekend.
Nicola x

I wish to enter card to the following challenges:
Craft for the Craic - Easter or Spring
Crafty Individuals - Nature's Beauty
The Ribbon Girl Challenge - Spring
Simon Says Wednesday - Easter / Sweet Treats
It's All About the Vintage and Beauty - Shabby Chic
Moving Along With The Times - Easter / Spring
A Creative Romance - Eggcellent Spring
Inspiration Journal - A Few of my Favourite Things

Friday, 7 March 2014

Like my hat?

Hello and welcome.

I needed to make a 'male' card (which like most of you I always dread) but resisted temptation to purchase and wondered how I might make it more easily. I've never made a card according to a sketch challenge so decided to follow the layout at Sketchy Colours to see how it might go.


I like the end result and enjoyed having to 'think less' re layout so will definitely follow a sketch route again.

Papers: Prima 'Printery' and 'Engraver'. Pion Design 'For Father'. All stitched on my little Ikea sewing machine.

Other Paper: Embellishments and centre image by Kaisercraft 'Sears & Son'.

Stamping: Some random stamping/embossing of clock and numerals using Crafty Individuals CI-354 not showing up too well as embossing done with Antiquities 'Weathered white' similar to paper shades.

Inks / Mediums: DIs 'Tea Dye', 'Vintage Photo' and 'Walnut Stain'. I painted hat portion, ties and moustaches with Decoart One Step Crackle. Used Stampendous 'Aged Ivory' for frantage effects. The clock is well coated with glossy accents.

Other Embellishments: Tim Holtz 'Ring Fastener'. Prima wood clock face. Brads and ribbon from stash.

Many thanks for stopping by and special thanks to new followers who signed on recently. It's lovely to have your company in blogland.

Nicola x

I wish to enter card to the following challenges:
Sketchy Colours: Challenge #200
Vintage Udfording - Monochromatic
Simon Says Stamp Monday - Tick Tock
Craft Hoarders Anonymous Challenge - Vintage or Retro
Inky Chicks - Monochromatic
Divas by Design - Let's hear it for the boys
Country View Crafts Challenge - Paper Chase

Monday, 27 January 2014

Vintage Sewing Themed Drawer Cabinet

Hello and Thank-You so much for visiting. I'm sorry to have been absent from blogging recently... I'll try to catch up with you all soon.

I smiled when I saw the challenge theme "Shopping Sins" at Our Creative Corner this month; there are three things for sure in my life; death, taxes and overspending!

So having been away from crafting for most of this month I've spent the last few days working on today's piece in my favourite vintage style. I'm mortified to have so many long unused items in my stash - the main contenders here were some Kaisercraft mini drawers, several uninked sewing themed stamp sets and a few untested crackle mediums.


Re wooden part of mini drawers: Painted all the wooden parts first with gesso, then PaperArtsy 'Snowflake', followed by PaperArtsy 'Old Gold'. I had bought some crackle products to try and improve on efforts to date - glad to finally put them to test. I like result from Decoart One Step Crackle (you can see on gold pediment). My first choice however goes to Kroma crackle - you can see its lizardlike results on the front part of cabinet. Some of the more thickly crackled areas are where I have done a double coat of crackle to experiment.

Re little drawers: All the hidden drawers are painted with PaperArtsy 'Ice Blue' followed by a coat of 'Metallic Glaze'. I tied string around each drawer when gluing its sides to keep them together whilst the glue set (rather fiddly). Opened packaging on my Krylon gold pen to gild the edge of each of the drawers - I like result so will use this pen a lot!

Decorative fronts and sides: The lovely papers are from Maja Design 'Vintage Summer Basics' collection. The drawer fronts were all punched out, stamped and gold embossed with several images being double foam mounted. I've added lots of sewing themed paraphernalia. The stamps used throughout piece are from Crafty Individuals CI-328 (first use) and CI-306 (both following Laura's inspiration), Chapel Road Artstamps "Sew Much to Do" and Studio 490 Wendy Vecchi "Art By Hand" (again it's first use).


The left side of cabinet shows a seamstress hard at work.

Feet and Pediments
You'll also have noticed the cabinet feet and pediment. I die cut two layers of chipboard (by 4) for the feet using Sizzix Bigz Ironworks die. Made sure all the fleurs-de-lis were same height and glued each twosome together and then painted with Fresco 'Old Gold' followed by 'One Step Crackle'. I used loctite glue to hold these in place for a fast glue result. They are holding very solidly. The pediments at the top are also diecut from chipboard using Sizzix Bigz On-The-Edge 'Ornate'. The lower white one is Fresco 'Snowflake' coated with Kroma crackle to see how the crackle would look without a gold paint layer below.


The cabinet rear is also stamped and embossed with some machine stitching too. Santa brought me a sewing machine - I'm pleased to be finally trying it out!


The right side of cabinet shows the mannequin in use by this particular sewing establishment - again cut from chipboard using Bigz 'Sewing Room' die, painted as before and dressed in some finery


Finally, a close up of the cabinet top:


A word of thanks too to May, Cathi and Alison who all provided some of the ingredients used in this piece.

Thank-you so much for stopping by and enjoy the rest of your week,
Nicola x


I wish to enter cabinet to the following challenges:

Our Creative Corner - No more shopping sins (Guilty as accused!)
Vintage Udfordring - Use Dies and/or Punch
The Ribbon Girl Challenge - Anything Goes
Allsorts Challenge - Vintage
It's all about the vintage - Embossing
Fussy and Fancy Friday - Vintage
Sugar Creek Hollow - Fibres & Texture
Stamping Sensations - Ribbon, Buttons and Bows
Sweet Stampin - In Stitches
Bunny Zoe's Crafts - Stitching
Inspiration Emporium - Diecuts and Punches

Thursday, 9 January 2014

A Shot of Blue

Hi there and welcome! A short post as I'm afraid I'm struggling getting 'into production mode' at the moment.

The current challenge at Simon Says Stamp Monday is "Blues". This brought to mind a card I made last November but haven't posted. I made it for the lovely and talented Anne who you might know had sustained a nasty hip injury.


I was glad to hear from Anne that the crutches and syringe embellies made her chuckle!

Stamp and Stencil: Crafty Individuals (can't recall make of sentiment stamp)
Papers: Maja Design "Vintage Summer Basics"
Dies: Spellbinders and Joy Crafts
Inks: Ranger Distress and Archival Inks
Embellishments: Stampendous Frantage. Silk ribbon by May Arts. Metal charms by Karen Foster and remainder from stash

Thank-you all most sincerely for your kind visits and comments.

Nicola x

I wish to enter card to the following challenge:
Simon Says Stamp Monday - Blues


Monday, 25 November 2013

Let The Bells Ring - Spotlight at 'Crafts-Too Challenge You'

Hello and Welcome!

Recently I was thrilled to be selected in the Top 3 over at 'Crafts-Too Challenge You' blog and am delighted to accept their kind invitation to feature today in their Spotlight post.

Their challenge theme this month is 'Vintage Christmas' with the current twist being 'polychromatic' - meaning multi-coloured. I've adapted a Melissa Frances chipboard 'large church/house' for my spotlight piece. Here it is:


My three main colours are gold, blue and red. I've used all Scandinavian papers (By Inkido, Pion Design and Maja Design) as they have the perfect vintage look. The lacy roof is made using a Cheery Lynn die and the roof papers are sprayed with a Perfect Pearls mist for a frosty look. The little windows are painted with PaperArtsy 'Nougat'. The whole project has been liberally treated with Melissa Frances crushed glass glitter, Snow-tex and Mica Flakes. The eaves are painted with PaperArtsy 'Old Gold' before being wrapped in paper and speckled with glitter.


The surrounding fence has also being painted and then stenciled using Crafty Individuals mask and Dreamweaver paste. When dry I coated the fence with multi-matte medium, somehow the chemical interactions have produced a greenish tinge in parts - but doesn't that all add to the vintage feel! All the church/house edges were inked with Versamark and then embossed using my favourite Ranger's 'Queen's Gold' EP. I've hung some bells in the belfry so that they can ring out on Christmas morning! The spire was stencilled using a Crafter's Workshop 'damask' stencil, painted and then gold embossed. The same stencil was used on the doors - can you see Santa peeking out from one door? Idea-ology ring fasteners make really cute door knockers too.


I gilded a cocktail stick and attached a Moon diecut (Sizzix / Tim Holtz) and stamped/embossed sentiment (Artistic Outpost). There's also a lot of script type stamping on the 'ground' area but as usual I've gone and covered most of it up! I also ran a ribbon trim around the 'ground' edge. The little Christmas Tree has been gilded and frantaged (thank-heavens I noticed the smoke before it turned to flame!) and dotted with pearls.

It took a lot of careful training to coax those dashing reindeer to slow-down and stand 'unaided'! Added a selection of embellishments, tossed on even more glitter and stickles for good measure and afixed to the Idea-ology box feet that I had rubbed with some Treasure Gold to warm up. The whole piece sparkles fabulously in artificial light so I'm looking forward to seeing it on display at Christmas!

Very many thanks to 'Crafts-Too Challenge You' for generously allowing me feature - why don't you pop over and join in with their fantastic challenge blog.

Thanks so much for stopping by,
Have a lovely week,
Nicola x

Thank-you to the hosts, sponsors and design teams at the following challenges that I wish to enter:
Frilly and Funkie - Christmas Preparations
Vintage Udfordring - Christmas
Fashionable Stamping Challenges - Shabby Chic Christmas
Rhedd and Rosie Challenge - Christmas Is Coming (with key items)
Stamping Sensations - Christmas
A Creative Romance - Vintage Style
Allsorts Challenge - Bring On The Bling
Crafty Hands Challenge Blog - Sparkle and Bling
Vintage Stamping Challenges - Traditional Christmas
Bunny Zoe's Crafts Challenge - Shabby Chic / Vintage

Tuesday, 15 October 2013

Angel Rays

Hi there! Thank-you for stopping by and a warm welcome to new followers. Well I just can't put away all the Christmassy sparkle and glitter...


Stamps: Tim Holtz 'Joyful Song', Various script, music and map stamps for background paper. Sentiment by Crafty Individuals.
Stenciling: Tim Holtz 'Rays'. Wendy Vecchi Metallic Gold embossing paste. Stampendous Gold crushed glass glitter.
Inky stuff: Gloss paper inked with a mix of DIs 'Weathered Wood', Broken China' and 'Tumbled Glass'. Stampendous Frantage in 'Shabby Blue'. Delicata 'Golden Glitz'.
Embossing folder: Tim Holtz 'Snow Flurries' texture fade. Embossed areas inked with Versamark using brayer and then heat embossed randomly with embossing powders (Ranger 'Queen's Gold' and WOW 'Opaque Bright White').
Embellishments: Metal snowflake by Nunn Design, Silk ribbon by May Arts tied with 'BowEasy' and little stars from stash.

Today's post has to be short and sweet!

Many thanks again for your visit - I appreciate each and every one!
Nicola x

I wish to enter card to the following challenges;
Fashionable Stamping Challenges - Use a mask or stencil
The Cheerful Stamp Pad - Let's Stencil
Simon Says Stamp Wednesday - Use a stamp
Bunny Zoe's October Challenge - Ribbon

Friday, 11 October 2013

Miles to go ...

Hello All and thank-you for your visit.

I'm really on a Christmas card roll as here's another:


Stamps: Artistic Outpost (Snowy Woods), Crafty Individuals (Clock and numerals CI-354)
Papers: Pion Design 'Wintertime in Swedish Lapland' and cotton fabric for top edge
Dies: Memory Box 'Lantern', Memory Box 'Branch' and Bigz Snowflake On The Edge
Inks: Gesso, Distress glitter in 'Clear Rock Candy' (lots!) and 'Old Paper', UTEE, Adirondack Alcohol ink 'Rust', Brilliance 'Pearlescent Rust' and 'Pearlescent Chocolate', DI 'Tea Dye' and 'Vintage Photo', Prima Chalk 'Rust', Distress Stain 'Antique Bronze', Archival 'Coffee', Copper EP, 'Vintage Photo' EP, Frantage in 'Shabby White', Stickles 'Mercury Glass', 'White Fire' gilding wax, Glossy Accents, Dreamweaver paste. Paper Artsy Fresco paint 'Snowflake'
Stencil: Crafter's Workshop 'Art Is'
Punch: Woodware
Embellishments: Tim Holtz Ice Skates, bark heart, twine, pearls and clock charm from stash

Little details:

The adorable ideaology Ice Skates are 'aged' using the brilliant Tammy Tutterow's technique 'Distress stain on metal'. For the skates I used lots of rusty inks and metallic distress stain in 'antique bronze'. I opted to coat with UTEE instead of clear EP. Gesso is also on the blades.

The lantern has been aged to be 'Faux Rusted Copper' by adapting the always awesome Shelly Hickox technique for 'Faux Tarnished Silver' but instead using copper EP before the UTEE heat blast.

Before stamping the main image I painted the paper with Paper Artsy Fresco Finish paint in 'Snowflake' to have a matt 'snowy' base to stamp on once dry. The raised snow on the main image is done by sprinkling frantage onto wet gesso and drying with heat gun to puff nicely. All the 'snowy' edges are done with gesso and distress glitter.

To cut the cotton for the top edge I first needed to stiffen it ... so painted fabric with a coat of gesso and heat dried and then randomly dabbed chocolate ink. Once dry and stiff it was cut with the on the edge die.

I'm sorry I've not been blog visiting but I'm not too well this week. I hope to be properly back in action in a few days time.

Wishing everyone a warm and happy weekend,
Nicola x

I wish to enter card to the following challenges;
Simon Says Stamp Monday - Inspired by Tammy Tutterow
Crafts Too Challenge You - Christmas Festivities 'Scene'
Vintage Udfordring - Vintage card for a male with charm and twine
Vintage Card Cafe - Brown/Beige Colour Marathon
Artistic Outpost - October Referral Programme - Anything Goes
Fashionable Stamping Challenge - Use a mask or stencil
Deep Ocean Challenge - Christmas is round the corner
Try It On Tuesdays - Texture
Christmas at Sweet Stampin - Cards for Men
Simon Says Stamp - Use a rubber or clear stamp
Crafty Individuals - October - getting ready for Christmas

Wednesday, 18 September 2013

Santa O'Clock

Hi there and special greetings to my new followers! In case you missed my recent post about my 1st Blogaversary Candy, please click here. Remember, if you're not in, you can't win!

Apologies for the dark shadows in this photo but you see it was taken at night whilst Santa and Co. were doing a test run for imminent globetrotting!


A brief post today...

Papers: Melissa Frances 'Countdown to Christmas' and Clear acetate for the clock (the latter had been forgotten but found when I was searching for something other than plain paper to stamp on!)

Dies: Sizzix Bigz - 'Stars' and 'Mini Reindeer & 25', Spellbinders 'Circles' and 'Eyelet Circles', Joy Crafts 'Round No 3', MFT 'Postage Stamp Stax'

Stamps: Crafty Individuals Clock Face 'CI-354', Inkadinkado 'A Visit From Santa' and Unity Itty Bitty 'Ticket to Christmas'

Little details: All the stars and the 25 are cardboard backed and coated with Distress Glitter 'Clear Rock Candy'. The clock (on clear acetate) is embossed using Stampendous EP 'Winter Wonderland'. The clock hands 'Prima Junkyard Findings' are also coated with Distress Glitter. Santa is embossed using 'Red Tinsel' EP on patterned paper. Padded reindeer are coated with Stampendous Silver Crushed Glass Glitter. Ticket is embossed on acetate with Judikins EP 'Silver Twinkle'. Little tree on the postage stamp image is decorated with Stickles. Most edges are inked with DIs for definition 'Salty Ocean', 'Festive Berries' and 'Bundled Sage'. Gems and twine from stash. Top Banner by Melissa Frances.

I'm so glad you took the time to visit! Enjoy the rest of your day.

Nicola x

I wish to enter card to the following challenges:
Simon Says Stamp Monday - Stamp on anything other than paper
SSS Wednesday - Product from SSSS - Melissa Frances Papers
Our Creative Corner - Forgotten Things
CraftyHazelnut's Christmas Challenge - Cut It Out
Creative Card Crew - Christmas
Cherish This - Memories for Life - Åpen utfordring
Crafts Too Challenge You - Texture with a twist - style Shabby Chic

Friday, 13 September 2013

Snow Baby

Hello! Thank-you for stopping by and a warm welcome to new followers. In case you missed my last post for my 1st BLOGAVERSARY CANDY then please click here.

Well I've finally made a start on Christmas cards. Isn't she sweet? I know she looks cold but she has her teddy for cuddles!


I've used a pink Bazzill CS for base and cut a Sizzix on the edge die snowflake border. I glittered those snowflakes with Distress glitter and daubed with Snow-tex. Discovered that by layering vellum over vellum it achieved a good ice slab appearance so the background is two layers of vellum with the upper one embossed with Sizzix snow flurries texture fade and liberally covered with Snow-Tex. I then cut two more layers using Spellbinders Fleur de lis squares. The lower layer is white CS and upper layer is vellum again embossed with snow flurries folder.

Next stamped the gorgeous munchkin - stamp by Crafty Individuals (CI-240) with a pink Brilliance ink and embossed with Adirondack EP (Wild Plum). The little ticket at the top left (Unity Itty Bitty stamps) and the Jingle Bells text (freebie from Crafty Individuals) were also done the same way.

I thought I had some silver stickles as I wanted to coat edges in silver for definition - unfortunately there was none in my stash. So all the sparkly silver edges that you see were done by heat embossing. (Ran Brilliance silver ink around the edge and then coated withg Judikins EP (Silver Twinkle) before blasting with my heat gun. Any edge that wasn't silvered was instead coated with Snow-Tex.

Added some bobble ribbon along the base of the Snow Baby to resemble snow. I really wanted to make the card sparkle (though that isn't captured too well by photo) so I was delighted when I went thru my stash to find some Idea-ology tinsel that I had bought when reduced last January and had long forgotten about - ran that along left edge. Diecut some Memory Box 'Precious Stars' and again inked and sprinkled with Judikins EP to get some silver blingy stars. Also diecut some Winterberry sprigs (Memory Box) from white SEI Velvet paper so that there are lots and lots of textures going on.

Punched several size snowflakes from CS, vellum, and silver paper (that I ran thru a flourish texture fade so that it wasnt just flat paper) and affixed all to the card. Gave the snowflakes little gem centres too. Also included some Magnolia silvery berries. Finally attached the metal bells and little teddy to complete.

Thanks so much for stopping by. Wishing all a lovely weekend!
Nicola x

I wish to enter card to the following challenges:
Our Creative Corner - Forgotten Things
Simon Says Stamp Monday Challenge - Embossed
Simon Says Stamp Wednesday Challenge - Emboss It
Crafts Too Challenge You - Texture with a twist style (Vintage)
Country View Crafts - Layers
Creative Creations Challenges - Early Christmas Makes
Flourishes - Make A Good Impression
Sparkles Christmas Challenge - Non Traditional Colours
Christmas Stampin All Year Long - Cute and Cuddly Christmas
Inspiration Emporium - Falling for Faux (Faux snow and ice)

Friday, 16 August 2013

I only have eyes for you!

Hello all and thank-you for stopping by.

I'm sorry I've been absent from blogland for some time but there was a bit of a crisis that meant I was away from my crafting goodies. I'm hoping to catch up with all your blogs later today. In the meantime here's a wedding card that I've made for a special couple.


The highlight pieces are of course the gorgeous owl charm (that I gave eyes of pearls) and their backing wooden house. The owl charm was a freebie with an order from Live & Love Crafts (thank-you Sandy) and the wooden birdcage is compliments of the lovely Alison as part of her fab candy haul that I luckily won.

Base: Bazzill CS covered with a layer of crepe paper (to give a rustling forest sound!)
Die Cuts: Corners (Memory Box 'Madera Corner'), Branches (Memory Box 'Woodland Branch'), Backing Oval (Spellbinders 'Floral Ovals'), Foliage cut from SEI Velvet paper (Spellbinders 'Foliage' and Memory Box 'Royal Leaves')
Decoration on Oval: I've stamped and clear embossed several wild flowers using Crafty Individuals CI-226 set and then sprinkled on shabby white frantage for more texture
Words: The white metal accents are by Making Memories. I first painted them in a cream with brown cracks finish but this didn't look right so stripped all the paint off and repainted it with Paper Artsy 'Snowflake'. Then dabbed the raised parts with gilding wax for highlights. The brass 'Mr & Mrs' has also been dabbed with gilding wax.
I adorned further with pearls, Snow-Tex dabbed roses, punched branches and lace.
To complete I wrapped card in a wide band of tulle (dabbed with Snow-Tex) and May Arts Silk ribbon tied with my Boweasy.

Thank-you for visiting - it's always so lovely to have you view my crafting.

Happy Weekend!
Nicola x

I wish to enter card to the following challenges;
Our Creative Corner - Words, Words, Words
Live & Love Crafts - Warm or Cool Colours
Craft Room Challenge - It's Bingo Time (Lace, Brown, Pearls)
Inky Chicks - Lovely Lace
Simon Says Stamp Monday Challenge - Make The Cut
Crafty Boots - Die Cuts
Fussy and Fancy Friday - Bingo Board (Pearls, Free, Lace)
Card and Scrap - Alt er lov (Anything Goes)
My Craft Creations - Ribbons and Bows

Friday, 10 May 2013

Entering Time

Hello Again! Thank-you for stopping by and a warm welcome to new followers.

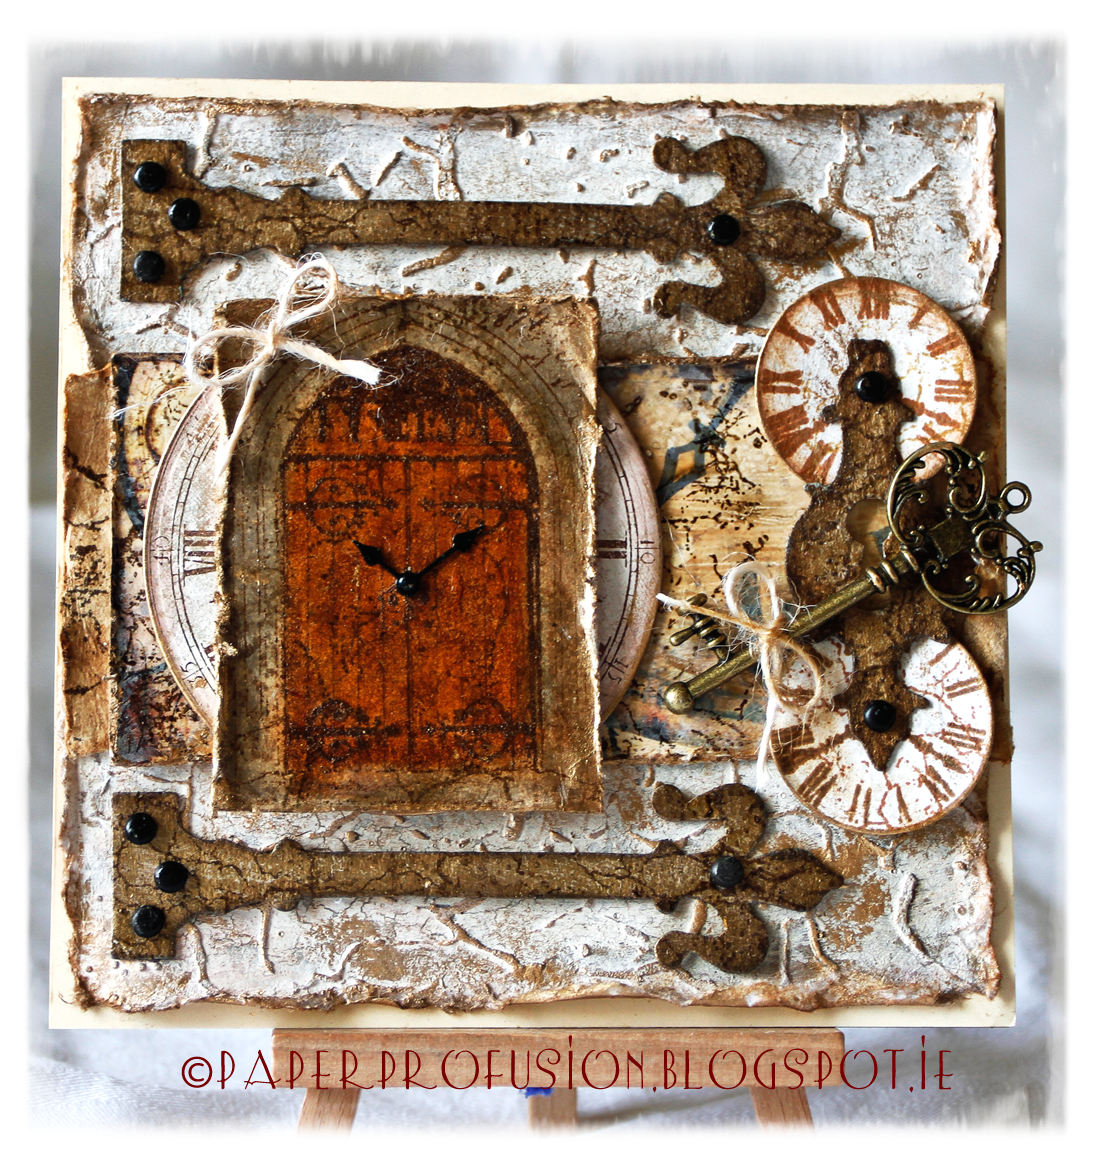
I've made my card today with a number of challenges in mind. The challenge at Frilly and Funkie is 'There's no time to waste'. As this card is for someone who is sitting exams soon that challenge theme is very appropriate (although the young gentleman in question needs no reminder from anyone re his studies). The challenge at Vintage Udfordring is 'Use paint or gesso' - I've used both on my card. The challenge at Simon Says Stamp and Show is 'Inspired By' - well someone I greatly admire is Anita at The Artful Maven Haven. She is one of the most creative people in blogland - please visit her blog for immense inspiration. Anita always signs off her blogposts "I hope your hands get creatively dirty soon!". My hands sure got inky and dirty on this card so I thank Anita for her inspiration. Finally I'd like to enter card to two of my favourite challenge spots Our Creative Corner (newly revamped / 'under new management') and Fashionable Stamping Challenges who both are running 'Anything Goes' at the moment.

So without further ado, here is my card.


The base layer is a cotton handmade paper. First of all I applied embossing paste to it through a Prima 6x6 stencil ('Crackle') and left to dry overnight. I next painted the stenciled paper with Paper Artsy Fresco Finish paint in 'Old Gold'. Once dry I applied a thin layer of Paper Artsy Crackle Glaze. When that was dry I again painted the sheet with Fresco Finish paint in 'Nougat'. By this stage the paper was gorgeously crackled - it's a pity that I had to cover most of it up! I dabbed the raised stenciled parts with distress inks and then some gilding wax to highlight.

Next layer up is a band of cotton paper that I aged with a wet teabag (Twinings!). On top of that is a complimentary sample of glossy card that I kindly received from Crafty Individuals. It looked much too shiny and new for this card so I diluted a little gesso with water and brushed over the card to 'age' it. I then 'aged' further with two useful stamps that I recently bought, both Kaisercraft Clear Stamps 'Crackle' and 'Distress' using Distress Inks.

The main door image is a stamp by Crafty Individuals CI-249 'Gothic Door'. I've stamped with Archival ink and embossed with Ranger Distress EP ('Vintage Photo'). Using my Tim Holtz waterbrush I coloured in the door and stone surround with various DIs. I then painted image with Inkssentials Crackle Glaze to give it a old leathery look. The door image sits atop a clock image. To make the chalky clock, I painted some CS with Paper Artsy Fresco Finish paint in 'Vintage Lace', once dry a layer of Fresco Finish Crackle Glaze and finally, when dry, a layer of Fresco Finish in 'Nougat'. Next stamped the crackled CS using Brilliance Ink with another Crafty Individuals Stamp CI-354 'Clock Face'. I then diecut the clock with a circular Spellbinder die. The clock does have a lovely crackled appearance but once again I ended up covering it up!

Using Sizzix die 'Hardware Findings', I cut some grungeboard. I painted a layer of Paper Artsy Fresco Finish paint in 'Nougat', then FF crackle glaze, then FF 'Old Gold'. Next stamped all with the aforementioned Kaisercraft stamps for further aging effects. I attached with brads that I had coated with Inkssentials Crackle Glaze so as to look a bit worn. The two clocks on the right are stamped with a 7Gypsies stamp from the 'Venice' clear set using Archival and Brilliance inks. They are also 'aged' with DIs and cut to shape with a Spellbinders circular die. I've attached them via the keyhole diecut to fit with 'Time' theme.

Prior to assembling I decorated most edges with gilding wax. The metal clockhands are by Prima and the key is by Maya Road. Finished off with two little twine bows! Phew!

I thank each and every one of you who stop by - your visits and comments are truly appreciated.
Have a lovely weekend.

Nicola x

Thank-you to the hosts, sponsors and DTs at the following challenges that I wish to enter;
Frilly and Funkie - There's No Time To Waste
Vintage Udfording - Use Paint or Gesso
Simon Says Stamp and Show - Inspired By
Our Creative Corner - Anything Goes
Fashionable Stamping Challenge - Anything Goes

Tuesday, 30 April 2013

Spring Dressforms

A cheery hello from Dublin. I appreciate your visiting.

This was one of those cards where Plan A didn't work out at all, at all! So I'm very glad that several reconfigurations later I finally have a card to post...


I've used papers from Maja Design (Vintage Summer Basics) and all the stamping is on Ranger Speciality Stamping Paper. I had thought that I would give the dressform wings so that it was like a 'flying dressform' - but no way was this working out!

I cut dressform with Tim Holtz die and mounted on chipboard. Stamped it with Distress Inks using Crafty Individuals stamp set CI-226 'Wild Flowers'. Next stamped and embossed (Ranger Queen's Gold EP) Crafty Individuls stamp CI-357 'Springtime Robin' - I think this stamp is intended as a bookmark but I'm considering it a dress! I've coloured it in with DIs using a Tim Holtz waterbrush. The bird, butterflies and text on the dress are 'paper pieced' and raised on sticky pads.

I also stamped a large sheet with a colourful range of DIs using the CI-226 'Wild Flowers' stamp set and then diecut and punched into lots of butterflies. Then stamped and embossed clothing articles from Crafty Individuals stamp set CI-306 'French Corsets' and coloured them in using Tim Holtz water brush and DIs.

I bought the water brush from The Funkie Junkie Boutique and so wish to enter card to the Frilly and Funkie Sunday Share.

Gilded most edges with gilding wax and left them to dry overnight. All elements of the card are mounted with foam to add dimension. The two circular dies are by Cheery Lynn and Noor Design. I've also embossed the outer circle with a Cheery Lynn circular stitching plate.

That's It - hope you like! Enjoy the rest of your day.

Nicola x


I wish to enter card to the following challenges;
Crafty Individuals - Spring In Fashion
Country View Crafts - Butterflies
Fashionable Stamping Challenges - Sentimental ("Song of Spring")
Simon Says Stamp - Anything Goes
Love To Create - Punches and/or Dies
Dream Valley Challenges - Things With Wings
Sweet Stamping Challenge - Anything but Birthday

Friday, 22 March 2013

Days of yore

Hello again from the deluge that is Dublin! Thank-you for stopping by.


Isn't she lovely?! The central image is a stamp by Chapel Road Artstamps called 'Miranda'. I stamped the image onto Lesley Riley's TAP (transfer artist paper) using Archival ink in Coffee and then ironed the TAP onto cream muslin to transfer the image to the cloth. I then fussy cut her outline. I bought a half-metre of the 'drop-pearl' trim recently in a local haberdashery not knowing what it might work with but am pleased with it as a necklace here. Added water to some Perfect Pearls and painted the dress portion of image for a pearly shimmer.

The base CS is a handmade Indian Gold cardstock. I've done stencil work at the four corners using The Crafter's Workshop stencil (Fancy Frames) and Dreamweaver stencil paste. Next cut the cream frame with Cheery Lynn die 'Mini Pearl French Flair'. Using the same Fancy Frames mask I did more stencilling on the cream frame and then gilded the raised paste with gold gilding wax.

The cream frame is atop a layer of cream silk fibre paper with gold circle embossing. I stamped the paper with Crafty Individuals elegant swirl stamp (CI-182) using gold Delicata ink. Also embossed some of the gold CS using Sizzix Regal Flourishes folder and then cut a Fleur-de-Lis square with a Spellbinders die. I diecut more gold swirls with Sizzix Bigz die 'Elegant Flourishes'. Both cream frame and Fleur-de-Lis square are mounted with foam tape for added dimension.

I added the cream bow having embossed the ribbon with my Regal Flourishes embossing folder. The swirls on the ribbon aren't showing up too well in the photo - but they are there! Sorry but I can't locate the tutorial where I first read about embossing ribbon - it gives a kind of moire silk effect with this flourish folder. I cut the folded end of the embossing folder about an inch wide to allow the ribbon to thread through after embossing each section, in the same way that 'Tim' cuts folders to accomodate the larger size tags.

Added some pearls to finish. I think She is gazing at that pearl in top left corner and planning her next neck adornment!

Thank-you so much for visiting and for any lovely comments you might leave. I hope you have a wonderful weekend.

Nicola x

I wish to enter card to the following challenges;
Fashionable Stamping Challenges - Swirls
Simon Says Stamp and Show - Water
Inspiration Journal - Add a Little P.O.P.
Country View Crafts - Pick and Mix
The Shabby Tea Room - Anything Goes
Crafty Catz - Sparkle with a bow
Kaboodle Doodles - # 163 Bows/Pearls/Anything with frills
Bunny Zoe's Crafts - Girly
Creative Corner Challenges - Layer It Up
Happy Campers - Add Dimension

Wednesday, 20 February 2013

Best Pals

Hi there and welcome to another blog post.

Unusually I'd like to say a little bit about myself personally. I've been living with ongoing serious illness for several years and achieve a certain level of functionality by maintaining a quiet and carefully paced life. Starting up my blog last September was a big undertaking for me but all the extra activity has been taking its toll healthwise. Unfortunately I have decided to resign from my Design Team post at Eclectic Ellapu and I thank Elaine and all the ladies there for being so understanding. I hope you will also bear with me as I won't be making so many visits to your blogs over the next while but I do hope to be able to keep making and posting my little card productions.

So without further ado, here's my card today made in a shabby style;


I've decorated the side panels with Dreamweaver texture paste through a Crafty Individuals 'Leafy Border' mask. The last time I applied texture paste over distress inks I found that the paste absorbed the ink but this time I wanted to keep the raised paste white so I waited till the paste was dry and then sponged over a blend of distress inks to colour the cardstock panel, wiping the raised paste with a baby wipe as I went along. The paste acted like a resist and remained white. Tore the cardstock whilst wet to give a ripped shabby look.

The centre panel is layered with some aqua tissue paper and then some scalloped doily strips. I've stamped the central image (Crafty Individuals CI-084) using Coffee Archival ink. I restamped a couple of times onto some patterned papers (Melissa Frances and Maja Design) and then paper pieced dresses onto the little girls. Also arranged some roses in the flower basket. I cut a frame from Silver Stardream CS using a Spellbinders die and then dry embossed this. Added frantage in shabby blue and blue fragments to add further interest. I then shabbily painted some corrugated cardboard with Paper Artsy's Snowflake paint and sprinkled more frantage. Decorated further with metal charms from Nunn Design and a broderie anglaise bow. Finally dabbed some metal words (by Making Memories) with Brilliance Ink (Pearlescent Chocolate) to highlight.

Wishing you all a lovely day and thank-you so much for your visit.

Nicola x

I wish to enter card to the following challenges;
Crafty Individuals - For My Friend
The Shabby Tea Room - A Silver Lining
Sugar Creek Hollow - Metal Mania
Simon Says Stamp and Show - Metal-ology
Vintage Stamping Challenge - Blues, Brown and Beige
Stampin' for the Weekend - Distressed
Happy Daze Challenge - Love Is All Around
365 Cards Word Wednesday - Sister
Addicted to Stamps and More - Vintage
Polkadoodles and Studio 12 - Shabby Chic

Friday, 18 January 2013

White Valentine

Hello from a cold, sleety Dublin with snow forecast for today.

Lots of challenges this week with a white theme which is so appropriate for snowy region. Hope you are snuggly warm wherever you are.


The background layer is Lace Paper - tissue weight paper is pulsated with high speed water jets through a silk screen to create the 'lace pattern'. I've then die cut 4 borders from velvet paper (by SEI) so that edges are lovely and soft. (Magnolia die "Old Swedish Lace"). The doily is cut from Bazzill CS using Cheery Lynn's Sophia's Heart die. I painted the primitive heart die cut with Paper Artsy's Fresco Finish in Snowflake. Then stamped and embossed swirls using Crafty Individuals stamp (CI-182) and embossed with Stampendous EP (Winter Wonderland). The top chip-board die cut was first painted in Paper Artsy's Nougat paint. I then applied their crackle glaze paint. When dry, painted again using Snowflake paint and the lovely cracks appeared. The top embellishment is a beautiful french enamel by 7Gypsies. I tried 'crackling' the enamel but it didn't work out so I've just dabbed it with Adirondack paint dabber in Snowcap to 'remove the bare look'. I received the pretty corrugated butterflies as a freebie with an order from The Funkie Junkie Boutique - thanks Linda! I've painted them with Paper Artsy's Snowflake paint and then dabbed the ridges with Paper Artsy's Metallic Glaze which gives a lovely pearly shimmer. I've completed by adding roses, pearls, Cheery Lynn flourish die cuts and lace.

Thanks so much for stopping by. Stay warm and have a lovely weekend.

Nicola x

I wish to enter my card to the following challenges;
Sugar Creek Hollow - Winter White
Simon Says Stamp and Show - Lace Love
Flutter By Wednesday - Winter White
The Pretty Little Ribbon - Flowers & Ribbon
Make My Monday - Diecuts and Punches
4 Crafty Chicks - Pearls, pearls, pearls
Crafty Ribbons - Love, Romance, Anniversary


Thursday, 10 January 2013

Treasure Chests

Welcome to a special post today! As you may know I was previously featured at the stunning blog Our Creative Corner for twice winning their Top Talent Challenge. For that spotlight I crafted 'A Christmas Tree'. I was lucky enough to win again there recently for my 'Vintage Santa' card and was kindly invited to feature once more and make a project to showcase. So I took the term 'showcase' literally!

I very much appreciate Our Creative Corner hosting this spotlight piece. Their design team are a platinum talented group of ladies whose crafting will ALWAYS inspire. Please do pop over Our Creative Corner for more details of my showcase today and a q and a session. My first spotlight interview from last November is here.

I have altered a pair of miniature papier-mâché suitcases to turn them into little vintage Treasure Chests. Apologies for photographs that were tricky earlier this week given Dublin's dark skies.


Firstly I gave each case a coat of Gesso. Next I applied a coat of Paper Artsy's Fresco Finish paint in Nougat. Then painted a thin coat of Fresco Finish Crackle Glaze. Once dry I followed with a coat of Fresco Finish Vintage Lace for one case, Ice Blue for the other. Also painted the corners and leather strap elements with Fresco Finish 'Old Gold'. The resulting crackle effect was super (thanks Alison). I then (for the first time) stencilled using Crafter's Workshop mini damask stencil together with Dreamweaver embossing paste in white. It wasn't possible to tape the stencil down flat given the raised 'leather straps' either side so the stencils aren't as clean as could be if they had been entirely flat. I sponged Distress Inks liberally over both cases.

Next stamped a mix of script and scroll stamps using Archival Rose Madder and gold inks. I then painted a coat of Fresco Finish Metallic Glaze - resulting in a gorgeous pearlescent sheen. However given that I had used pale colours at the crackling stage I lost some of the detail of the crackle and paler stamping as I applied the glaze. Paper Artsy's site does explain that the metallic glaze can be mixed with Satin Glaze to lessen the pearlescent sheen and I will follow their advice next time. I re-sponged a mix of Distress Inks for layering effect.

I 'recrackled' the leather handles and straps to 'age' and nubble further. Using my finger I applied a gilding wax (LeFranc & Bourgeois Pale Gold) over the damask stencilling and left to dry overnight. The next day I did a second stencil layer with the embossing paste to heighten. Again it wasn't possible to lay stencil flat but the second layer gave the pattern a better definition. I then did my gilding wax trick again. (Whole project done over several days).

Given the wonderful results achieved by Joanna and others and tip from Anne I just had to try out some Stampendous Frantage. For the pink chest I used Stampendous Shabby Pink embossing enamel speckled with Melissa Frances pink glass glitter. On the blue chest I scattered Aged Ivory embossing enamel flecked with gold glass glitter. I ended up covering some stamping again but I loved the jewel encrusted texture so much that I didn't mind! I also embossed edges of cases with Ranger Queen's Gold EP. Added the little pearls to the case corners and handles with Viva Decor pearl pen.

I die cut the tags with a mix of Cheery Lynn and Spellbinders dies and some Brenda Walton tag and Nunn Design embellishments and charms from stash. I gave them the same paint, glaze and frantage treatment and attached with gold cord.

I 'aged and gilded' the crown charm and Melissa Frances resin bird and fixed to the pink chest. Similarly decorated the blue chest with bird charm and butterfly by Brenda Walton.


During the early stage of the project I also made 'linings' for the cases using silk fibre tissue with petals. I stamped the tissue and then fixed inside with modge podge. Inside the pink case is a sentiment by Paper Bag Studios (PBS-038-C Beauty) and Justrite Stamps (Damask Background) - stamped with Worn Lipstick DI. The blue case has Flourishes Stamp (Antique Map) and the very lovely Crafty Individuals Stamp (CI-101). Stamped with Chipped Sapphire and Broken China DIs. Also stamped mini flowers, fleur de lis and butterflies and dabbed with DIs.


Very many thanks once again to all at Our Creative Corner for giving me the opportunity to shine. Being invited to produce a special project inspired me to push my boundaries. This is my first 'altered item' - I have learnt a lot in the process and had fun along the way!

Thank-you so much for spending time at my blog. Your visits and comments mean a great deal!

Nicola x

I wish to enter my Treasure Chests to the following challenges;
Fashionable Stamping Challenges - Surprise Us
Vintage Stamping Challenges - Vintage
Simon Says Stamp and Show - Embrace The Old
Crafty-emblies - Toy Box or Toy or Box
Flourishes Timeless Tuesday - #202 New (with flourishes stamp)
Live & Love Crafts - Something Old
Craft Your Passion - Vintage / Shabby Chic
Kaboodle Doodles - Vintage
Crafty Creations Challenges - Something New - new stencil
Little Red Wagon - Bring On The Bling

Wednesday, 12 December 2012

Doves of Peace

Greetings all - today 12.12.12 is the last posting day to the North Pole so be sure to get your letters to Santa in the post!


I am really pressed for time today (who isn't!) so will be brief and just give card ingredients as follows;

Stamps - Penny Black 'World Peace' (3040K), Flourishes Stamps - Antique Map, Stamped Sentiment by Crafty Individuals
Inks - Versamark (for clear emboss resist), Distress Metallic Stain in Brushed Pewter, DI in Chipped Sapphire
Embossing powders - Judikins Silver Twinkle, Stampendous Twilight
Lots of UTEE for Dove image and sentiment
Bird cage die cut glittered with Silver Twinkle
Backing paper for bird cage a free image courtesy of the wonderful Astrid of Astrid's Artistic Efforts
Doves punched with Fiskars / Jenny Bowlin sqeeze punch and glittered with Distress Dry Glitter in Clear Rock Candy
CS - Stardream and Curious Metallic
Other - glass glitter (Stampendous), bells, pearls (Kaisercraft), clock hand charm (silvered and glittered), Corner punches by Fiskars, Stars

Thanks for taking the time to visit today as I know everyone is super busy at the mo! Hugs to those lovely people who leave comments or better still become followers. It means a lot!

Have a great day.
Nicola x

I wish to enter card to the following challenges;
Fashionable Stamping Challenge - To Die For
Penny Black Saturday - Glitter and Sparkle
Penny Black Allsorts - It's Your Choice
Bunny Zoe's Crafts - Celebration
Sweet Stamping Challenge - Dies and / or Punches
Crafting Ireland - 12 Days of Christmas
LEJ Designs - Sentimental
No Matter Which Challenges - Christmas
Glitter n Sparkle - Use some metal
ABC Christmas Challenge - Y is for your favourite punch/die
Creative Card Crew- Use A Star
The Sisterhood of Crafters - Christmas with a background twist
Inspiration Emporium - Inspiration Journal - Joyful Creations

Sunday, 9 December 2012

Let's Ice Skate

Happy Sunday everyone! I am delighted to see so many visits, comments and new followers. I appreciate them all and thank everyone for hopping on board!


I saw and saved an ice skate shaped card some time ago (can't remember from where). I printed out the shape and cut templates for the skate and boot. I am forever bookmarking tutorials and was glad to put one of them into practice today - please see Shelly Hickox's tutorial on Faux Tarnished Metal here as it is so effective.

I cut out the skate shape from grungeboard and gave it a coat of Metallic Stain in Pewter. Following Shelly's tutorial I gave the skate a few coats of silver embossing powder heating each as I went along. I then sprinkled some UTEE randomly and heat blasted it. The whole process caused the silver to bubble and tarnish beautifully. Just lovely for a vintage ice-skate.

The boot itself is cut from faux leather paper - bought in the most va va voom of Stationers - Kate's Paperie in NYC. The top of the boot is white Bazzill CS stamped using french text stamp by Andy Skinner (Simply Angelic set). Also edged boot top with silver glass glitter. I tucked in 2 types of venise lace from Linda's Funkie Junkie Boutique. Just for shopping balance the lovely lace ribbon used for bow comes from another beautiful Stationer Daintree (in Dublin). I added 3 little heart brads and bow for faux lacing effect.

The background is a square of red velvet SEI Velvet paper (love this for Christmas). I painted glue across end of the velvet and applied a thick layer of Melissa Frances mica flakes. I spent forever trying to see what worked best to highlight the red leather of the boot and eventually settled on a band of white CS stamped and embossed with Stampendous Christmas Background stamp (CRR144). All the stamping on card is done with Versafine crimson and EP is Sparkle n Sprinkle Japanese Lacquer.

Took the shine from some Darice jingle bells by dabbing with pewter metallic stain and tied them together and stitched to the white lace bow. I recently got a fab stash of freebies with an order from Crafty Individuals so stamped and embossed their lovely free Jingle Bells sentiment and backed with strip of red velvet. I punched snowflakes from CS and vellum, coated them with glue and dipped them in Distress Dry glitter in clear rock candy. Also added same glitter to rim of boot and skate for sparkle aplenty.

Lots to do today - I wish I really could skate! Enjoy the rest of your weekend.

Nicola x

Thank-you to the many hosts, sponsors and DTs of the following challenges that I wish to enter card to:
Simon Says Stamp - Snowflakes
Crafty Mess Challenge - Vintage Christmas
Jingle Belles Rock - December to Remember
Craft Us Crazy - Its beginning to look a lot
Crafting Ireland - 12 Days of Christmas
Charisma Cards - Christmas
Stampin for the Weekend - Let it Snow
Glitter n Sparkle - Use Some Metal
Pixie Dust Studio - Sparkle and Snowflakes
Divas By Design - Let It Snow
Alphabet Challenge - V for Vintage
Sweet Stampin Christmas - Anything Goes
Just Us Girls - Embossing
Pile It On - Embellishments

Friday, 23 November 2012

Smitten Penguins in Snowland

A belated Happy Thanksgiving to all Americans wherever you are in the world. Thank you so much to everyone who visits my blog and a very special thank-you to all my new followers.

No creations for the last week I'm afraid as I wasn't well. I hope to be more productive this week. I decided I would try and make a shaker card as a lot of YouTube videos make it look easy! It isn't ... mine sprung a leak alas and some careful plumbing work was required. I reckon I should get used to glitter on the floor for the next couple of weeks!


Onto Stardream cardstock I stamped some Christmas Penguins (Penny Black 3514H - Cheerful Giving) and then embossed with Judikins Black Diamond EP. I also stamped with Versamark and clear embossed some snowflakes around the penguins for a resist (Fiskars Winter Wonderland) but these aren't showing up too well against the pale blues. The background was sponged with a mix of Ranger Distress inks and Snow Cap Adirondack paint dabber. I punched some snowflakes with my Martha Stewart and Woodware punches and gave them gemstone centres from Hero Arts. Card is my literal interpretation of one of the challenges I entering - Home Sweet Home as I agree "home is where the heart is". This smitten little pair's home just happens to be the great outdoors. I've added little key and heart charms for them. Used Twinklets glass glitter (Diamond Dust) for the filling underneath the (now securely stuck!) clear acetate. I painted a diecut banner from Melissa Frances with layers of white Gesso. Whilst wet I blasted it with the heat tool so that the Gesso formed nice snowy blisters. I've addded bow, heart and tree charm (both painted and glittered) and stamped sentiment and embossed with Judikins EP. (Stamp was a freebie (amongst many fab freebies!) that I just received in an order from Crafty Individuals). Shaker mounted on Bazzill CS to complete.

Thanks so much for taking the time to stop by.

Nicola x

I wish to enter card to the following challenges;
Penny Black Saturday Challenge - Cute Christmas
Fashionable Stamping Challenge - Home Sweet Home
Aud Sentiments - Bingo (Embossing, Bling, Joy)
Sparkles Christmas - Contemporary Colour Combo
Bearly Mine - Snowflakes
Crazy Amigos - Colours of Winter
Creative Craft Challenges - Bingo (Blue, Stamps, Emboss)
Ladybug Crafts - Snowflakes
Fashionista Challenge - Blue Christmas
Crimbo Crackers - Anything Goes
Fussy and Fancy - Feeling Blue
Stampin For The Weekend - Use some texture