Showing posts with label Stampendous. Show all posts

Saturday, 12 April 2014

A Little Blue Egg

Hi there! It’s a record for me - three posts in three days so thank-you so much for popping by again! I certainly have been busy and it has been a great compliment to be invited to do so many Guest Design slots.

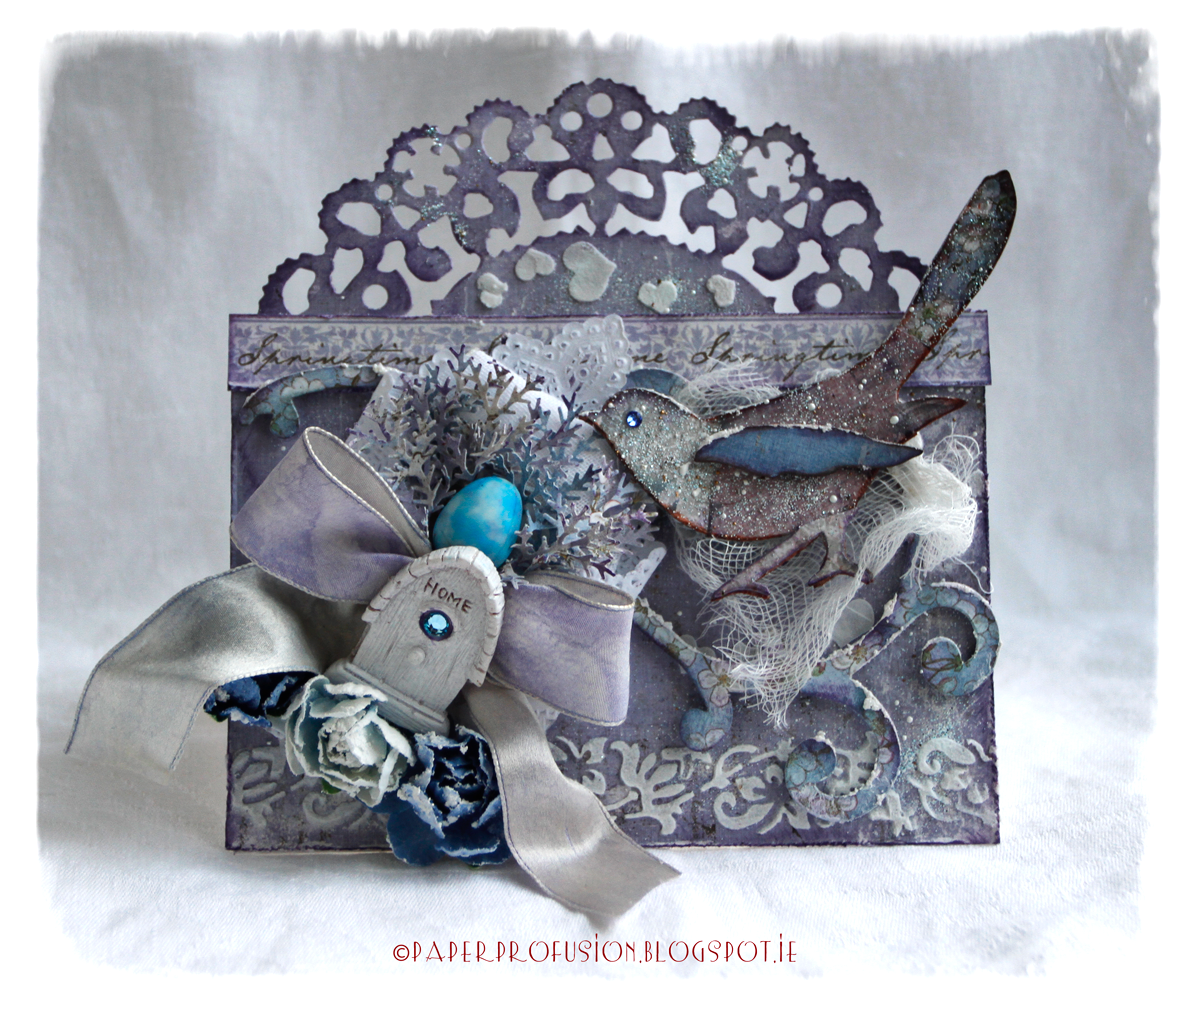
Today I’m really happy to have been selected to enjoy the guest design limelight at one of my favourite challenges - the always pretty Sugar Creek Hollow. Their current challenge theme is ‘Easter’. I was going to go with traditional yellow shades but just couldn’t put down these gorgeous lilac and blue papers so have ended up with more of a gentle lavender Easter! I think that blue egg is going to hatch any day now!


Papers: Maja Design ‘Vintage Spring’ collection

Dies: Sizzix Bigz ‘Bird Scroll’ and On-the-edge ‘Vintage Doily’

Stencilling: Crafty Individuals and Heidi Swapp stencils using Wendy Vecchi texture paste

Distress Inks: ‘Weathered Wood’, 'Dusty Concord'

Other: Frantage ‘Shabby Blue’, paper doily, cheesecloth, gems, Prima resin bird-house, flowers, punched branches and hand dyed silk ribbon

Sincere thanks to all at Sugar Creek Hollow for kindly inviting me to Guest Design. Be sure to check out their challenge for some of the very best vintage / shabby chic talents in blogland.

Thank-you so much for visiting and taking the time,
Enjoy the rest of your weekend.
Nicola x

I wish to enter card to the following challenges:
Craft for the Craic - Easter or Spring
Crafty Individuals - Nature's Beauty
The Ribbon Girl Challenge - Spring
Simon Says Wednesday - Easter / Sweet Treats
It's All About the Vintage and Beauty - Shabby Chic
Moving Along With The Times - Easter / Spring
A Creative Romance - Eggcellent Spring
Inspiration Journal - A Few of my Favourite Things

Monday, 24 March 2014

For Mother's Day

Greetings from Dublin and thank-you for visiting.

After my adventures in grunge in last project I'm back in my more comfortable zone making pretty, vintage cards.


I wanted to make a card for my Mum on Mother's Day next Sunday. As usual, several challenge themes gave shape to the end result.

Vintage Café Card Challenge are looking for images of women and Sugar Creek Hollow have photo inspiration of a little girl's floral bedroom. Also at Fussy & Fancy Friday they too have an inspiration photo of a pink bedroom. Thank-you to 'Magic Moonlight Free Images' showing this little girl and her Mother, sitting on a bed in their night attire. I think they are looking at a sparkling ring!

Craft Hoarders Anonymous seek sparkle and glitz together with an inspiration photo - hence I've applied lots of blingy gems, frantage and pearls.

At Frilly and Funkie the theme is neglected dies. I searched to see which set I hadn't used in a long time and came across Spellbinders Romantic Rectangles. The photo has been sized to fit one of the smaller rectangles and I decided to use this die set only for the card.

Card and Scrap are looking for lace / ribbon so I've attached a lacey ribbon!

The papers are by Graphic 45 ('Secret Garden' and 'A Ladies' Diary'). All edges have been inked with Distress Inks and Prima chalk edgers. Included lots of flowers and punched butterflies and a lovely chipboard 'garden border' that I painted with white and pink pearlescent paints before adding some pink Frantage.

It's lovely to have you stop by. As always I love to read your comments - they are very much appreciated.

Have a lovely week,
Nicola x

I wish to enter card to the following challenges:
Vintage Cafe Card Challenge - Images of Women
Sugar Creek Hollow - Photo Inspiration
Craft Hoarders Anonymous - Show Some Sparkle, Glitz or Glam
Fussy and Fancy Friday - Shabby Chic with photo inspiration
Frilly and Funkie - Neglected Dies
Card and Scrap - Use Lace and / or Ribbon
Creative Inspirations Challenge - Vintage / Shabby Chic
Dream Valley Challenges - Mothering Sunday
That Craft Place - Flowers and / or Mother's Day
My Time To Craft - Mother's Day / Special Lady

Sunday, 16 March 2014

Goin' on a trip? Pack your bags!

Hello and thank-you for your visit. A warm welcome too to new followers.

As you might know my favourite style is vintage, usually done with some prettiness. The challenge at exciting new blog A Vintage Journey requests anything vintage with a strong hint of Maestro Tim Holtz (TH). As the mega talented DT sets forth on their journey I thought it appropriate to alter some suitcases for them. So for a change ... here's some grunge and a warning for a verrry long post...


I started off with some papier mache suitcases. Ages ago the lovely Alison sent me a package all beautifully wrapped up in TH's tissue wrap. I've collaged this tissue wrap all over each case. There then followed a brown and black marathon using TH distress inks, stains, paints, stencils and stamps. I particularly had fun using the splatter brush (by Liquitex) that TH has used in recent videos. It wasn't so much fun though cleaning up afterwards! When I decided that enough layers of ink etc. were on I added a crackle layer to make sure that cases looked even more battered.


I love the Idea-ology pieces that TH has designed. On the outside of the cases I've used TH box corners, hitch fasteners and ring fasteners. The larger suitcase has a TH ornate plate on the front. I recently won an amazing Maja Design giveaway from the lovely Jenny and I've cut out some words from one sheet to go inside the plate that is then topped up with glossy accents.


I know it's an anachronism but given that TH designed pulley wheels I thought it would be fun to have wheels on the cases. I didn't have ones by TH so I've devised my own. They are made from miniature wooden spools. Painted the inner areas black/brown and the 'wheels' copper. I rummaged through some of my late Dad's old toolkits and found screws, nuts and other metal bits that I don't know the name of but once I had 'rusted them up' with Adirondack alcohol ink and distress EP they looked perfect for the cases.


TH box corners come in a worn sort of pewter colour. I needed to change them to an aged copper so I inked them with versamark and added variously copper and black EPs. To achieve the greeny patina I dabbed Pearl-ex blue/green powder into the melting EP mixture. (This 'aging' has been applied to all the metal elements).


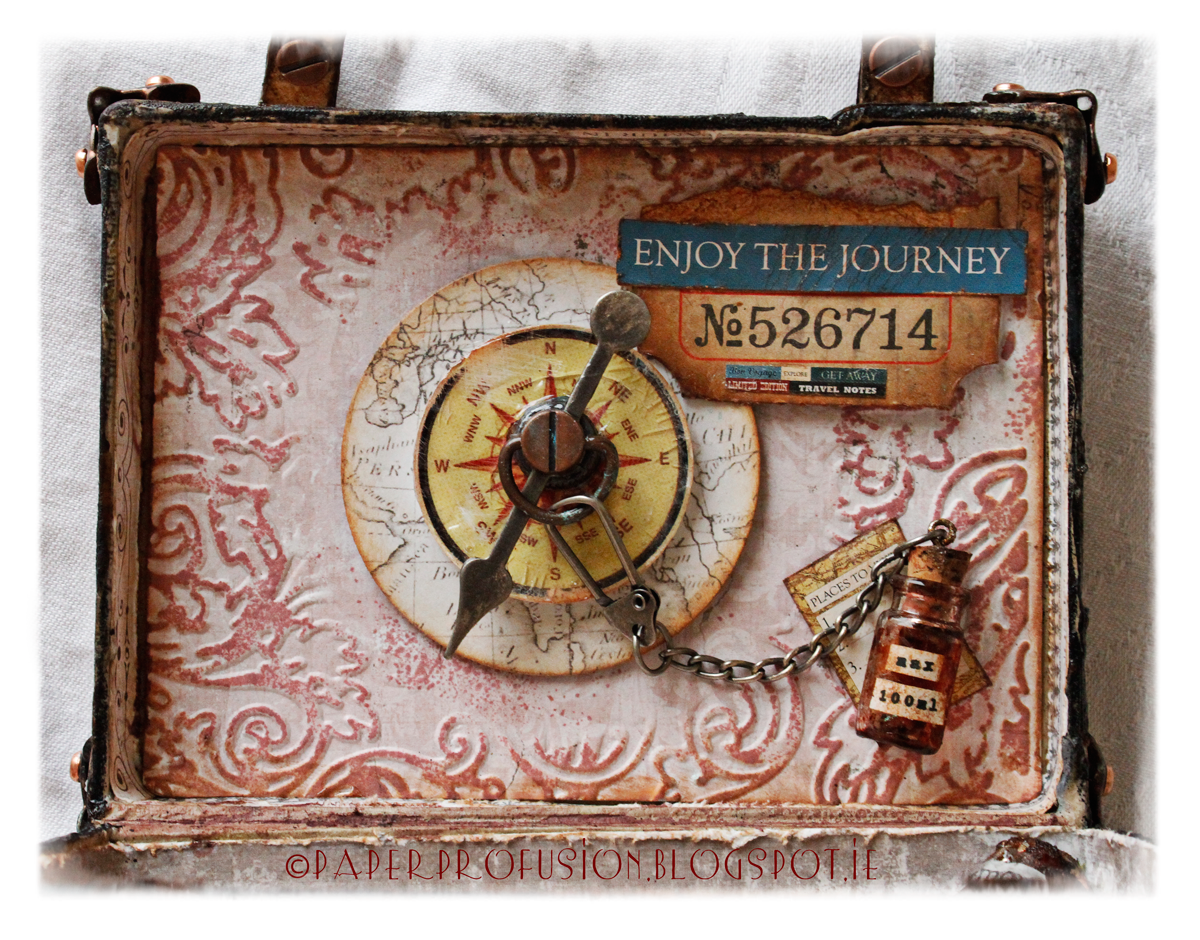
Some welcome relief from the dark hues comes inside each case. I've lined the insides with some of the gorgeous Maja Design papers and borders that come at the end of each 12 x 12 sheet. As I'd already used lots of TH stamps on the outside I decided to use one of his texture fades to emboss the inside lid and finally made use of the TH circular embossing diffuser to 'frame' my globe and compass. Then brayered over some DI for emphasis. A TH game spinner, ticket and a hitch fastener are also used. I spent a lot of time making that water bottle grimey! I've labelled it to remind owner of the current airline restriction levels for liquids in carry-ons!


Now you all know TH is famous for his tags and brilliantly educational monthly tag challenges. So I just had to include a tag! The thing is, I've never done a TH 'monthly tag'. I thought I should remedy this and so have included my take on TH's March tag inside the larger case. I hope this format (and resized tag) is ok to enter to his challenge. I don't yet have the really fab nest stamp set or the spritzer tool so I've improvised. Thank-you to generous Geraldine for her beautiful gifts last week including the TH bird branch stamp and some other items included in project.

The egg is from a M&S candy & chocolate eggs packet. I set aside a green egg and as I crafted I ate the rest of the packet. Next thing was I had a brainwave that I should add more speckle to the egg so I proceeded to splat brown paint at it. It looked great! I needed to dry one side so that I could splatter the rest of the egg, so I began to dry the egg with my heat gun. All of a nano-second the poor egg suffered a catastrophe ... the chocolate turned to liquid and the candy disintegrated into a pooled mess! The next day I had to dash to M&S for another packet of eggs ... no splats this time!! I thought that the TH light bulb would co-ordinate well with his rays stencil. Same stencil is also used on outside of top lid of case. I've made nest with dried moss and shredded paper. I cut a small circle in the tag and inset the little nest into it. (For info: the nest is mostly inked with one of Wendy Vecchi's new ink shades - 'Tree Branch').


The label plate on the smaller suitcase is by Artemio with insert a cutout from Maja Design. I tried out black brads in the metal elements but considered them too dark so have put in shiny copper ones instead. By the way, if you look at left hand corner of luggage tag below you can see the initials of the owner!


For the 'leather' straps I used SEI velvet paper that I fairly well battered, smudged and sprayed to get it worn looking. I also machine stitched along the centre of each strap for further texture.


I attached a luggage tag and charms to each case with TH swivel clasps. Collaged each tag with cutouts from G45 / Echo Park 'Photo Freedom' kit, then sanded and aged with DIs before coating with crackle.


For the inside of the smaller case I've used TH's new decorative strip 'Butterfly Frenzy'. The lid part is decorated with the little die cutouts along with some balloon cutouts from beautiful Maja Design papers. I painted and glittered (Clear Rock) some chipboard letters too. I've followed the very creative Candy who often uses 'Mercury Glass' stickles for edging. (Sorry for photo quality but I couldn't hold open and snap the small case sufficiently to get a decent photo).


I've used the remaining part of 'Butterfly Frenzy' on the lower portion of case. Also stamped TH stamp on paper using Wendy Vecchi new 'Hydrangea' colour in case you are interested in shades.


Finally, here is a rear view to show you those lovely TH hinges that I've given the aged copper treatment to.


Thank-you so much if you've read through all this lengthy post. I've spent ages on this piece through the week so apologies for not visiting as much. I hope to catch up tomorrow.

Have a lovely week,
Nicola x

I wish to enter cases to the following challenges:
A Vintage Journey - Anything Tim
Simon Monday Challenge - D is for Distress
Craft Hoarders Anonymous - Vintage or Retro
Tim Holtz - 12 Tags of 2014 - March
Vintage Udfordring - Sewing (Machine stitching is on 'leather' straps)
Inspiration Journal - A Splash of Colour
Rhedd and Rosie Challenge - Aged / Distressed
Rhedd's Creative Spirit - Altered Art March
Country View Challenges - Paper Chase
Art With Heart Challenge - New Beginnings (for AVJ)

Friday, 7 March 2014

Like my hat?

Hello and welcome.

I needed to make a 'male' card (which like most of you I always dread) but resisted temptation to purchase and wondered how I might make it more easily. I've never made a card according to a sketch challenge so decided to follow the layout at Sketchy Colours to see how it might go.


I like the end result and enjoyed having to 'think less' re layout so will definitely follow a sketch route again.

Papers: Prima 'Printery' and 'Engraver'. Pion Design 'For Father'. All stitched on my little Ikea sewing machine.

Other Paper: Embellishments and centre image by Kaisercraft 'Sears & Son'.

Stamping: Some random stamping/embossing of clock and numerals using Crafty Individuals CI-354 not showing up too well as embossing done with Antiquities 'Weathered white' similar to paper shades.

Inks / Mediums: DIs 'Tea Dye', 'Vintage Photo' and 'Walnut Stain'. I painted hat portion, ties and moustaches with Decoart One Step Crackle. Used Stampendous 'Aged Ivory' for frantage effects. The clock is well coated with glossy accents.

Other Embellishments: Tim Holtz 'Ring Fastener'. Prima wood clock face. Brads and ribbon from stash.

Many thanks for stopping by and special thanks to new followers who signed on recently. It's lovely to have your company in blogland.

Nicola x

I wish to enter card to the following challenges:
Sketchy Colours: Challenge #200
Vintage Udfording - Monochromatic
Simon Says Stamp Monday - Tick Tock
Craft Hoarders Anonymous Challenge - Vintage or Retro
Inky Chicks - Monochromatic
Divas by Design - Let's hear it for the boys
Country View Crafts Challenge - Paper Chase

Thursday, 27 February 2014

Lovebirds

Hello. Thanks so much for visiting!

Today's card is in keeping with February's 'romantic' theme and incorporates words, texture, stenciling, paste and lots more and so fits well with a number of my favourite challenges.


This is another of my cards where I put lots of work into underlying layers and then went and covered them up!

Papers: Mixture of french book text and Prima papers that have been variously stitched, torn and aged using several DIs and Prima chalk inks. Lace has been added to fill in torn gaps and the papers were also splattered with gold calligraphy ink.

Stenciling: Papers and heart stencilled using Wendi Vecchi texture paste. Stencils from Heidi Swapp (Hearts) and The Crafters Workshop (Art Is).

Frame and heart: Both were treated to Kroma Crackle medium for leathery crackle effect. Used DIs and pearlescent sprays to colour and topped with Treasure Gold for the frame and gold stamped script on the heart. Both cut from Tim Holtz grungepaper with Sizzix Bigz dies.

Lovebirds: Using multi matte medium I glued some burlap and some cotton cloth to grungepaper. When dry I diecut the 'fabric' birds using Sizzix Bigz die. Frantaged both with Stampendous 'Aged Ivory' though it doesn't show too well on the burlap. Also stamped gold script on the cotton bird. Rubbed gilding paste on both wings. Ran Prima chalk ink around their rims for definition. Mounted each onto some muslin with gave them perches of pleated ribbon / tulle.

Other embellishments: The 'Je t'aime' is from 7 Gypsies 'French Enamels' that I have dabbed with DIs and sealed. Ribbon, pearls, pins and flowers from stash. Finally a little Snow-tex has been dabbed on the flowers.

Thank-you for all the lovely comments and visits that you make - I truly appreciate each and every one.

Nicola x

I wish to enter card to the following challenges:
Inspiration Journal - Show It With Words
Simon Says Stamp Monday - Paste
Frilly and Funkie - Stencils and Texture
Craft for the Craic - Heart
Simon Says Wednesday - Anything Goes with Pearls
City Crafter Challenge - Do You Speak English?
Stamping Fantasies 5th Blogaverary Celebration - Favourite Item - mine is the Sizzix 'Caged Bird' die
We Love Vintage - Use favourite mold/pons (die/punch) - mine is Sizzix Bird die
It's All About The Vintage & Beauty - Use Lace

Wednesday, 5 February 2014

A Love Meringue!

Hello from drenched, dripping Dublin! Special kind thoughts go out to readers adversely affected by current appalling weather. If the sun shines on you however be sure to soak it up and enjoy!


It's a love/wedding card from me today, all in lovely white/creamy tones, and yes I do love meringues!

I recently was very lucky to receive a phenomenally generous giveaway from the lovely Cathi. Amongst the huge haul was this gorgeous large rose that I have built the card around.

Used a Martha Stewart punch on base card edges with lots of card and doily layers then laid thereon. Whilst I wanted a vintage look I didn't darken too many edges as it seemed better to keep it pristine. The two hearts are cut with Sizzix die 'Primitive Hearts' and dotted around their edges with Waco pearl pen. Added lots of Snow-tex and Frantage to rose and hearts. The little metal words (by Making Memories) are painted with white pearlescent mix. Added some Frantaged Magnolia and MFT die cuts with lots of ribbon, lace, tulle and pearls to make it pretty!

It's really lovely to see you have visited - thank-you for looking.

Nicola x

I wish to enter card to the following challenges:
Vintage Café Card Challenge - Flower Parade - Rose
Sugar Creek Hollow - Love and Adore
Simon Says Stamp Monday - Love Notes
Inspiration Journal - Show It With Words
The Ribbon Girl - Hearts
Craft Room Challenge - Ribbons and Lace
Crafty Hands Challenge - Shades of the Same Colour
A Creative Romance - Show Us Some Love
Kort o Mania - Laces and Ribbons
Allsorts - Love is in the Air
Simon Says Wednesday - Have a Heart

Monday, 27 January 2014

Vintage Sewing Themed Drawer Cabinet

Hello and Thank-You so much for visiting. I'm sorry to have been absent from blogging recently... I'll try to catch up with you all soon.

I smiled when I saw the challenge theme "Shopping Sins" at Our Creative Corner this month; there are three things for sure in my life; death, taxes and overspending!

So having been away from crafting for most of this month I've spent the last few days working on today's piece in my favourite vintage style. I'm mortified to have so many long unused items in my stash - the main contenders here were some Kaisercraft mini drawers, several uninked sewing themed stamp sets and a few untested crackle mediums.


Re wooden part of mini drawers: Painted all the wooden parts first with gesso, then PaperArtsy 'Snowflake', followed by PaperArtsy 'Old Gold'. I had bought some crackle products to try and improve on efforts to date - glad to finally put them to test. I like result from Decoart One Step Crackle (you can see on gold pediment). My first choice however goes to Kroma crackle - you can see its lizardlike results on the front part of cabinet. Some of the more thickly crackled areas are where I have done a double coat of crackle to experiment.

Re little drawers: All the hidden drawers are painted with PaperArtsy 'Ice Blue' followed by a coat of 'Metallic Glaze'. I tied string around each drawer when gluing its sides to keep them together whilst the glue set (rather fiddly). Opened packaging on my Krylon gold pen to gild the edge of each of the drawers - I like result so will use this pen a lot!

Decorative fronts and sides: The lovely papers are from Maja Design 'Vintage Summer Basics' collection. The drawer fronts were all punched out, stamped and gold embossed with several images being double foam mounted. I've added lots of sewing themed paraphernalia. The stamps used throughout piece are from Crafty Individuals CI-328 (first use) and CI-306 (both following Laura's inspiration), Chapel Road Artstamps "Sew Much to Do" and Studio 490 Wendy Vecchi "Art By Hand" (again it's first use).


The left side of cabinet shows a seamstress hard at work.

Feet and Pediments
You'll also have noticed the cabinet feet and pediment. I die cut two layers of chipboard (by 4) for the feet using Sizzix Bigz Ironworks die. Made sure all the fleurs-de-lis were same height and glued each twosome together and then painted with Fresco 'Old Gold' followed by 'One Step Crackle'. I used loctite glue to hold these in place for a fast glue result. They are holding very solidly. The pediments at the top are also diecut from chipboard using Sizzix Bigz On-The-Edge 'Ornate'. The lower white one is Fresco 'Snowflake' coated with Kroma crackle to see how the crackle would look without a gold paint layer below.


The cabinet rear is also stamped and embossed with some machine stitching too. Santa brought me a sewing machine - I'm pleased to be finally trying it out!


The right side of cabinet shows the mannequin in use by this particular sewing establishment - again cut from chipboard using Bigz 'Sewing Room' die, painted as before and dressed in some finery


Finally, a close up of the cabinet top:


A word of thanks too to May, Cathi and Alison who all provided some of the ingredients used in this piece.

Thank-you so much for stopping by and enjoy the rest of your week,
Nicola x


I wish to enter cabinet to the following challenges:

Our Creative Corner - No more shopping sins (Guilty as accused!)
Vintage Udfordring - Use Dies and/or Punch
The Ribbon Girl Challenge - Anything Goes
Allsorts Challenge - Vintage
It's all about the vintage - Embossing
Fussy and Fancy Friday - Vintage
Sugar Creek Hollow - Fibres & Texture
Stamping Sensations - Ribbon, Buttons and Bows
Sweet Stampin - In Stitches
Bunny Zoe's Crafts - Stitching
Inspiration Emporium - Diecuts and Punches

Thursday, 9 January 2014

A Shot of Blue

Hi there and welcome! A short post as I'm afraid I'm struggling getting 'into production mode' at the moment.

The current challenge at Simon Says Stamp Monday is "Blues". This brought to mind a card I made last November but haven't posted. I made it for the lovely and talented Anne who you might know had sustained a nasty hip injury.


I was glad to hear from Anne that the crutches and syringe embellies made her chuckle!

Stamp and Stencil: Crafty Individuals (can't recall make of sentiment stamp)
Papers: Maja Design "Vintage Summer Basics"
Dies: Spellbinders and Joy Crafts
Inks: Ranger Distress and Archival Inks
Embellishments: Stampendous Frantage. Silk ribbon by May Arts. Metal charms by Karen Foster and remainder from stash

Thank-you all most sincerely for your kind visits and comments.

Nicola x

I wish to enter card to the following challenge:
Simon Says Stamp Monday - Blues


Thursday, 2 January 2014

Unplug and Go Outside

Happy New Year to you - wishing you a 2014 filled with good health and happiness. Many thanks for stopping by.

I'm especially pleased to post today as I've made this project as Guest Designer for one of the most talented and educational blogs around - Frilly and Funkie Challenge. The fabulous F&F team have as their challenge theme this fortnight 'New Year's Resolutions'. My top resolution is to spend less time on pc and smartphone and more time outside.

I wanted to created something light and fresh after all the darker coloured Christmas makes. As it is very stormy and wet in these parts recently I also needed something bright and pretty to entice me outdoors. The gorgeous Graphic 45 'Secret Garden' papers seem to meet these requirements imho. (Picture laden post follows!).


I've decorated a Tim Holtz Idea-ology configurations box with a selection of 'Secret Garden' papers. Similar to when I made box using Graphic 45 'A Ladies' Diary' papers I turned the Idea-ology box into a hinged type box with dummy outer and inner lids. In order to keep piece looking light I first painted the box and Idea-ology feet with a coat of Gesso, then two coats of PaperArtsy 'Vintage Lace' paint followed by a top coat of PaperArtsy 'Metallic Glaze' - this adds a lovely pearlescent shimmer.

The top lid has been embellished with lots of diecuts, charms and flowers - most of which I've drenched with 'Clear Rock Candy' distress glitter so that they all look sugary sweet. The two soft blue felt roses are from a prize I was lucky enough to win from the lovely Ivana at Paper Girl Crafts. (Ivana's blog and beautiful creations are well worth checking out). I've also wrapped the lid with pretty venise lace - you can see it here at Linda's Funkie Junkie Boutique. As usual I've managed to also include a bow.


I added a light dusting of Frantage to the papers and then set about doing a whole lot of cutting and pasting.


I can't remember who sent me a freebie of a diecut picket fence ages ago - it came in very handy here to give dimension to the inner lid. Painted fence with a few coats of PaperArtsy 'Snowflake' to give a clean white. Again decorated the little inner scene with glittered flowers, charms, ribbon and a Prima resin birdhouse.


The last time I altered an Idea-ology box I pasted paper to both the inside and outside of the drawers but the added layers made for a very tight fit. This time I painted the outer sides with pearly pale pink as above and just papered the drawer insides.


One of my favourite features of the box is the front 'lock'. First of all I diecut two layers of chipboard using Sizzix Bigz 'Hardware Findings' die. Then also diecut some thin grungepaper. I embossed the grungepaper layer with Sizzix Regal Flourishes folder so that it would have impressions similar to the Idea-ology box feet. Somehow though by the time I had glued the three diecut layers together and painted as above, alas it had mostly lost the embossed impressions - maybe the base coat of gesso was too thick. Added in two little gold brads as faux nails.


Around top and bottom sides I stencilled some Butterflies and Dragonflies using a Crafters Workshop stencil and white texture paste. Whilst wet I sprinkled on more distress glitter in 'Clear Rock Candy' - a girl has gotta add sparkle every chance she gets!

Very many thanks to the always inspirational Frilly and Funkie Challenge Blog for allowing me feature as their Guest Designer today.

Huge thanks in advance for your visits and comments that are all truly appreciated.

Nicola x

I wish to enter box to the following challenges:
Simon Says Wednesday - Something New (New Year Resolution)
Crafts 4 Eternity - Something New (New Year Resolution)
Crafty Creations Challenges - Anything Goes
Little Red Wagon - New Beginnings
Card and Scrap - Bruk blomster / Use Flowers
Natalie & Amy's Challenge - One for the Girlies


Wednesday, 4 December 2013

Snowy cabin

Greetings dear readers - welcome to yet another Christmas card post!


I was delighted recently to have won at The Artistic Outpost referral programme, and even happier still to select my choice of their gorgeous stamp sets as prize (not easy to choose from fab array!). After lots of deliberation I went for the 'Midwinter' set and now love it. I bet the occupants of this cabin are blissfully content in their isolation.

The top circle is Stardream card cut with a Cheery Lynn die. I stamped the cabin image and embossed with Stampendous 'Twilight' EP. Did lots of frantage for the snow 'blizzard'. Painted gesso for the snowy foreground and coated it whilst wet with Distress glitter in 'Clear Rock Candy'. Also glittered the roof, windows and tree branches. Next inked the circle edges with Versamark and embossed with Judikins 'Silver Twinkle' EP. The two sentiments are from the AO sets 'Midwinter' and 'Snowy Woods' and are embossed as per cabin, silver ringed again and dotted with sparkly gesso. Sentiments also have faint shadow inked snowflakes.

The lower circle is cut using a Noor die. Again I've embossed the edge with 'Silver Twinkle' EP and glittered it too with more 'Clear Rock Candy'. The two circle layers are each propped on cardboard circles and foam tape to heighten dimension.

For the blue 'galaxy' layer I inked white CS with a combination of Distress Inks 'Chipped Sapphire' and 'Stormy Sky', Perfect Pearls mist 'Perfect Pearl' and Distress Stain 'Picket Fence'. I then gave it 3 coats of UTEE for a good thick glaze. Whilst the UTEE was hot I sprinked on silver glass glitter and little stars. Then edged it with Idea-ology silver tinsel.

Added metal key and little star brads from stash as finishing touches.

Thanks so much for visiting - I genuinely appreciate all the lovely comments you leave me.

Have a Happy Day!

Nicola x

I wish to enter card to the following challenges:
Artistic Outpost December Referral - Anything Goes using AO
Vintage Stamping Challenges - Cold and Frosty Colours
Stamping Sensations - Free and Easy
Country View Challenges - Bah, Humbug!
Simon Says Stamp Wednesday - Anything Goes
C.R.A.F.T. - Use Metal / Add a charm
Kaboodle Doodles - Start of Winter
QKR Stampede - Starting to Look a lot like Christmas
Everybody-Art-Challenge - Winter
Live & Love Crafts - Stardust

Friday, 29 November 2013

All Wrapped Up

Hi there and many thanks for visiting. A very warm welcome too to new followers and a belated 'Happy Thanksgiving' to everyone who celebrates same.

A while ago the lovely Lynne kindly gifted me some canvas printer paper that I had admired on her blog. I held off using it until I saw just the 'right' image. Then a couple of weeks ago I saw a beautiful picture at Nancy's blog here that I felt would be perfect - thank-you Nancy for finding this beauty.


Papers: Bazzill, Papermania, SEI Velvet, Doily and Lynne's canvas paper

Dies: Cheery Lynn Reflections 'Pearl French Flair' and 'Horizon Coved Rectangle'. Simon Says Stamp 'Faceted Snowflake'. Memory Box 'Berry Sprig'. Sizzix Bigz 'Mini Styled Labels'

Sparkle: It is not showing in photo but oodles of Distress Dry Glitter 'Clear Rock Candy' has been added around rim of each layer and main image. Ditto on snowflake, berry sprigs and around sentiment. Edges of cream layer are also versamark inked and then embossed with Sparkle and Sprinkle EP 'Gilded Ivory'. I've frantaged the focal image using Stampendous 'Shabby White' aged embossing enamel

Dry Embossing: The cream velvet paper has been embossed through a Sizzix 'Holly Swirls' folder

Stamping: The stamped sentiment is by 'Cats Life Press'. It's been inked using versamark and then embossed with Ranger 'Queen's Gold' EP

I then tied silk bow using 'Boweasy' and wrapped the gorgeous girl up in luxurious lace, cosy feathers (despite my being allergic!) and other trims from stash. The metal snowflakes are by Nunn Design.

Isn't she lovely?

Wishing all a very happy weekend. Your visits and comments are truly appreciated.

Nicola x


I wish to enter card to the following challenges:
Cheery Lynn Designs - Non-traditional Christmas Colours
Craft Room Challenge - Vintage Christmas
Rhedd and Rosie - Christmas is Coming
Simon Wednesday Challenge - Anything Goes
Crafty Ribbons - Anything Goes With Ribbon
Crafts and Me - Christmas Vintage
Songbird Challenge - Die Another Day
Moving Along With The Times - Girly but NO Pink
A Creative Romance - Vintage Style

Monday, 11 November 2013

'Tis The Season

Welcome to yet another Christmas card post. Thank-you for visiting and a warm hello to new followers.


Stamps: Graphic 45 'Christmas Emporium', Kaisercraft 'Twig & Berry Postmarks' and Artistic Outpost (using snowflakes from 'Snowy Woods' set)

Card / Papers: Bazzill, Neenah, Inkssentials 'Manila' CS, SEI Velvet 'Tomato'

Dies: Spellbinders 'Floral Ovals' and 'Decorative Labels 27', Joy Crafts 'Vintage Flourishes Corner'

Inking: Archival Ink 'Crimson', Sparkle & Sprinkle EP 'Japanese Lacquer' and 'Gilded Ivory', Versamark, Delicata Golden Glitz, Ranger 'Queen's Gold' EP, Embossing Antiquities 'Weathered White', Stickles, Frantage 'Shabby White'

Ribbons: May Arts (tied with Boweasy) and velvet from stash

Embellishments from stash and completed by adding Distress Glitter in 'Clear Rock Candy' to parts of little girls' outfits and Santa's beard (not showing up very well in photo).

Thank-you for spending time at my blog - I'll be catching up with blog visits later today.

Nicola x

I wish to enter card to the following challenges:
Vintage Stamping Challenges - Traditional Christmas Time
Vintage Udfordring - Vintage Jul
Crafty Hands Challenge - Vintage
Simon Says Monday Challenge - Got Ink?
Sugar Creek Hollow - Anything Vintage Goes
Crafty Little Fairies - Christmas in November
Stamping Sensations - Christmas
Deep Ocean Challenge - Winter

Wednesday, 30 October 2013

Joyeux Noël

Hello and welcome! I'm well and truly into Christmas production mode now - they certainly are my favourites to do.


Stamps: Artistic Outpost 'Snowy Woods' set

Papers: Maja Design, Pion Design and French book text

Dies: Mini trees and deer by Tim Holtz / Sizzix. Postage Stamp by MFT Dienamics. (The stamp 'frame' is triple layered for dimension).

Inking: Distress Inks ('Vintage Photo', 'Tea Dye', 'Walnut Stain', 'Brushed Corduroy'). Prima chalk edger 'Branch Bark'. Ranger Archival Ink 'Coffee' and 'Red Geranium'. Versamark. Stuart Gill Clear EP. Embossing Antiquities 'Weathered White' EP. Frantage 'Aged Ivory' embossing enamel. Glossy Accents. Crackle Accents. Gesso. Snow-Tex. Inkssentials white pen.

Punch: Woodware

Embellishments: from stash

I hope this post finds you all well and warm. I'm sending a special Get Well wish to dear Anne. May my pals in UK not have suffered too many ill effects of storm.

Thank-you so much for your visit - it's a pleasure to have you stop by.

Nicola x

I wish to enter card to the following challenges:

Artistic Outpost - October Referral Programme
Simon Says Monday Challenge - Anything Goes
Simon Says Wednesday Challenge - Anything Goes
Christmas Card Challenges - Bows
Christmas at Sweet Stamping Challenge - Cards for Men
It's All About The Vintage - Use at least 3 stamps
Flourishes Tuesday - Plaid/Houndstooth (on one of trees)
ABC Christmas Challenge - V for Vixen (Reindeer)
Rhedd and Rosie Challenge - Anything Goes

Tuesday, 15 October 2013

Angel Rays

Hi there! Thank-you for stopping by and a warm welcome to new followers. Well I just can't put away all the Christmassy sparkle and glitter...


Stamps: Tim Holtz 'Joyful Song', Various script, music and map stamps for background paper. Sentiment by Crafty Individuals.
Stenciling: Tim Holtz 'Rays'. Wendy Vecchi Metallic Gold embossing paste. Stampendous Gold crushed glass glitter.
Inky stuff: Gloss paper inked with a mix of DIs 'Weathered Wood', Broken China' and 'Tumbled Glass'. Stampendous Frantage in 'Shabby Blue'. Delicata 'Golden Glitz'.
Embossing folder: Tim Holtz 'Snow Flurries' texture fade. Embossed areas inked with Versamark using brayer and then heat embossed randomly with embossing powders (Ranger 'Queen's Gold' and WOW 'Opaque Bright White').
Embellishments: Metal snowflake by Nunn Design, Silk ribbon by May Arts tied with 'BowEasy' and little stars from stash.

Today's post has to be short and sweet!

Many thanks again for your visit - I appreciate each and every one!
Nicola x

I wish to enter card to the following challenges;
Fashionable Stamping Challenges - Use a mask or stencil
The Cheerful Stamp Pad - Let's Stencil
Simon Says Stamp Wednesday - Use a stamp
Bunny Zoe's October Challenge - Ribbon