Showing posts with label Maja Design. Show all posts

Saturday, 12 April 2014

A Little Blue Egg

Hi there! It’s a record for me - three posts in three days so thank-you so much for popping by again! I certainly have been busy and it has been a great compliment to be invited to do so many Guest Design slots.

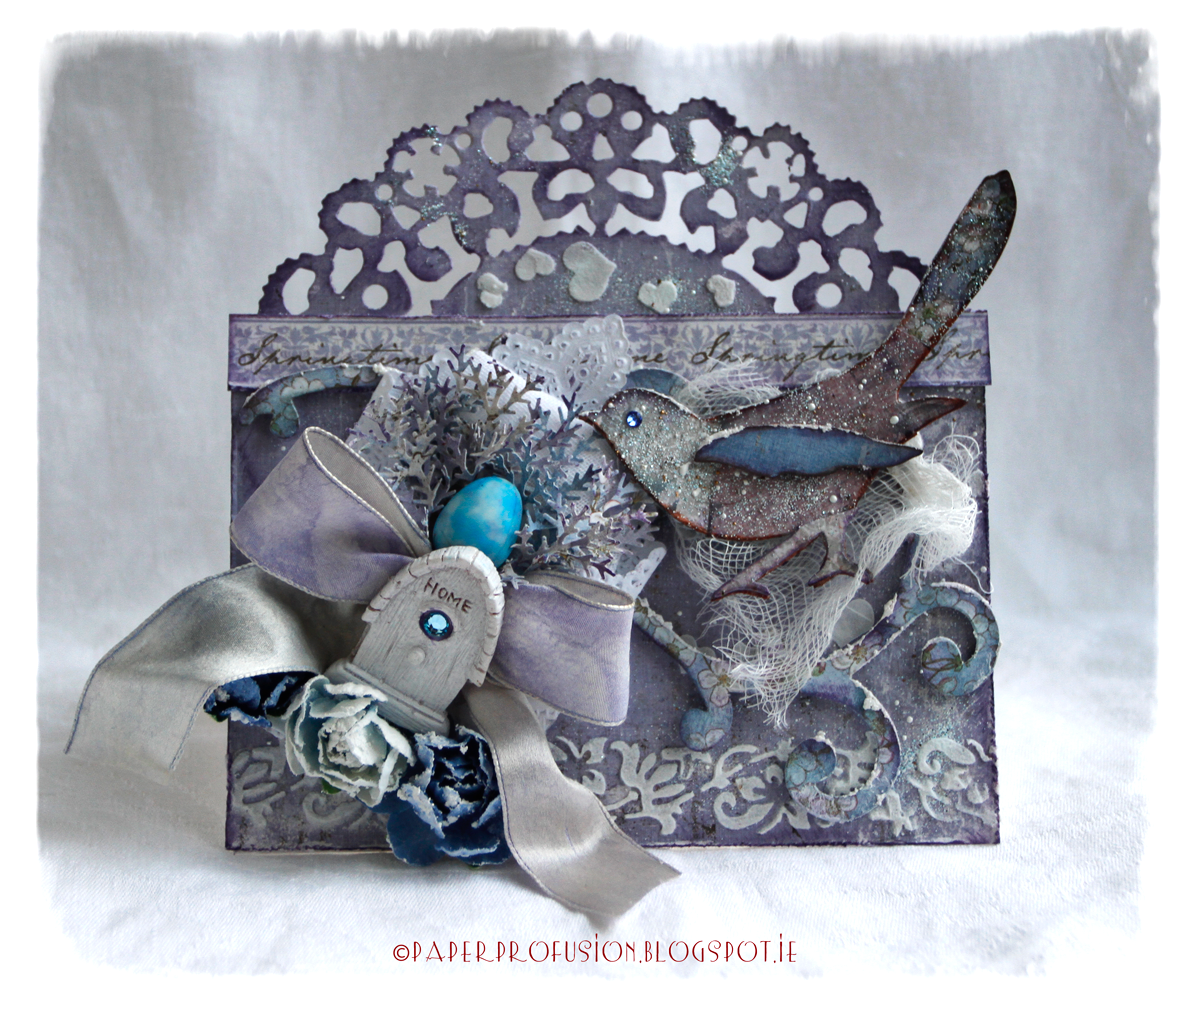
Today I’m really happy to have been selected to enjoy the guest design limelight at one of my favourite challenges - the always pretty Sugar Creek Hollow. Their current challenge theme is ‘Easter’. I was going to go with traditional yellow shades but just couldn’t put down these gorgeous lilac and blue papers so have ended up with more of a gentle lavender Easter! I think that blue egg is going to hatch any day now!


Papers: Maja Design ‘Vintage Spring’ collection

Dies: Sizzix Bigz ‘Bird Scroll’ and On-the-edge ‘Vintage Doily’

Stencilling: Crafty Individuals and Heidi Swapp stencils using Wendy Vecchi texture paste

Distress Inks: ‘Weathered Wood’, 'Dusty Concord'

Other: Frantage ‘Shabby Blue’, paper doily, cheesecloth, gems, Prima resin bird-house, flowers, punched branches and hand dyed silk ribbon

Sincere thanks to all at Sugar Creek Hollow for kindly inviting me to Guest Design. Be sure to check out their challenge for some of the very best vintage / shabby chic talents in blogland.

Thank-you so much for visiting and taking the time,
Enjoy the rest of your weekend.
Nicola x

I wish to enter card to the following challenges:
Craft for the Craic - Easter or Spring
Crafty Individuals - Nature's Beauty
The Ribbon Girl Challenge - Spring
Simon Says Wednesday - Easter / Sweet Treats
It's All About the Vintage and Beauty - Shabby Chic
Moving Along With The Times - Easter / Spring
A Creative Romance - Eggcellent Spring
Inspiration Journal - A Few of my Favourite Things

Thursday, 10 April 2014

Flights of Fancy

Hello and Welcome.

Today I’m delighted to be guest designing with the wonderful Frilly & Funkie Challenge as I won one of their recent challenges for my card here. Their current challenge theme is ‘Flights of Fancy’, (to include wings and inspired by the onset of Spring), so my card shows lots of butterflies and a little bird waiting for her eggs to hatch.


I was most fortunate to win a very generous giveaway of Maja Design papers from the lovely Jenny so I'm happy to be properly taking them out to play. All the papers used are from the gorgeous Maja ‘Vintage Spring’ Collection.

Here is a side shot so that you can better see the box like nest. I’ve used the Sizzix scalloped envelope die and then threaded through some cord to pull the sides together. The nest is lined with frilled ribbon, moss and various punched branches and diecuts and some nice candied eggs.


Papers: Maja Design ‘Vintage Spring’ Collection

Dies: Sizzix Bigz ‘Scalloped Envelope’, ‘Pocket Watch’ and ‘Sized Circles’. Magnolia ‘Heart Flourish’. Cheery Lynn ‘ Mini Fanciful Flourish’

Punches: Martha Stewart ‘Branch’ and ‘Vintage Lace’ edger

Distress Inks: Weathered Wood, Bundled Sage,Tattered Rose

Flowers: Wild Orchid Crafts and Jeans

Thank-you so much to all at Frilly and Funkie for allowing me feature at their blog today. If you aren’t already familiar with the challenge then you really should check it out for superb inspiration, excellent tutorials and a great challenge with chance of prize.

As always, thank-you for stopping by – all your visits, comments and followings are truly appreciated.

I’ll have another special post for you tomorrow so I do hope to see you back again soon.

Nicola x

I wish to enter card to the following challenges:
Country View Challenges - New Beginnings
It's All about the Vintage - Shabby Chic
Simon Wednesday - Happy Easter / Sweet Treats
Crafty Hands Devon - Anything Goes
Moving along with the times - Easter / Spring
Craft for the Craic - Easter or Spring
Inspiration Journal - A Few of my Favourite Things

Sunday, 16 March 2014

Goin' on a trip? Pack your bags!

Hello and thank-you for your visit. A warm welcome too to new followers.

As you might know my favourite style is vintage, usually done with some prettiness. The challenge at exciting new blog A Vintage Journey requests anything vintage with a strong hint of Maestro Tim Holtz (TH). As the mega talented DT sets forth on their journey I thought it appropriate to alter some suitcases for them. So for a change ... here's some grunge and a warning for a verrry long post...


I started off with some papier mache suitcases. Ages ago the lovely Alison sent me a package all beautifully wrapped up in TH's tissue wrap. I've collaged this tissue wrap all over each case. There then followed a brown and black marathon using TH distress inks, stains, paints, stencils and stamps. I particularly had fun using the splatter brush (by Liquitex) that TH has used in recent videos. It wasn't so much fun though cleaning up afterwards! When I decided that enough layers of ink etc. were on I added a crackle layer to make sure that cases looked even more battered.


I love the Idea-ology pieces that TH has designed. On the outside of the cases I've used TH box corners, hitch fasteners and ring fasteners. The larger suitcase has a TH ornate plate on the front. I recently won an amazing Maja Design giveaway from the lovely Jenny and I've cut out some words from one sheet to go inside the plate that is then topped up with glossy accents.


I know it's an anachronism but given that TH designed pulley wheels I thought it would be fun to have wheels on the cases. I didn't have ones by TH so I've devised my own. They are made from miniature wooden spools. Painted the inner areas black/brown and the 'wheels' copper. I rummaged through some of my late Dad's old toolkits and found screws, nuts and other metal bits that I don't know the name of but once I had 'rusted them up' with Adirondack alcohol ink and distress EP they looked perfect for the cases.


TH box corners come in a worn sort of pewter colour. I needed to change them to an aged copper so I inked them with versamark and added variously copper and black EPs. To achieve the greeny patina I dabbed Pearl-ex blue/green powder into the melting EP mixture. (This 'aging' has been applied to all the metal elements).


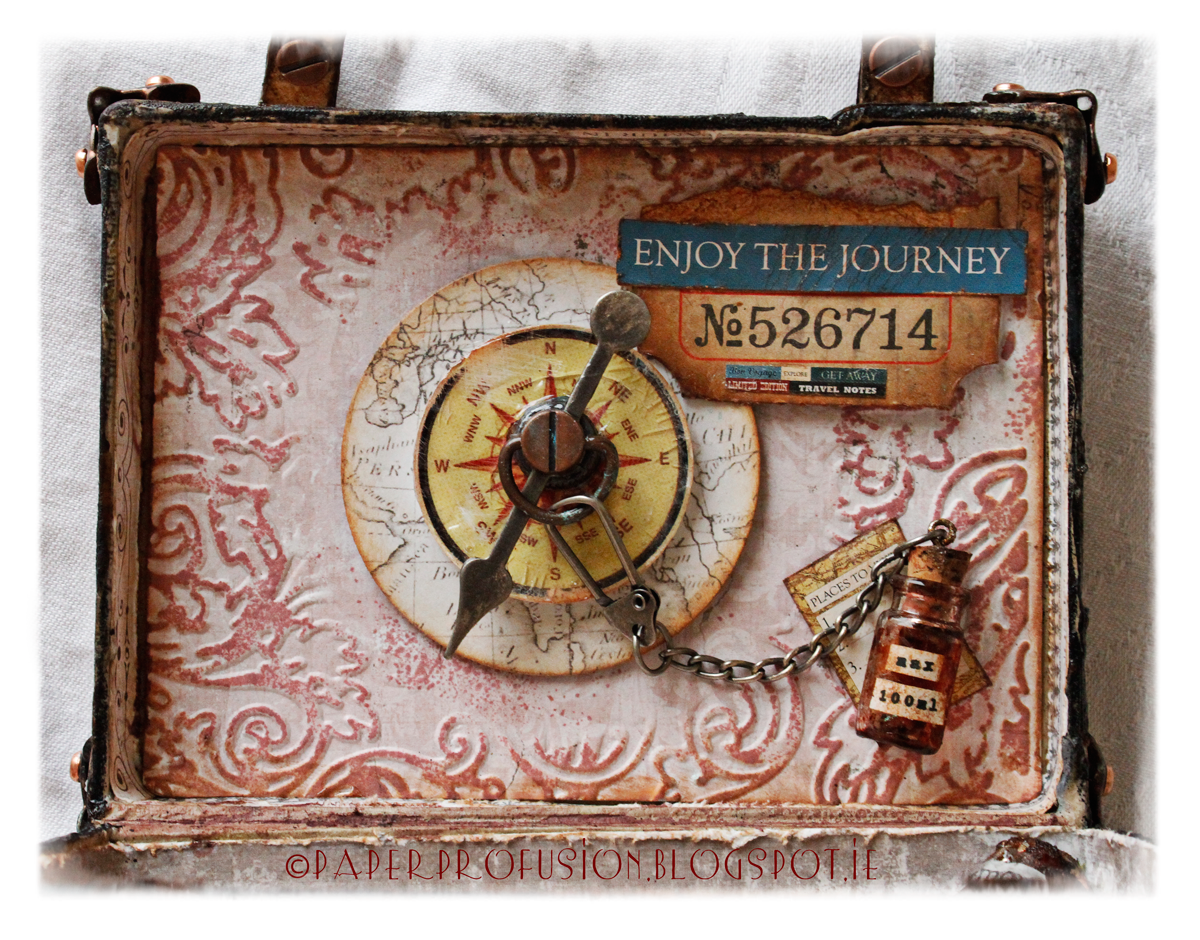
Some welcome relief from the dark hues comes inside each case. I've lined the insides with some of the gorgeous Maja Design papers and borders that come at the end of each 12 x 12 sheet. As I'd already used lots of TH stamps on the outside I decided to use one of his texture fades to emboss the inside lid and finally made use of the TH circular embossing diffuser to 'frame' my globe and compass. Then brayered over some DI for emphasis. A TH game spinner, ticket and a hitch fastener are also used. I spent a lot of time making that water bottle grimey! I've labelled it to remind owner of the current airline restriction levels for liquids in carry-ons!


Now you all know TH is famous for his tags and brilliantly educational monthly tag challenges. So I just had to include a tag! The thing is, I've never done a TH 'monthly tag'. I thought I should remedy this and so have included my take on TH's March tag inside the larger case. I hope this format (and resized tag) is ok to enter to his challenge. I don't yet have the really fab nest stamp set or the spritzer tool so I've improvised. Thank-you to generous Geraldine for her beautiful gifts last week including the TH bird branch stamp and some other items included in project.

The egg is from a M&S candy & chocolate eggs packet. I set aside a green egg and as I crafted I ate the rest of the packet. Next thing was I had a brainwave that I should add more speckle to the egg so I proceeded to splat brown paint at it. It looked great! I needed to dry one side so that I could splatter the rest of the egg, so I began to dry the egg with my heat gun. All of a nano-second the poor egg suffered a catastrophe ... the chocolate turned to liquid and the candy disintegrated into a pooled mess! The next day I had to dash to M&S for another packet of eggs ... no splats this time!! I thought that the TH light bulb would co-ordinate well with his rays stencil. Same stencil is also used on outside of top lid of case. I've made nest with dried moss and shredded paper. I cut a small circle in the tag and inset the little nest into it. (For info: the nest is mostly inked with one of Wendy Vecchi's new ink shades - 'Tree Branch').


The label plate on the smaller suitcase is by Artemio with insert a cutout from Maja Design. I tried out black brads in the metal elements but considered them too dark so have put in shiny copper ones instead. By the way, if you look at left hand corner of luggage tag below you can see the initials of the owner!


For the 'leather' straps I used SEI velvet paper that I fairly well battered, smudged and sprayed to get it worn looking. I also machine stitched along the centre of each strap for further texture.


I attached a luggage tag and charms to each case with TH swivel clasps. Collaged each tag with cutouts from G45 / Echo Park 'Photo Freedom' kit, then sanded and aged with DIs before coating with crackle.


For the inside of the smaller case I've used TH's new decorative strip 'Butterfly Frenzy'. The lid part is decorated with the little die cutouts along with some balloon cutouts from beautiful Maja Design papers. I painted and glittered (Clear Rock) some chipboard letters too. I've followed the very creative Candy who often uses 'Mercury Glass' stickles for edging. (Sorry for photo quality but I couldn't hold open and snap the small case sufficiently to get a decent photo).


I've used the remaining part of 'Butterfly Frenzy' on the lower portion of case. Also stamped TH stamp on paper using Wendy Vecchi new 'Hydrangea' colour in case you are interested in shades.


Finally, here is a rear view to show you those lovely TH hinges that I've given the aged copper treatment to.


Thank-you so much if you've read through all this lengthy post. I've spent ages on this piece through the week so apologies for not visiting as much. I hope to catch up tomorrow.

Have a lovely week,
Nicola x

I wish to enter cases to the following challenges:
A Vintage Journey - Anything Tim
Simon Monday Challenge - D is for Distress
Craft Hoarders Anonymous - Vintage or Retro
Tim Holtz - 12 Tags of 2014 - March
Vintage Udfordring - Sewing (Machine stitching is on 'leather' straps)
Inspiration Journal - A Splash of Colour
Rhedd and Rosie Challenge - Aged / Distressed
Rhedd's Creative Spirit - Altered Art March
Country View Challenges - Paper Chase
Art With Heart Challenge - New Beginnings (for AVJ)

Wednesday, 19 February 2014

Handmade Bouquet

Hi there and welcome. It's a gorgeous sunny day in Dublin - just perfect for my card today.

Prompted by the current challenge at 'Frilly & Funkie' I've finally sprung some of my flower dies to action. I've borrowed the card style from the wonderful Dorota whose blog I love. I havn't come near her standards but it's a start!


Ingredients:

Papers: Maja Design 'Vintage Summer Basics' and some Indian handmade cotton / tissue papers for alternative texture and smaller buds

Dies: Joy Crafts - '6002-0156', MFT 'Rolled Scallop flower', 'Mini Rolled Roses', 'Mini Royal Roses', Magnolia 'Rose Leaf', Cheery Lynn ' Mini Fanciful Flourish' and Spellbinders 'Fancy Trelllis'

Inks: Distress Inks - 'Worn Lipstick', 'Victorian Velvet', 'Tea Dye', 'Brushed Corduroy' and some Bobby Brown blusher

Mists and Drops: Perfect pearls mist, Waco Pearl Maker Pen for drops and Snow-Tex

Stencil: The Crafter's Workshop 'Damask' using Wendy Vecchi texture paste

Other: Used my new sewing machine from Ikea that's a little humdinger so far. Pearls and lace from stash.

Thank-you to the lovely Jennie for her terrific flower tutorials. I followed her instructions here for the flower on extreme left and am very pleased with result (a rare event!).

Thank-you so much for visiting. May the sun shine on you too!

Nicola x

I wish to enter card to the following challenges:
Frilly & Funkie - Bloomin' Marvellous
Vintage Udfordring - Use paint, spray and or drops
ABC Challenge - F is for Flowers
The Crafter's Cafe Challenge - Vintage or Shabby Chic
City Crafter Challenge - Flowers and Lace

Monday, 27 January 2014

Vintage Sewing Themed Drawer Cabinet

Hello and Thank-You so much for visiting. I'm sorry to have been absent from blogging recently... I'll try to catch up with you all soon.

I smiled when I saw the challenge theme "Shopping Sins" at Our Creative Corner this month; there are three things for sure in my life; death, taxes and overspending!

So having been away from crafting for most of this month I've spent the last few days working on today's piece in my favourite vintage style. I'm mortified to have so many long unused items in my stash - the main contenders here were some Kaisercraft mini drawers, several uninked sewing themed stamp sets and a few untested crackle mediums.


Re wooden part of mini drawers: Painted all the wooden parts first with gesso, then PaperArtsy 'Snowflake', followed by PaperArtsy 'Old Gold'. I had bought some crackle products to try and improve on efforts to date - glad to finally put them to test. I like result from Decoart One Step Crackle (you can see on gold pediment). My first choice however goes to Kroma crackle - you can see its lizardlike results on the front part of cabinet. Some of the more thickly crackled areas are where I have done a double coat of crackle to experiment.

Re little drawers: All the hidden drawers are painted with PaperArtsy 'Ice Blue' followed by a coat of 'Metallic Glaze'. I tied string around each drawer when gluing its sides to keep them together whilst the glue set (rather fiddly). Opened packaging on my Krylon gold pen to gild the edge of each of the drawers - I like result so will use this pen a lot!

Decorative fronts and sides: The lovely papers are from Maja Design 'Vintage Summer Basics' collection. The drawer fronts were all punched out, stamped and gold embossed with several images being double foam mounted. I've added lots of sewing themed paraphernalia. The stamps used throughout piece are from Crafty Individuals CI-328 (first use) and CI-306 (both following Laura's inspiration), Chapel Road Artstamps "Sew Much to Do" and Studio 490 Wendy Vecchi "Art By Hand" (again it's first use).


The left side of cabinet shows a seamstress hard at work.

Feet and Pediments
You'll also have noticed the cabinet feet and pediment. I die cut two layers of chipboard (by 4) for the feet using Sizzix Bigz Ironworks die. Made sure all the fleurs-de-lis were same height and glued each twosome together and then painted with Fresco 'Old Gold' followed by 'One Step Crackle'. I used loctite glue to hold these in place for a fast glue result. They are holding very solidly. The pediments at the top are also diecut from chipboard using Sizzix Bigz On-The-Edge 'Ornate'. The lower white one is Fresco 'Snowflake' coated with Kroma crackle to see how the crackle would look without a gold paint layer below.


The cabinet rear is also stamped and embossed with some machine stitching too. Santa brought me a sewing machine - I'm pleased to be finally trying it out!


The right side of cabinet shows the mannequin in use by this particular sewing establishment - again cut from chipboard using Bigz 'Sewing Room' die, painted as before and dressed in some finery


Finally, a close up of the cabinet top:


A word of thanks too to May, Cathi and Alison who all provided some of the ingredients used in this piece.

Thank-you so much for stopping by and enjoy the rest of your week,
Nicola x


I wish to enter cabinet to the following challenges:

Our Creative Corner - No more shopping sins (Guilty as accused!)
Vintage Udfordring - Use Dies and/or Punch
The Ribbon Girl Challenge - Anything Goes
Allsorts Challenge - Vintage
It's all about the vintage - Embossing
Fussy and Fancy Friday - Vintage
Sugar Creek Hollow - Fibres & Texture
Stamping Sensations - Ribbon, Buttons and Bows
Sweet Stampin - In Stitches
Bunny Zoe's Crafts - Stitching
Inspiration Emporium - Diecuts and Punches

Thursday, 9 January 2014

A Shot of Blue

Hi there and welcome! A short post as I'm afraid I'm struggling getting 'into production mode' at the moment.

The current challenge at Simon Says Stamp Monday is "Blues". This brought to mind a card I made last November but haven't posted. I made it for the lovely and talented Anne who you might know had sustained a nasty hip injury.


I was glad to hear from Anne that the crutches and syringe embellies made her chuckle!

Stamp and Stencil: Crafty Individuals (can't recall make of sentiment stamp)
Papers: Maja Design "Vintage Summer Basics"
Dies: Spellbinders and Joy Crafts
Inks: Ranger Distress and Archival Inks
Embellishments: Stampendous Frantage. Silk ribbon by May Arts. Metal charms by Karen Foster and remainder from stash

Thank-you all most sincerely for your kind visits and comments.

Nicola x

I wish to enter card to the following challenge:
Simon Says Stamp Monday - Blues


Monday, 25 November 2013

Let The Bells Ring - Spotlight at 'Crafts-Too Challenge You'

Hello and Welcome!

Recently I was thrilled to be selected in the Top 3 over at 'Crafts-Too Challenge You' blog and am delighted to accept their kind invitation to feature today in their Spotlight post.

Their challenge theme this month is 'Vintage Christmas' with the current twist being 'polychromatic' - meaning multi-coloured. I've adapted a Melissa Frances chipboard 'large church/house' for my spotlight piece. Here it is:


My three main colours are gold, blue and red. I've used all Scandinavian papers (By Inkido, Pion Design and Maja Design) as they have the perfect vintage look. The lacy roof is made using a Cheery Lynn die and the roof papers are sprayed with a Perfect Pearls mist for a frosty look. The little windows are painted with PaperArtsy 'Nougat'. The whole project has been liberally treated with Melissa Frances crushed glass glitter, Snow-tex and Mica Flakes. The eaves are painted with PaperArtsy 'Old Gold' before being wrapped in paper and speckled with glitter.


The surrounding fence has also being painted and then stenciled using Crafty Individuals mask and Dreamweaver paste. When dry I coated the fence with multi-matte medium, somehow the chemical interactions have produced a greenish tinge in parts - but doesn't that all add to the vintage feel! All the church/house edges were inked with Versamark and then embossed using my favourite Ranger's 'Queen's Gold' EP. I've hung some bells in the belfry so that they can ring out on Christmas morning! The spire was stencilled using a Crafter's Workshop 'damask' stencil, painted and then gold embossed. The same stencil was used on the doors - can you see Santa peeking out from one door? Idea-ology ring fasteners make really cute door knockers too.


I gilded a cocktail stick and attached a Moon diecut (Sizzix / Tim Holtz) and stamped/embossed sentiment (Artistic Outpost). There's also a lot of script type stamping on the 'ground' area but as usual I've gone and covered most of it up! I also ran a ribbon trim around the 'ground' edge. The little Christmas Tree has been gilded and frantaged (thank-heavens I noticed the smoke before it turned to flame!) and dotted with pearls.

It took a lot of careful training to coax those dashing reindeer to slow-down and stand 'unaided'! Added a selection of embellishments, tossed on even more glitter and stickles for good measure and afixed to the Idea-ology box feet that I had rubbed with some Treasure Gold to warm up. The whole piece sparkles fabulously in artificial light so I'm looking forward to seeing it on display at Christmas!

Very many thanks to 'Crafts-Too Challenge You' for generously allowing me feature - why don't you pop over and join in with their fantastic challenge blog.

Thanks so much for stopping by,
Have a lovely week,
Nicola x

Thank-you to the hosts, sponsors and design teams at the following challenges that I wish to enter:
Frilly and Funkie - Christmas Preparations
Vintage Udfordring - Christmas
Fashionable Stamping Challenges - Shabby Chic Christmas
Rhedd and Rosie Challenge - Christmas Is Coming (with key items)
Stamping Sensations - Christmas
A Creative Romance - Vintage Style
Allsorts Challenge - Bring On The Bling
Crafty Hands Challenge Blog - Sparkle and Bling
Vintage Stamping Challenges - Traditional Christmas
Bunny Zoe's Crafts Challenge - Shabby Chic / Vintage

Monday, 23 September 2013

Tea for Two

Hello and welcome! Thanks so much to all the lovely ladies who have signed up recently to follow.


Papers: Maja Design 'Vintage Summer Basics'.
Stamps: Hero Arts and Wendy Cotterill.
Inks and Powders: Ranger Archival (by Wendy Vecchi) 'Cornflower Blue', Archival 'Rose Madder', Versamark and Stampendous Clear EP. UTEE on the tea china. Ingvild Bolme Chalk Edger 'White'. Stampendous Frantage in 'Shabby white, pink and blue'. Roses dabbed with 'Snow-tex'.
Embellishments: Doily available here. Spoon charm available here. Flowers and lace from stash.
Dies: Cheery Lynn 'Mini Pearl French Flair' and 'Horizon Coved Rectangle'. Spellbinders 'Romantic Rectangles'.
Vintage Image: Many thanks to 'History in Photos' Blog.
Template for side step card: Many thanks to 'Bubbly Funk'.

The little details:

This card took quite a while to get together! It is my first attempt at a side step card so it took a little practice. Also, distressed inked edges and 'aging effects' were abandoned in favour of clean lines with slightly chalked white rims. The papers and photos were frantaged.

The china tea cups took a few tries because I didn't have all of the necessary ingredients ... I followed the wonderful Sherry Hickox's tutorial for 'Faux Crazed Porcelain'. I tred to subsitute with products I had but couldn't achieve clean stamped images. In the end I skipped the element of crackle paint on board and instead stamped onto white specialty paper, coloured in the flower petals using watering pen, heat dried and fussy cut out. Then gave them two coats of UTEE treatment. I adapted the 'faux' technique by popping the UTEE'd china into the freezer for 5 minutes. I then snapped each so that they have 'faux' cracks.

It's a beautiful sunny and mild day here in Dublin. I hope the sky shines on you wherever you are.

Finally, don't foget about your chance to win my 1st Blogaversary Candy - please click here.

Nicola x

I wish to enter card to the following challenges:
Frilly and Funkie - Eat, Drink and Be Merry
Inspiration Journal - Falling for Faux
Vintage Udfordring - Folding Techniques
Live & Love Crafts - Inspiration Collage (using pink roses)
Crafting Musketeers - Vintage
Crafts 4 Eternity - Cute Kids
SSS Wednesday - Use a product from SSS - UTEE
Cherish This - Memories for Life - Åpen utfordring

Wednesday, 21 August 2013

For The Newlyweds!

Greetings from Dublin! Firstly, thank-you all so much for your very kind welcome back and good wishes to my last post. Secondly, a warm welcome to the lovely ladies who have signed up recently to follow. Finally, I have yet another wedding card to share! It's going to a couple very dear to me who are getting married this Friday.


There are a few challenges at the moment with themes of 'words' or 'sayings'. In making this card, those challenges made me ponder weddings and come to realise that a vital element to every wedding (after the Bride and Groom of course) is the exchange of vows i.e. words are key. So I typed some vows, stamped and embossed script and used some paper with text thereon.

The paper at the top third is by Maja Design - I've stamped it with a La Blanche script stamp (1174) using 'Tea Dye' DI.

The paper on the lower two thirds is from Prima 'Fairy Rhymes' collection. I first embossed it with Cheery Lynn 'Petite Hearts' embossing plate and then edged it with a Cheery Lynn border 'City Girl Edger'.

The 'central' die cuts are done with Sizzix 'Majestic Labels' dies. One is cut from handmade paper and the second is cut from 7 Gypsies 'Trousseau' collection. I embossed both using Cuttlebug 'Script' embossing folder and did my very best to line up the script on both! Edges are tipped with 'Tea Dye' DI.

Printed out in a sepia shade vows and names on the Prima paper. Distressed edges etc with 'Tea Dye'. Then positioned the Melissa Frances floral resin frame having first applied some 'Tea Dye' ink and Treasure Gold to the frame to warm it up a little.

Put it all together and added some ruched ribbon peeking out at the base, and frilled ribbon at the top (that i had carefully sized my typed vows to). Layered it all up too with lots of lace and pearls. Die cut two Magnolia 'Heart Swirls' from the 7 Gypsies paper for even more subtle detailing. Finished with some pearl embellishments and a bow of pearl string.

Thanks so much for visiting. See you all again in the middle of next week when 'normal' blogging services should resume. I'm heading tomorrow to the West of Ireland for a break and to celebrate a wedding!

Nicola x

Thank-you to the hosts and DTs at the following challenges that I wish to enter:
Our Creative Corner - Words, Words, Words
Country View Crafts - Quotations and Sayings
It's All about the Vintage and Beauty - Summer Flowers
Paper Crafting Journey - Distressed/Vintage
My Time To Craft - Aperture
Papertake Weekly - Flower Power
'ABC' Challenges - Lots of Layers
TokBobok - Vintage
Aud Sentiments Challenge - Anything But a Birthday Card
Kort o Mania - Flowers

Tuesday, 18 June 2013

Little Bird Blue

Hello and thanks so much for stopping by.

My last project was made several weeks back so I am feeling relieved that I've produced a card today as I feared the ability might have disappeared! I've made this card to fit a few different challenges running at the mo. At Frilly & Funkie the challenge theme is Birds and Nests, both Simon Says Stamp & Show and Cheery Lynn Designs are running Kraft themed weeks and at Sugar Creek Hollow the lovely ladies there want us to incorporate mixed media. Serendipitously the new Mum that the card is going to was born in the month of March so this fits the Live & Love Crafts Birthstone theme with aquamarine.


The papers used are by Maja Design (It's Christmas Time and Vintage Summer Basics Collections). I painted the base layer with some Paper Artsy paints ('Snowflake' and 'Ice Blue') to give the impression of clouds. The 'Mummy' bird is die cut (Sizzix Bigz) from corrugated cardboard and some of the twigs are punched from Kraft paper - thereby meeting the 'Kraft' requirements. The longer branches are cut using a Memory Box die.

The nest is handcut from a cardboard nectarine holder which was perfectly curved for the nest shape. I've decorated it with muslin and burlap but then ended up covering most of that with feathers and diecut leaves (Marianne Design) and punched twigs (Martha Stewart). In order for the nest to 'sit into' the card I die cut a 'frame' shape that had just the right curve (Sizzix Majestic Labels die). Then double 3D mounted those two lower 'frame' layers so that they popped out sufficiently to hold the nest. The outer edges of the two lower panels are cut with Cheery Lynn's 'City Girl edger' - this is perfect to thread narrow ribbon through for extra decoration.

I distressed and hightlighted most edges with either Distress Ink ('Broken China') or Chalk Ink by Ingvild Bolme ('Dark Rust'). The latter is brilliantly shaped for edging. Also ripped into some of the base layer and tucked some lace underneath for pretty distressing.

Added the newly hatched chick (Memory Box) and placed some gems that Mummy was feeding having given her a nice feathery wing. Liberally applied frantage and colour fragments. (Wasn't it lucky that Stampendous make colour fragments in just the right shade of duck egg blue so that they match a broken eggshell!).

Added a frill underneath the nest and a bow and 3D sentiment to the top left. Completed with eyes for the birdies and gems at the corners.

Thank-you for visiting today - it is lovely to have your company!

Nicola x

I wish to enter card to the following challenges;
Sugar Creek Hollow - Mixed Media
Frilly and Funkie - Birds and Nests
Cheery Lynn Designs - Keep It Krafty
Simon Says Stamp and Show - Kraft
Live & Love Crafts - Birthstones (Aquamarine)

Friday, 3 May 2013

The Scissors

Hello again. Thank-you so much for your visit.

I'm tight for time today so will keep post short. I needed to make a card for a lady who is setting up a new hairdressing salon. Wasn't sure what to do but the inspiration photo at The Shabby Tea Room this week gave me lots of ideas. Here is my card:


This is The Shabby Tea Room photo:


The background paper provides a mirror shape (to echo the glass jars in photo and of course perfect for a hairdressers). I've used some Spellbinders dies for the layers including one from the new Imperial Gold series. I think that using the recommended Junior Magnetic Placement Mat really does make a difference when using this die. The outer swirls are from a Memory Box die. The papers are by Melissa Frances (5th Avenue) and Maja Design (Vintage Summer) and some Bazzill cardstock. I've inked most edges with Distress Ink in 'Victorian Velvet'.

The scissors charm should suit for hairdressing! It's available at The Funkie Junkie Boutique. I've attached a little metal tag that says Congrats. I lightly sprinkled / melted some Frantage for some pretty bling and completed with some flower embellishments (available from Cottage Crafts).

Thank-you for stopping by and huge thanks in advance for any comments that I am lucky enough to receive.

Wishing all a lovely weekend.

Nicola x


I wish to enter card to the following challenges;
The Shabby Tea Room - Beautiful Spring
Vintage Cafe Card Challenges - "Your Inspiration"
The Perfect Sentiment - Make It Feminine
Crafty Ribbons - Anything Goes With Ribbon
Happy Campers - Use Lace
MilkCoffee Challenge - Lace and Pearls

Tuesday, 30 April 2013

Spring Dressforms

A cheery hello from Dublin. I appreciate your visiting.

This was one of those cards where Plan A didn't work out at all, at all! So I'm very glad that several reconfigurations later I finally have a card to post...


I've used papers from Maja Design (Vintage Summer Basics) and all the stamping is on Ranger Speciality Stamping Paper. I had thought that I would give the dressform wings so that it was like a 'flying dressform' - but no way was this working out!

I cut dressform with Tim Holtz die and mounted on chipboard. Stamped it with Distress Inks using Crafty Individuals stamp set CI-226 'Wild Flowers'. Next stamped and embossed (Ranger Queen's Gold EP) Crafty Individuls stamp CI-357 'Springtime Robin' - I think this stamp is intended as a bookmark but I'm considering it a dress! I've coloured it in with DIs using a Tim Holtz waterbrush. The bird, butterflies and text on the dress are 'paper pieced' and raised on sticky pads.

I also stamped a large sheet with a colourful range of DIs using the CI-226 'Wild Flowers' stamp set and then diecut and punched into lots of butterflies. Then stamped and embossed clothing articles from Crafty Individuals stamp set CI-306 'French Corsets' and coloured them in using Tim Holtz water brush and DIs.

I bought the water brush from The Funkie Junkie Boutique and so wish to enter card to the Frilly and Funkie Sunday Share.

Gilded most edges with gilding wax and left them to dry overnight. All elements of the card are mounted with foam to add dimension. The two circular dies are by Cheery Lynn and Noor Design. I've also embossed the outer circle with a Cheery Lynn circular stitching plate.

That's It - hope you like! Enjoy the rest of your day.

Nicola x


I wish to enter card to the following challenges;
Crafty Individuals - Spring In Fashion
Country View Crafts - Butterflies
Fashionable Stamping Challenges - Sentimental ("Song of Spring")
Simon Says Stamp - Anything Goes
Love To Create - Punches and/or Dies
Dream Valley Challenges - Things With Wings
Sweet Stamping Challenge - Anything but Birthday

Thursday, 25 April 2013

Springtime Birdie

Greetings from Dublin! So glad to have a card once more to share. Thank-you all for your kind good wishes on my last post - my Mum is improving as each day passes. I hope to catch up with more of your blogs over the coming days.

I made this card for someone who is starting exams - hence the wise owl on the little tag. I've kept it very muted in a vintage style.


Papers: Maja Design (Vintage Summer Basics collection)
Inks: DI Victorian Velvet. May Arts white leaf trim inked with DI Bundled Sage
Dies: Sizzix Bigz - Bird Scroll (I think my favourite die so far!), Sizzix Framelits 'Majestic Labels', Magnolia 'Old Swedish Lace'. (I also diecut the bird in chipboard to have a chunky birdie)
Embellishments: Kaisercraft, Wild Orchid Crafts, Prima, Tim Holtz. Plus cheesecloth, doily, charm and twine from stash


Thanks so much for visiting,
Nicola x

I wish to enter card to the following challenges;
Live & Love Crafts - Bingo (Cheesecloth, Vintage, Flowers)
By The Cute And Girly - Vintage
Wild Orchid Challenges - Twine
Die Cuttin Divas - Flowers
Kaboodle Doodles - Spring
Creative Moments - Challenge 15 Spring
Simon Says Stamp and Show - Color
Simon Says Stamp - Anything Goes

Tuesday, 8 January 2013

Blue Snowland

Hello and welcome to my Big Shot inaugural post! I officially declare my new toy from Santa as active and much loved already!


I've used Bazzill CS. The beautiful top quality papers are from Maja Design (It's Christmas Time collection). Dies are by Cheery Lynn and Memory Box. I'm just loving how easy it is to create diecuts and the 'extra' punch that they can add (no pun intended!). Distressed the first layer and edged with Antik Metallic paste in silver. I've stamped the forest using stamp by 'Just for Fun' and little snowflakes stamp by Fiskars and embossed them with Stampendous Winter Wonderland EP. I daubed some 'snow' with Adirondack paint dabber and gesso. Added some frantage silver glass glitter. Snowflake punches by Martha Stewart, pearls from Kaisercraft, Bird House by Prima (Ingvild Bolme). Partly distressed the papers and 'house' with Distress Inks.

Thank-you so much for taking time at my blog. I hope that it's warm wherever you are!

Nicola x

I wish to enter card to the following challenges;
Maja Design - January Mood Board
Creative Craft Challenges - New Beginnings
LEJ Designs - New Beginnings
Try It On Tuesday - New Stash
Tuesday Throwdown - Shiny and New

Thursday, 20 December 2012

Merry Christmas Everyone!

Hello and welcome to my last post for 2012 as I've tidied away the craft goodies and am taking a little break. I'm looking forward to getting back into full throttle in January.

I began my blog in September this year. My venture into blogging was a kind of unknown as I didn't know what to expect - I could not have been more happily surprised with how it has turned out. I wish to extend my warmest appreciation for the wonderful welcome that has greeted me and to each and every one who has taken the time to visit. I am amazed at how much I have learned over the past 4 months from you all - your blogs, creations, posts, challenges, design teams and tutorials are an incredible university and a never-ending source of entertainment and inspiration! Heartfelt thanks especially go to those who have posted such lovely compliments and those who became followers - doing so makes you so much more real and your encouragement is what spurs me on.
Instruction does much, but encouragement everything." Johann W. von Goethe.

I'm also THRILLED to advise that my card 'Oh Jingle Bells' will be shown tomorrow (21st) on the wonderful Melissa Frances Blog. I genuinely love Melissa Frances creations and products so to be published on her blog is the cherry on top of this Christmas. Thank-you so much to all at Melissa Frances.

My very first post in September was 'Starting with Santa'. I thought it would be a nice balance to end 2012 using the same stamp. So without further ado - here he is!


Ingredients for my card today;
Papers: Maja Design (It's Christmas Time)
Stamps: Inkadinkado (A Visit from Santa 98223) and Stampendous (Christmas Wishes SSC1068)
Ink: Versafine (Crimson) and papers edged with Encore Metallic in Gold. Edges also distressed with Distress Inks (Brushed Corduroy and Vintage Photo)
Embossing Powder: Sparkle and Sprinkle (Japanese Lacquer) and Ranger (Queen's Gold)
Punches: Edger and snowflake by Martha Stewart
Free vintage images printed onto TAP (Transfer Artist Paper by Lesley Riley) and then ironed onto muslin
Bunting embellishment: Melissa Frances (Countdown to Christmas)
Ribbon: May Arts Silk
Dabs of Stickles Glitter
Everything else from stash

Wishing you a joyous and peaceful Christmas,
Nicola x

I wish to enter card to the following challenges;
The Ribbon Reel - Nordic Noel
Holly Jolly Christmas - Vintage Christmas
LEJ Designs - Santa's Coming To Town
Loves Rubberstamps - Merry Christmas
Celebrate the Occasion - Christmas Anything Goes
Deep Ocean Challenge - Santa is coming to town
The Pretty Little Ribbon - Its Christmas
Simon Says Challenge - Merry Christmas
Charisma Cardz - Sanata Claus is coming to town
Craft Us Crazy - Merry Christmas