Showing posts with label Decoart. Show all posts

Sunday, 16 March 2014

Goin' on a trip? Pack your bags!

Hello and thank-you for your visit. A warm welcome too to new followers.

As you might know my favourite style is vintage, usually done with some prettiness. The challenge at exciting new blog A Vintage Journey requests anything vintage with a strong hint of Maestro Tim Holtz (TH). As the mega talented DT sets forth on their journey I thought it appropriate to alter some suitcases for them. So for a change ... here's some grunge and a warning for a verrry long post...


I started off with some papier mache suitcases. Ages ago the lovely Alison sent me a package all beautifully wrapped up in TH's tissue wrap. I've collaged this tissue wrap all over each case. There then followed a brown and black marathon using TH distress inks, stains, paints, stencils and stamps. I particularly had fun using the splatter brush (by Liquitex) that TH has used in recent videos. It wasn't so much fun though cleaning up afterwards! When I decided that enough layers of ink etc. were on I added a crackle layer to make sure that cases looked even more battered.


I love the Idea-ology pieces that TH has designed. On the outside of the cases I've used TH box corners, hitch fasteners and ring fasteners. The larger suitcase has a TH ornate plate on the front. I recently won an amazing Maja Design giveaway from the lovely Jenny and I've cut out some words from one sheet to go inside the plate that is then topped up with glossy accents.


I know it's an anachronism but given that TH designed pulley wheels I thought it would be fun to have wheels on the cases. I didn't have ones by TH so I've devised my own. They are made from miniature wooden spools. Painted the inner areas black/brown and the 'wheels' copper. I rummaged through some of my late Dad's old toolkits and found screws, nuts and other metal bits that I don't know the name of but once I had 'rusted them up' with Adirondack alcohol ink and distress EP they looked perfect for the cases.


TH box corners come in a worn sort of pewter colour. I needed to change them to an aged copper so I inked them with versamark and added variously copper and black EPs. To achieve the greeny patina I dabbed Pearl-ex blue/green powder into the melting EP mixture. (This 'aging' has been applied to all the metal elements).


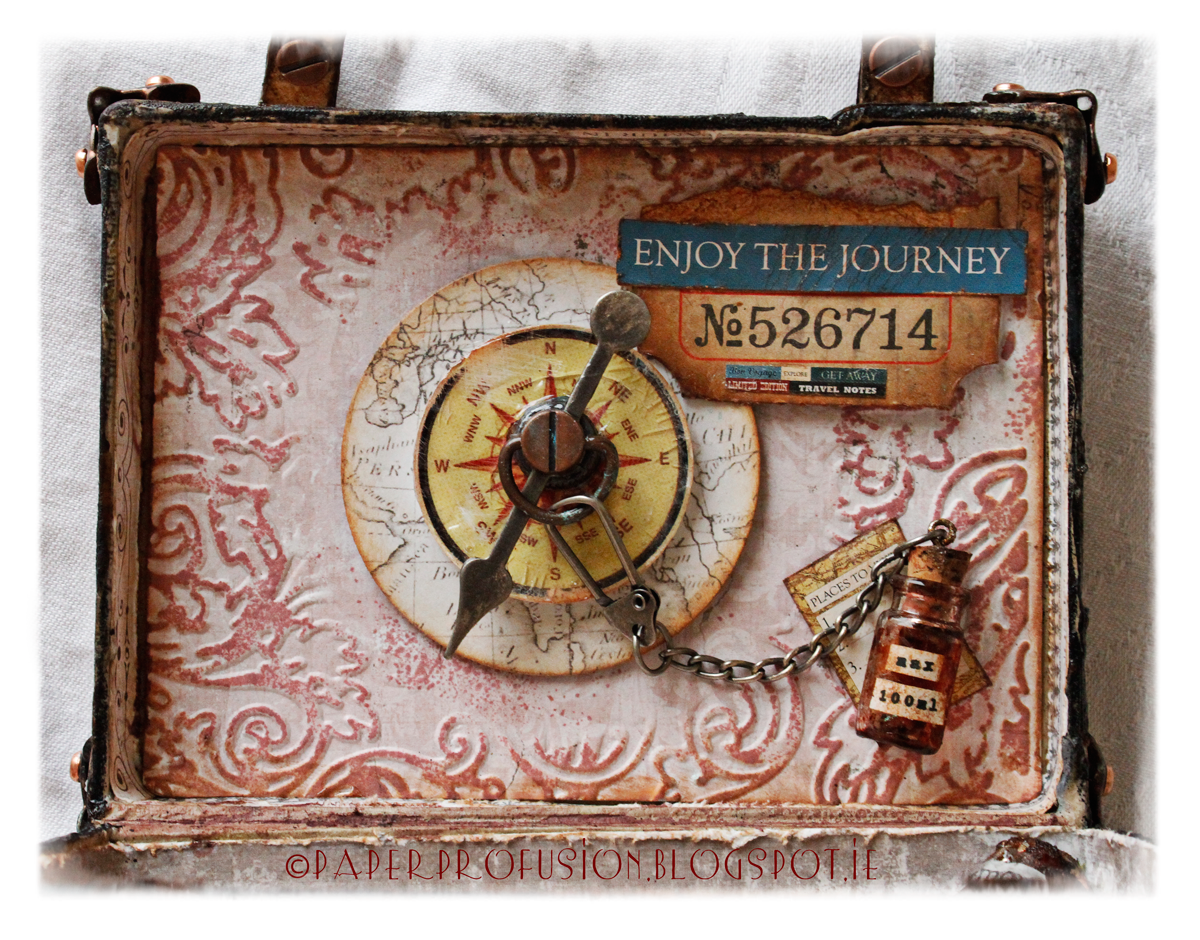
Some welcome relief from the dark hues comes inside each case. I've lined the insides with some of the gorgeous Maja Design papers and borders that come at the end of each 12 x 12 sheet. As I'd already used lots of TH stamps on the outside I decided to use one of his texture fades to emboss the inside lid and finally made use of the TH circular embossing diffuser to 'frame' my globe and compass. Then brayered over some DI for emphasis. A TH game spinner, ticket and a hitch fastener are also used. I spent a lot of time making that water bottle grimey! I've labelled it to remind owner of the current airline restriction levels for liquids in carry-ons!

Now you all know TH is famous for his tags and brilliantly educational monthly tag challenges. So I just had to include a tag! The thing is, I've never done a TH 'monthly tag'. I thought I should remedy this and so have included my take on TH's March tag inside the larger case. I hope this format (and resized tag) is ok to enter to his challenge. I don't yet have the really fab nest stamp set or the spritzer tool so I've improvised. Thank-you to generous Geraldine for her beautiful gifts last week including the TH bird branch stamp and some other items included in project.

The egg is from a M&S candy & chocolate eggs packet. I set aside a green egg and as I crafted I ate the rest of the packet. Next thing was I had a brainwave that I should add more speckle to the egg so I proceeded to splat brown paint at it. It looked great! I needed to dry one side so that I could splatter the rest of the egg, so I began to dry the egg with my heat gun. All of a nano-second the poor egg suffered a catastrophe ... the chocolate turned to liquid and the candy disintegrated into a pooled mess! The next day I had to dash to M&S for another packet of eggs ... no splats this time!! I thought that the TH light bulb would co-ordinate well with his rays stencil. Same stencil is also used on outside of top lid of case. I've made nest with dried moss and shredded paper. I cut a small circle in the tag and inset the little nest into it. (For info: the nest is mostly inked with one of Wendy Vecchi's new ink shades - 'Tree Branch').


The label plate on the smaller suitcase is by Artemio with insert a cutout from Maja Design. I tried out black brads in the metal elements but considered them too dark so have put in shiny copper ones instead. By the way, if you look at left hand corner of luggage tag below you can see the initials of the owner!


For the 'leather' straps I used SEI velvet paper that I fairly well battered, smudged and sprayed to get it worn looking. I also machine stitched along the centre of each strap for further texture.


I attached a luggage tag and charms to each case with TH swivel clasps. Collaged each tag with cutouts from G45 / Echo Park 'Photo Freedom' kit, then sanded and aged with DIs before coating with crackle.


For the inside of the smaller case I've used TH's new decorative strip 'Butterfly Frenzy'. The lid part is decorated with the little die cutouts along with some balloon cutouts from beautiful Maja Design papers. I painted and glittered (Clear Rock) some chipboard letters too. I've followed the very creative Candy who often uses 'Mercury Glass' stickles for edging. (Sorry for photo quality but I couldn't hold open and snap the small case sufficiently to get a decent photo).


I've used the remaining part of 'Butterfly Frenzy' on the lower portion of case. Also stamped TH stamp on paper using Wendy Vecchi new 'Hydrangea' colour in case you are interested in shades.


Finally, here is a rear view to show you those lovely TH hinges that I've given the aged copper treatment to.


Thank-you so much if you've read through all this lengthy post. I've spent ages on this piece through the week so apologies for not visiting as much. I hope to catch up tomorrow.

Have a lovely week,
Nicola x

I wish to enter cases to the following challenges:
A Vintage Journey - Anything Tim
Simon Monday Challenge - D is for Distress
Craft Hoarders Anonymous - Vintage or Retro
Tim Holtz - 12 Tags of 2014 - March
Vintage Udfordring - Sewing (Machine stitching is on 'leather' straps)
Inspiration Journal - A Splash of Colour
Rhedd and Rosie Challenge - Aged / Distressed
Rhedd's Creative Spirit - Altered Art March
Country View Challenges - Paper Chase
Art With Heart Challenge - New Beginnings (for AVJ)

Friday, 7 March 2014

Like my hat?

Hello and welcome.

I needed to make a 'male' card (which like most of you I always dread) but resisted temptation to purchase and wondered how I might make it more easily. I've never made a card according to a sketch challenge so decided to follow the layout at Sketchy Colours to see how it might go.


I like the end result and enjoyed having to 'think less' re layout so will definitely follow a sketch route again.

Papers: Prima 'Printery' and 'Engraver'. Pion Design 'For Father'. All stitched on my little Ikea sewing machine.

Other Paper: Embellishments and centre image by Kaisercraft 'Sears & Son'.

Stamping: Some random stamping/embossing of clock and numerals using Crafty Individuals CI-354 not showing up too well as embossing done with Antiquities 'Weathered white' similar to paper shades.

Inks / Mediums: DIs 'Tea Dye', 'Vintage Photo' and 'Walnut Stain'. I painted hat portion, ties and moustaches with Decoart One Step Crackle. Used Stampendous 'Aged Ivory' for frantage effects. The clock is well coated with glossy accents.

Other Embellishments: Tim Holtz 'Ring Fastener'. Prima wood clock face. Brads and ribbon from stash.

Many thanks for stopping by and special thanks to new followers who signed on recently. It's lovely to have your company in blogland.

Nicola x

I wish to enter card to the following challenges:
Sketchy Colours: Challenge #200
Vintage Udfording - Monochromatic
Simon Says Stamp Monday - Tick Tock
Craft Hoarders Anonymous Challenge - Vintage or Retro
Inky Chicks - Monochromatic
Divas by Design - Let's hear it for the boys
Country View Crafts Challenge - Paper Chase

Monday, 27 January 2014

Vintage Sewing Themed Drawer Cabinet

Hello and Thank-You so much for visiting. I'm sorry to have been absent from blogging recently... I'll try to catch up with you all soon.

I smiled when I saw the challenge theme "Shopping Sins" at Our Creative Corner this month; there are three things for sure in my life; death, taxes and overspending!

So having been away from crafting for most of this month I've spent the last few days working on today's piece in my favourite vintage style. I'm mortified to have so many long unused items in my stash - the main contenders here were some Kaisercraft mini drawers, several uninked sewing themed stamp sets and a few untested crackle mediums.


Re wooden part of mini drawers: Painted all the wooden parts first with gesso, then PaperArtsy 'Snowflake', followed by PaperArtsy 'Old Gold'. I had bought some crackle products to try and improve on efforts to date - glad to finally put them to test. I like result from Decoart One Step Crackle (you can see on gold pediment). My first choice however goes to Kroma crackle - you can see its lizardlike results on the front part of cabinet. Some of the more thickly crackled areas are where I have done a double coat of crackle to experiment.

Re little drawers: All the hidden drawers are painted with PaperArtsy 'Ice Blue' followed by a coat of 'Metallic Glaze'. I tied string around each drawer when gluing its sides to keep them together whilst the glue set (rather fiddly). Opened packaging on my Krylon gold pen to gild the edge of each of the drawers - I like result so will use this pen a lot!

Decorative fronts and sides: The lovely papers are from Maja Design 'Vintage Summer Basics' collection. The drawer fronts were all punched out, stamped and gold embossed with several images being double foam mounted. I've added lots of sewing themed paraphernalia. The stamps used throughout piece are from Crafty Individuals CI-328 (first use) and CI-306 (both following Laura's inspiration), Chapel Road Artstamps "Sew Much to Do" and Studio 490 Wendy Vecchi "Art By Hand" (again it's first use).


The left side of cabinet shows a seamstress hard at work.

Feet and Pediments
You'll also have noticed the cabinet feet and pediment. I die cut two layers of chipboard (by 4) for the feet using Sizzix Bigz Ironworks die. Made sure all the fleurs-de-lis were same height and glued each twosome together and then painted with Fresco 'Old Gold' followed by 'One Step Crackle'. I used loctite glue to hold these in place for a fast glue result. They are holding very solidly. The pediments at the top are also diecut from chipboard using Sizzix Bigz On-The-Edge 'Ornate'. The lower white one is Fresco 'Snowflake' coated with Kroma crackle to see how the crackle would look without a gold paint layer below.


The cabinet rear is also stamped and embossed with some machine stitching too. Santa brought me a sewing machine - I'm pleased to be finally trying it out!


The right side of cabinet shows the mannequin in use by this particular sewing establishment - again cut from chipboard using Bigz 'Sewing Room' die, painted as before and dressed in some finery


Finally, a close up of the cabinet top:


A word of thanks too to May, Cathi and Alison who all provided some of the ingredients used in this piece.

Thank-you so much for stopping by and enjoy the rest of your week,
Nicola x


I wish to enter cabinet to the following challenges:

Our Creative Corner - No more shopping sins (Guilty as accused!)
Vintage Udfordring - Use Dies and/or Punch
The Ribbon Girl Challenge - Anything Goes
Allsorts Challenge - Vintage
It's all about the vintage - Embossing
Fussy and Fancy Friday - Vintage
Sugar Creek Hollow - Fibres & Texture
Stamping Sensations - Ribbon, Buttons and Bows
Sweet Stampin - In Stitches
Bunny Zoe's Crafts - Stitching
Inspiration Emporium - Diecuts and Punches