Showing posts with label Encore. Show all posts

Sunday, 16 March 2014

Goin' on a trip? Pack your bags!

Hello and thank-you for your visit. A warm welcome too to new followers.

As you might know my favourite style is vintage, usually done with some prettiness. The challenge at exciting new blog A Vintage Journey requests anything vintage with a strong hint of Maestro Tim Holtz (TH). As the mega talented DT sets forth on their journey I thought it appropriate to alter some suitcases for them. So for a change ... here's some grunge and a warning for a verrry long post...


I started off with some papier mache suitcases. Ages ago the lovely Alison sent me a package all beautifully wrapped up in TH's tissue wrap. I've collaged this tissue wrap all over each case. There then followed a brown and black marathon using TH distress inks, stains, paints, stencils and stamps. I particularly had fun using the splatter brush (by Liquitex) that TH has used in recent videos. It wasn't so much fun though cleaning up afterwards! When I decided that enough layers of ink etc. were on I added a crackle layer to make sure that cases looked even more battered.


I love the Idea-ology pieces that TH has designed. On the outside of the cases I've used TH box corners, hitch fasteners and ring fasteners. The larger suitcase has a TH ornate plate on the front. I recently won an amazing Maja Design giveaway from the lovely Jenny and I've cut out some words from one sheet to go inside the plate that is then topped up with glossy accents.


I know it's an anachronism but given that TH designed pulley wheels I thought it would be fun to have wheels on the cases. I didn't have ones by TH so I've devised my own. They are made from miniature wooden spools. Painted the inner areas black/brown and the 'wheels' copper. I rummaged through some of my late Dad's old toolkits and found screws, nuts and other metal bits that I don't know the name of but once I had 'rusted them up' with Adirondack alcohol ink and distress EP they looked perfect for the cases.


TH box corners come in a worn sort of pewter colour. I needed to change them to an aged copper so I inked them with versamark and added variously copper and black EPs. To achieve the greeny patina I dabbed Pearl-ex blue/green powder into the melting EP mixture. (This 'aging' has been applied to all the metal elements).


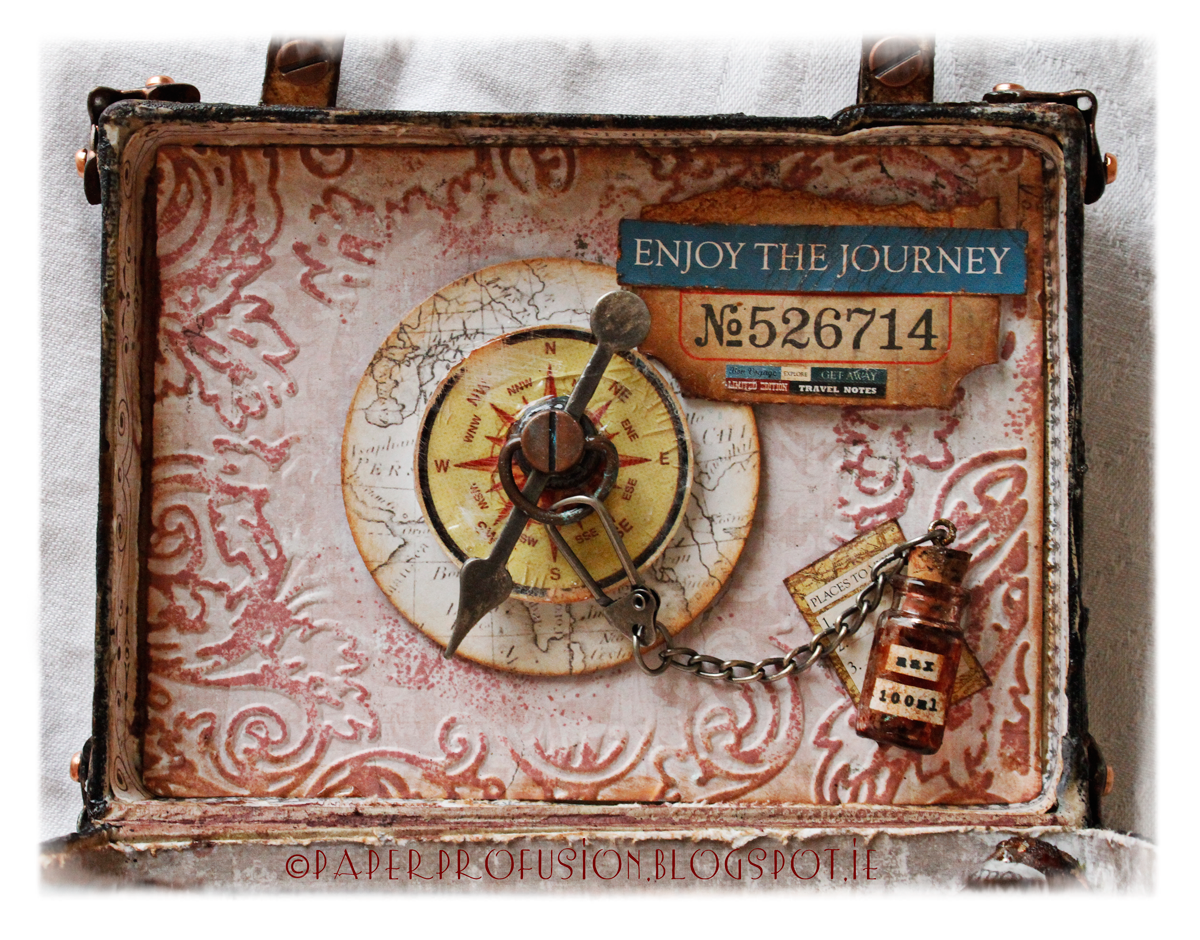
Some welcome relief from the dark hues comes inside each case. I've lined the insides with some of the gorgeous Maja Design papers and borders that come at the end of each 12 x 12 sheet. As I'd already used lots of TH stamps on the outside I decided to use one of his texture fades to emboss the inside lid and finally made use of the TH circular embossing diffuser to 'frame' my globe and compass. Then brayered over some DI for emphasis. A TH game spinner, ticket and a hitch fastener are also used. I spent a lot of time making that water bottle grimey! I've labelled it to remind owner of the current airline restriction levels for liquids in carry-ons!

Now you all know TH is famous for his tags and brilliantly educational monthly tag challenges. So I just had to include a tag! The thing is, I've never done a TH 'monthly tag'. I thought I should remedy this and so have included my take on TH's March tag inside the larger case. I hope this format (and resized tag) is ok to enter to his challenge. I don't yet have the really fab nest stamp set or the spritzer tool so I've improvised. Thank-you to generous Geraldine for her beautiful gifts last week including the TH bird branch stamp and some other items included in project.

The egg is from a M&S candy & chocolate eggs packet. I set aside a green egg and as I crafted I ate the rest of the packet. Next thing was I had a brainwave that I should add more speckle to the egg so I proceeded to splat brown paint at it. It looked great! I needed to dry one side so that I could splatter the rest of the egg, so I began to dry the egg with my heat gun. All of a nano-second the poor egg suffered a catastrophe ... the chocolate turned to liquid and the candy disintegrated into a pooled mess! The next day I had to dash to M&S for another packet of eggs ... no splats this time!! I thought that the TH light bulb would co-ordinate well with his rays stencil. Same stencil is also used on outside of top lid of case. I've made nest with dried moss and shredded paper. I cut a small circle in the tag and inset the little nest into it. (For info: the nest is mostly inked with one of Wendy Vecchi's new ink shades - 'Tree Branch').


The label plate on the smaller suitcase is by Artemio with insert a cutout from Maja Design. I tried out black brads in the metal elements but considered them too dark so have put in shiny copper ones instead. By the way, if you look at left hand corner of luggage tag below you can see the initials of the owner!


For the 'leather' straps I used SEI velvet paper that I fairly well battered, smudged and sprayed to get it worn looking. I also machine stitched along the centre of each strap for further texture.


I attached a luggage tag and charms to each case with TH swivel clasps. Collaged each tag with cutouts from G45 / Echo Park 'Photo Freedom' kit, then sanded and aged with DIs before coating with crackle.


For the inside of the smaller case I've used TH's new decorative strip 'Butterfly Frenzy'. The lid part is decorated with the little die cutouts along with some balloon cutouts from beautiful Maja Design papers. I painted and glittered (Clear Rock) some chipboard letters too. I've followed the very creative Candy who often uses 'Mercury Glass' stickles for edging. (Sorry for photo quality but I couldn't hold open and snap the small case sufficiently to get a decent photo).


I've used the remaining part of 'Butterfly Frenzy' on the lower portion of case. Also stamped TH stamp on paper using Wendy Vecchi new 'Hydrangea' colour in case you are interested in shades.


Finally, here is a rear view to show you those lovely TH hinges that I've given the aged copper treatment to.


Thank-you so much if you've read through all this lengthy post. I've spent ages on this piece through the week so apologies for not visiting as much. I hope to catch up tomorrow.

Have a lovely week,
Nicola x

I wish to enter cases to the following challenges:
A Vintage Journey - Anything Tim
Simon Monday Challenge - D is for Distress
Craft Hoarders Anonymous - Vintage or Retro
Tim Holtz - 12 Tags of 2014 - March
Vintage Udfordring - Sewing (Machine stitching is on 'leather' straps)
Inspiration Journal - A Splash of Colour
Rhedd and Rosie Challenge - Aged / Distressed
Rhedd's Creative Spirit - Altered Art March
Country View Challenges - Paper Chase
Art With Heart Challenge - New Beginnings (for AVJ)

Sunday, 26 May 2013

Vintage Bridal Veil

Hello all you lovely readers - welcome to another post. There are lots of wedding related challenges at the moment so here is my vintage wedding card.


Please click on photo to enlarge as the tulle to the right of card becomes clearer.

Firstly I layered silver cardstock onto white CS base. The next layer of pink paper is made by my own fair hands - talk about hand crafted! (I attended a workshop last year as to how to make paper from pulp and fibres - this is the result - any little flecks are part of the organic process). I've embossed the pink layer with Cheery Lynn's 'Petite Hearts' embossing plate.

The photograph is a free image (sorry did not note source) that I adjusted to faded black and white. Printed this on handmade paper (not by me) in keeping with the vintage look. I cut the photo frame using Tim Holtz baroque and mini baroque dies and then ran it through my Tim Holtz damask embossing folder. I then followed the steps in Shelly Hickox's fab tutorial on 'Faux Tarnished Metal' - take a peek here for details. I previously used the technique in my post here, it's very effective and done with ink, embossing powder and Utee.

Stitched some lace that I had been saving for a wedding card to form a veil having made a little head-dress of pearls and roses. I was so pleased it worked as a veil as it is scalloped on both edges. Decorated veil further with a pearl flourish to the base/train. I wanted to do something different for a bouquet so decided to go with a message in a bottle! I printed out 'Sealed with a kiss' on handmade paper and placed it and some flowers into the little vial - leftover from a workshop. The cork stopper looked wrong (plus Frilly and Funkie have limited colours in their challenge) so I gave it a few coats of Metallic Distress Stain in Brushed Pewter. Added a little lace bow and heart charm and mounted on some tulle and 2 hearts that I cut using Sizzix Bigz Primitive Hearts die. Covered hearts with pink CS and translucent patterned paper.

Finally I scrunched some tulle and attached underneath the cardstock to right of card. Completed with pink ribbon along top and bottom of card that I adorned with pearls .

Thank-you for visiting my blog, your visits and comments are genuinely appreciated. I won't be present in blogland too much over the coming week but I will do my best to maintain visits. Have a lovely Sunday.

Nicola x

I wish to enter card to the following challenges:
Frilly and Funkie - A Time for Weddings
It's All about the Vintage - Spring Romances / Weddings
Vintage Udfordring - Wedding
Simon Says Stamp - Take A Picture
Sugar Creek Hollow - Clean It Out

Thursday, 20 December 2012

Merry Christmas Everyone!

Hello and welcome to my last post for 2012 as I've tidied away the craft goodies and am taking a little break. I'm looking forward to getting back into full throttle in January.

I began my blog in September this year. My venture into blogging was a kind of unknown as I didn't know what to expect - I could not have been more happily surprised with how it has turned out. I wish to extend my warmest appreciation for the wonderful welcome that has greeted me and to each and every one who has taken the time to visit. I am amazed at how much I have learned over the past 4 months from you all - your blogs, creations, posts, challenges, design teams and tutorials are an incredible university and a never-ending source of entertainment and inspiration! Heartfelt thanks especially go to those who have posted such lovely compliments and those who became followers - doing so makes you so much more real and your encouragement is what spurs me on.
“Instruction does much, but encouragement everything." Johann W. von Goethe.

I'm also THRILLED to advise that my card 'Oh Jingle Bells' will be shown tomorrow (21st) on the wonderful Melissa Frances Blog. I genuinely love Melissa Frances creations and products so to be published on her blog is the cherry on top of this Christmas. Thank-you so much to all at Melissa Frances.

My very first post in September was 'Starting with Santa'. I thought it would be a nice balance to end 2012 using the same stamp. So without further ado - here he is!


Ingredients for my card today;
Papers: Maja Design (It's Christmas Time)
Stamps: Inkadinkado (A Visit from Santa 98223) and Stampendous (Christmas Wishes SSC1068)
Ink: Versafine (Crimson) and papers edged with Encore Metallic in Gold. Edges also distressed with Distress Inks (Brushed Corduroy and Vintage Photo)
Embossing Powder: Sparkle and Sprinkle (Japanese Lacquer) and Ranger (Queen's Gold)
Punches: Edger and snowflake by Martha Stewart
Free vintage images printed onto TAP (Transfer Artist Paper by Lesley Riley) and then ironed onto muslin
Bunting embellishment: Melissa Frances (Countdown to Christmas)
Ribbon: May Arts Silk
Dabs of Stickles Glitter
Everything else from stash

Wishing you a joyous and peaceful Christmas,
Nicola x

I wish to enter card to the following challenges;
The Ribbon Reel - Nordic Noel
Holly Jolly Christmas - Vintage Christmas
LEJ Designs - Santa's Coming To Town
Loves Rubberstamps - Merry Christmas
Celebrate the Occasion - Christmas Anything Goes
Deep Ocean Challenge - Santa is coming to town
The Pretty Little Ribbon - Its Christmas
Simon Says Challenge - Merry Christmas
Charisma Cardz - Sanata Claus is coming to town
Craft Us Crazy - Merry Christmas

Friday, 16 November 2012

Oh Jingle Bells ....

Greetings from Dublin. Thank-you for stopping by and a warm welcome to my new followers. I've had my card today bobbing around in my head for the last week so am delighted to finally get it made and posted. This one was very tricky to photograph.


I've made an easel card to accomodate a musical scene with Rudolph, Dasher and Blitzen rushing over snowy stars (yes, climate change has a lot to answer for!) to bring wondrous toys to all the girls and boys. They are singing Jingle Bells as they go, with not a snowflake clinging to them as they are moving so quickly!

This might be a better angle;


CS is Bazzill. Papers and tags are from Melissa Frances (Countdown to Christmas and music sheet from 5th Avenue). Stamps are from the magical Stampington and Company (S7338 - Classic Christmas), with the dashing reindeer and Santa Moon inked with Encore metallic inks and embossed with Judikins sparkle EPs. The Jingle Bells ticket at front is from Unity Stamps IB-127 stamped with Versafine. The chipboard musical note has been inked with Distress Stains Metallic Pewter and then stamped with music stamp from Anna Griffin (580K21) using Versafine. (By chance I won some chipboard notes in a raffle at a crop last weekend, so I think it was serendipity to make this card). Same musical stamp also used on centre part of a doily backing the chipboard note. I've edged the top and slanting borders and punched snowflakes with Martha Stewart punches. Tied little bows to those jangling jingle bells (Anitas) and liberally applied liquid pearls and stickles for more sparkle. Dotted some of the snowflake centres with pearls (Artoz). The stars were handcut as I don't have a die cutting machine ... yet ... Santa?!

Thank you so much for checking out my blog. Have a lovely day! Nicola x

I wish to enter card to the following challenges;
Fashionable Stamping Challenges - Musical
Frilly and Funkie - Chipboard and Metal
Moving Along with The Times - Seeing Stars!
Milk Coffee Challenge - More Than 1 Fold
Crafts 4 Eternity - Marvellous Music