Tuesday 22 December 2015

Saturday 19 December 2015

Joyeux Noël

Seasons Greetings! Thanks so much for taking the time to visit.

I have some other Christmas posts ready but may not get them published, though I expect everyone is mighty busy now anyway with Christmas preparations. I received more injections to my neck yesterday so my online time must be very curtailed.

This pretty image is taken from a paper napkin available here. Isn't she lovely.


Following the Servietten Technique I seperated the top layer of napkin and glued it to white cardstock using Ranger multi-medium matte. Once completely dry, die-cut and embossed the image using a Marianne Design die. Sprinkled on a pinch of white Frantage and stencilled some stars using a Heidi Swapp stencil. Coated the stars with clear rock glitter before the paste dried. Rubbed silved gilding wax to die-cut edge and burnished it well with cloth.

The lowest layer has been embossed with a Sizzix music folder. Again gilded the edges silver. Cut a round doily in half and adhered to base layer. Die-cut some glittery silver paper with Memory Box 'Star of Wonder', Memory Box 'Elegant Scrollwork' and Magnolia 'Sprawling Ferns' dies and arranged on card. Die-cut little stars from this glittery paper using offcuts from a Sizzix Triplits balloon die so some of the stars are white and some silver.

Added lace trim and tinsel trim to the left and placed a Swarovski crystal on star. The berries are by Magnolia and I've added some white stamens from stash too. Stamped the Joyeux Noël sentiment using a Stempelglede stamp set. Finally, sprayed some seam binding to a matching shade of blue and affixed. C'est ça!

Hope to pop around blogland in another couple of days. In the meantime, enjoy the happiness of this season and Stay Calm!

Nicola x

I wish to enter card to the following challenges:
We Love Vintage - Vintage Children
Simon Monday Challenge - Just a pinch (of Frantage)
Anything But Cute - You've got Happy Mail
Scrapy Land - Holidays (Use a die brand carried by Scrapy Land)
Scrap & Craft - Anything Christmas
Inspiration Journal - Tis The Season
ABC Christmas - Y is for Youngsters
Sparkles Challenge - Die Cuts for Christmas
Creative Inspirations - Merry Christmas
Alphabet Challenge - V for Vintage

Monday 14 December 2015

A Victorian Christmas

Greetings from a dark and drizzling Dublin - the reason for awful shadows in picture. Thank-you for visiting, especially during this busy Christmas countdown.


I've used papers from the lovely Prima collection 'A Victorian Christmas'. Placed the robin in a faux layered nest and then magnified him with a Prima Memory Hardware Antique cloche that was rather tricky to photograph. The holly branches are cut using Creative Expressions 'Holly Sprays' die. All the holly has been glittered. Edges are variously inked with Prima chalk edger and Stickles 'Memory Glass'. The outer edge is torn in places and Prima lace trim 'Snow' is placed beneath the tears. I've also done a little random stencilling using Finnabair white crackle texture paste - it's meant to represent some snow swirling around a weary looking Santa! The banners (cut with MFT Fishtail Flags die) are coated with Glossy accents to highlight them and then edged with stickles. Added 'berries' with a Waco pearl pen. Finished with a copper star atop tree.

Thank-you so much for stopping by and warmest welcomes to those who have recently signed up to follow.

Nicola x

I wish to enter card to the following challenges:
Prima - 12 Days of Christmas (Day 1 'A Victorian Christmas' and memory hardware)
Anything But Cute - You've got Happy Mail
Craft for the Craic - Christmas Cheer
Frilly & Funkie - Tis The Season
Scrap & Craft - Anything Christmas
Sparkles Christmas Challenge - Die Cuts for Christmas
Country View Challenges - Create A Scene
Simon Monday Challenge - Just a pinch - I've used tiny amount of crackle paste
Inspiration Emporium - Tis The Season

Saturday 12 December 2015

Shhhhh! Look who's inside!

Hi there, I hope your weekend is going well. A quick post today ...


Papers: Pion Design 'Christmas in Norway' and 'Silent Night'
Dies: Sizzix/Tim Holtz 'Window' and 'Mini Reindeer'. My Favorite Things Borders - 'Scallop' and 'Mini Scallop'.
Stencil: Memory Box 'Tiny Snowflakes'. Texture paste has been glittered with clear rock whilst still wet.
Other: The window was painted with cream DecoArt paint and liberally frantaged with both cream and white embossing enamels. One deer is painted with clear crackle and the other has been glittered with clear rock candy. Little jingle bells adorn their necks. I've painted an Idea-ology snowflake cream, dabbed it with red stickles and placed a red swarovski crystal in centre. Punched some 'foliage', glittered it and lined along base. Punched little snowflakes and gave them pearl centres. Completed with addition of red sparkly trim.

Wishing you a lovely weekend and very many thanks for stopping by.
Nicola x

I wish to enter card to the following challenges:

Pion Design Challenge - Christmas Wishes - Inspiration photo below


Scrapyland - Anything Goes - Use a die brand Scrapyland carries
Frilly & Funkie - Tis The Season
Inspiration Emporium - Tis The Season
Craft For The Craic - Christmas Cheer
Dies R Us - Christmas
Scrap & Craft - Anything Christmas
Sparkles Christmas - Die Cuts for Christmas
Little Red Wagon - Snow Much Fun
Anything But Cute - You've got Happy Mail

Tuesday 8 December 2015

Matching sleigh for 'Cosy Little Christmas'

Hello! It's lovely of you to stop by. Thanks so much for all your kind comments on Christmas house in my post below. I've now made a matching sleigh and deer to complete the set.


Papers: Pion Design 'Christmas in Norway'
Dies: Sizzix/Tim Holtz 'Prancing Deer', Sizzix/Tim Holtz 'Sleigh Ride'. (Made the deer and sleigh cardboard centres for reinforcement. Painted some corrugated cardboard cream and adhered it between sleigh sides for centre of carriage).
Stencil: Wendy Vecchi 'Vintage Quilt' - not seen very well but the 'ground' is stencilled and sprinkled with lots of clear rock glitter
Other: Idea-ology Tree that has been sprayed with various golds and whites to make it match the house. Deer are harnessed to sleigh via Idea-ology screw eyes. Distress Dry Glitter 'Clear Rock'. Stickles 'Gold' and 'Mercury Glass'. Gesso and Snow-Tex. Woodware tiny snowflake punch. 'Metal' part of sleigh is gold embossed. Tinsel, pearls, gems and bells from stash.

We've had awful rain and wind in these parts over recent days so I hope this post finds you well and warm wherever you are based. The warmest of welcomes too to the lovely people who have signed up recently to follow, it's great to have your company.

Have a super week,
Nicola

I wish to enter sleigh to the following challenges:

Pion Design December Challenge - Christmas Wishes.
Here is the inspiration photo, why don't you give this a try, there's a wonderful prize on offer that I was lucky enough to win last month

Live & Love Crafts - Sparkle
A Vintage Journey - Vintage Christmas
Frilly & Funkie - Tis The Season
Scrapyland - Anything Goes - Use die brand that Scrapyland carries
Country View Challenges - Create a Scene
Dies R Us - Christmas
Scrap & Craft - Anything Christmas

Friday 20 November 2015

Cosy Little Christmas

Welcome! Thank-you for visiting.

I needed to make another Christmas house and it seemed apt for a number of challenges so without further ado here is yet another altered Melissa Frances chipboard house.


The papers are by Pion Design, most from the new 'Christmas in Norway' collection but some from their 'Flower Frames' and 'Winter in Swedish Lapland' collections too. I've also used a gold foil paper (reinforced with backing cardstock) for accents.

The papers have been well frantaged (with both white and cream enamel) and some parts of house are crackle glazed. While the glaze was still wet I sprinkled on Melissa Frances glass glitter and Ranger 'Clear Rock' glitter for plenty of sparkle. Other elements are completely coated with Ranger Glitter. Used pompoms, lace and tinsel to decorate some edges. Other edges and window frames were inked with Krylon 18 kt gilding pen although I went and covered up a lot of this when I added Snow-tex to edges. The windows are adorned with venise lace and cream tulle as well as those little munchkins peeking out. I've painted and crackled a Kaisercraft wooden street light and it's illuminated by a Tim Holtz battery lantern. Used a Decoart cream paint on several of the surfaces.

Dies used to front are; Magnolia 'Old Swedish Lace' and 'Tilda Lace', Sizzix 'On the fence' decorative strip, Sizzix 'Mini Reindeer', Sizzix bigz 'Stars' and Sizzix 'Crescent Moon'. Thanks to Lindt for the little bells around the deer!


Turning to one side you can see Santa starting his climb to the chimney. There is quite a snowstorm going on with all those punched little snowflakes and plenty of stencilled snowflakes too - made using Memory Box 'Tiny Snowflakes' stencil and Decoart texture paste.

The word 'Joy' is diecut with a WPlus9 die. The gold snowflakes throughout project are by Nunn Design.


Let's see the Christmas Tree around the other side. Used Sizzix 'Woodlands' die to give outline for tree shape and then cut 'branches' using Magnolia and Creative Expressions dies. Inked the 'branches' with Distress Inks and coated them with Ranger Glitter. Added stamens and pearl dots with a Waco pen. A Prima resin angel sits atop the tree - she has been gilded with 'White Fire' gilding wax. Some glittered cones are at tree base.


Finally to the rear we can see the little munchkins checking out what's inside Santa's sack.


I've added lots of charms from stash and arranged them and some wrapped presents right around the house. When I was assembling the house one of the wall joins wasn't very clean so I diecut narrow gold strips and adhered to all 4 edges to make it neat and tidy. Ditto at roof ridge. The 'Let It Snow' is from a Memory Box die. You can see several punched bow shapes - done with Sizzix / Holtz bow punch. You can't see from photos but the 'ground' area is also well glittered and snow stencilled. Added pearls, stickles and swarovski red crystals for eyes just to ensure optimum bling. Finally mounted it all on painted Idea-ology Box Feet.

If you would like to see any of my other altered chipboard houses you can find them here, here, here and here.

Thanks so very much for stopping by - it's much appreciated.
Have a lovely weekend.
Nicola x

Today is the deadline for Pion Design's November challenge with theme 'Fluffy Friends' so I'm glad to get this posted just in the nick of time. Lots of fluffiness around project from the fur on the little peoples' clothes and on the dog and deer to the front. Here is their inspiration photo:


I also wish to enter house to the following challenges:
Live & Love Crafts - November Tic Tac Toe - Glitter, Snow, Star
Anything But Cute - It's Ornamental (tho' it is kindof cute!)
Frilly & Funkie - An Altered State
Craft For The Craic - Something Glittery
Try It On Tuesday - Create a Scene
Vintage Cafe Card Challenge - Home Decor
Alphabet Challenge - Tis The Season
The Ribbon Girls - Use Any Image
Papertake Weekly - Let it Snow

Thursday 5 November 2015

Traditional Christmas Selection

Hi there and thank-you for stopping by.

As mentioned in last post, it's handy to make a similar series of cards once you have set up some papers and dies and have them at the ready. I have 5 cards to show today all made with beautiful Inkido papers. (Sadly Inkido are no longer in operation).


I've used dies from Spellbinders (Heirloom Ornaments) and some edge ones from Magnolia and Cheery Lynn.


Most edges are gilded using Krylon 18kt leafing pen. Lots of frantage has been sprinkled around for snowy effects.


Various snowflakes are punched using Fiskars punches. I've dotted centres of snowflakes and berries on each image with red Waco pearl pen.


Placed lace around centre image and finished off with berries, charms, stickpins, buttons and trims from stash.


I hope these cosy reds bring warmth and good cheer.

As always your visit and any comments you leave are hugely appreciated.

Nicola x


I wish to enter the following challenges:
Scrapy Land - Anything Goes (using any die Scrapyland carries)
Allsorts - Christmas
The Ribbon Girl - November Anything Goes card challenge
Try it on Tuesday - Lots of Layers
Make my Monday - Shabby Chic
The Crazy challenge - Vintage
City Crafter - Getting ready for Christmas
Card and Scrap - Christmas
Papertake Weekly - Anything Goes
Scrap + Craft -Shabby Chic or Vintage

Tuesday 27 October 2015

Jingling Deer

Greetings to you and welcome! It's been dismally grey here in recent days so I was glad to be able to play with sparkle.

I usually have the end design already in mind before I start a card but then sometimes what was in my head turns up on my desk as a sorry mess! This card was one such example and several reworks were needed to eventually deem it passable. Having put in so much effort I then set up a little production line to make a few similar versions of the card.


The deer have been diecut using Sizzix 'Prancing Deer' and Sizzix Mini Movers and Shakers 'Mini Reindeer'. The paper I've used is SEI Velvet paper in 'Chocolate' so that the deer have a nice plush coat. For sturdiness the velvet paper is glued to a backing of corrugated cardboard. Their necks are adorned with gold tinsel and diecut/stamped tabs and jingle bells (Stamps by Cat's Life Press). Lots of gold stickles coat the antlers.


I've used TH/Sizzix 'Birch Trees' die to make the backing layer. This diecut's width is 4" which is a little narrow for my liking so I cut some extras and 'joined' them as seamlessly as possible so that the 'forest' is wider. Plain cream cardstock was used which I then inked with DIs 'Walnut Stain' and 'Ground Espresso'. Then splattered lots of 'Ground Espresso' paint over the trees to make them look more birch-like. Once heatset, coated them liberally with crackle in 'Clear Rock Candy' and left to dry overnight. This layer is affixed on top of foam pads for height.

Lots of frantage work has been done to the next 2 underlying layers. Dotted around several wood veneer stars by Studio Calico topped with little clear gems.

Cards still needed some glitzing so I diecut gold foil paper to make the star at top right and foliage underfoot. The gold foil is very thin (similar to that in cigarette packets) so for strenght I affixed it with glue stick to cardstock before diecutting. Dies are Sizzix 'Holiday Greens' and Memory Box 'Star of Wonder'.

That's it for today - hope you like!

Thanks so much for your visit,
Nicola x

I wish to enter cards to the following challenges:
Simon Says Stamp Monday - Throwback - to July 27th 'No Ordinary Paper'
Country View Challenges - Add some Texture
Eileen Hull Art with Heart - Hauntings and Holidays
Winter Wonderland - Jingle Bells
Christmas Card Challenges - Anything Goes
Use Your Stuff - Diecuts / Punches
Try It On Tuesday - Lots of Layers

Thursday 22 October 2015

Skates in Blue

Hello and welcome!

Another quick post showing how I placed crackled ice skates in alternate colour scheme to previous post. They look a little chiller here!


Papers: Maja Design
Dies: Sizzix 'Ice Skates', Sizzix 'Holiday Words', Sizzix Framelits 'Enchanted' by Prima, Sizzix Decorative Strip 'Holly, Snowflake, Beaded Garland'
Glitter: Melissa Frances Silver glass glitter and Ranger Clear Rock Candy
Media: Crackle glaze by Decoart. Weathered Wood DI. Ground Espresso Distress paint. Waco Chrome pearl pen. Krylon Silver leafing pen.
Other: Silver metallic string from stash

Thought I'd share that I've recently bought the Sizzix Precision Base Plate to use with my Big Shot. It's a great buy! Much handier to use with one cutting plate (that will stay flat) rather than struggling with the usual bent plates. One pass and it's cut.

Thank-you for your visit!

Nicola

I wish to enter card to the following challenges:
Eileen Hull - Art with Heart - Hauntings and Holidays
Allsorts - All sentimental
We Love to Create - Anything Mixed Media Goes
Country View Challenges - Add some Texture
Christmas Cards all year round - No Stamping

Thursday 15 October 2015

Crackled Skates

Hi there,

Thanks so much for the lovely comments on my last post, it was a pleasure to read them all. A quick post from me today - I'm getting into stride for some Christmas card production...


Papers: Pion Design
Dies: Sizzix 'Ice Skates', Sizzix 'Holiday Words', Sizzix 'Mini Holly', Sizzix 'Stacked Snowflakes', My Favorite Things 'Stitched Fishtail Flags'
Stencil: Heidi Swapp
Glitter: Melissa Frances and Ranger
Media: Crackle glaze and Texture paste - both by Decoart. Krylon pale gold leafing pen
Other: May Arts string. Charms, lace and pearls from stash

As always, huge thanks for stopping by!
Nicola x

I wish to enter card to the following challenges:
City Crafter - Paste It!
Scrapyland - Anything Goes using die carried by Scrapyland
ABC Christmas Challenges - Unusual Christmas Colours
Picture & Scrap - Shabby Chic
Christmas card challenges - Anything Goes
Country View Challenges - Add some texture
Live & Love Crafts - Pink Again
Inky Chicks - Think Pink
Papertake Weekly - Two by Two (Two skates!)
Jingle Belles Rock - Deck The Halls in Pink

Friday 18 September 2015

Home for Christmas

Hi there!

I'm delighted to say that I'm being featured today over at the wonderful A Vintage Journey as one of their Guest Designers (Thank-you ladies!). I was really pleased when I learned that the theme to work towards was 'Home Sweet Home'. Those familiar with my blog are bound to know that Christmas is my favourite topic to craft for. Christmas, for me anyway, is all about being at home, in the company of loved ones. I've created a Christmas home decor project with lots of emphasis on products and techniques from the one and only Tim Holtz. I've been dabbling at the project over several weeks so am happy to finally have it done and dusted.

Please be warned that a photo laden long post follows! Apologies for the different tones in photos. Weather was dismally grey outside up to my sending snaps to AVJ, I've managed to take some sharper pics since.

So first up here's the whole project...


The house is a chipboard 'Large Twin Peaks' by Melissa Frances.

Beginning with the front of the house, I've decorated it using Maja Design papers except for the little muchkin images at the windows from Inkido. Almost all papers have been well frantaged. The centre of roof is stamped / embossed using a Christmas text stamp from Inkido. The outer roof sides are then treated using one of my favourite techniques as follows. First I dry embossed each side with Tim Holtz (TH) 'Tiles' texture fade. I then brayered over Versamark, sprinkled on some EP and heat embossed. Repeated latter stage several times so as to build up some nice thick definition to the raised areas. Also added silver 'pearls' using a pearl pen. Then applied same technique to the eaves on different colour paper.


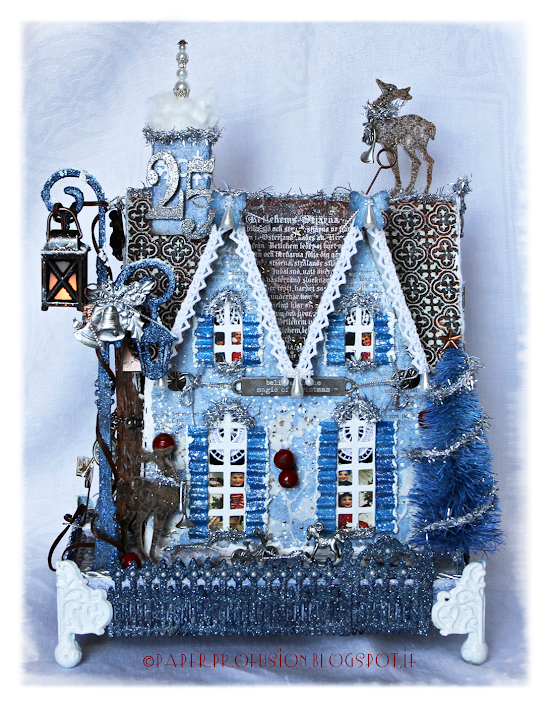
You'll see lots of tinsel throughout project - all from TH Idea-ology. I suggest leaving tinsel placement until last as one's heat gun can cause it to shrivel and shrivelled tinsel is not a good look! The numerals 25 are silver sparkle embossed. They, and the deer, are diecut using TH movers and shakers. The little deer atop the roof is held in place with an Idea-ology memo pin. Practically everything in the project has been crackled and splattered with gusto!

As soon as I saw the Kaisercraft wooden street light online I knew it would fit perfectly for the house, together with the Idea-ology battery lantern. The street light and fence were an awfully long time coming together. I used 2 layers of cardstock when cutting the fence (a TH decorative strip die). First I made it silver but it didn't contrast enough. I had bought the new TH paint 'Ground Espresso' thinking it would match the roof, which it did, but the fence then seemed too dark for Christmas and more akin to Halloween. So I coated everything in 'Clear Rock Candy' glitter but it was still too dark. Next idea was to spray it with Tattered Angels glimmer mist in 'Sapphire'. This was an improvement but still seemed too dark - navy now. Finally I dabbed on lots of Distress Stain in 'Brushed Pewter' - ta da!! Pleased with result!

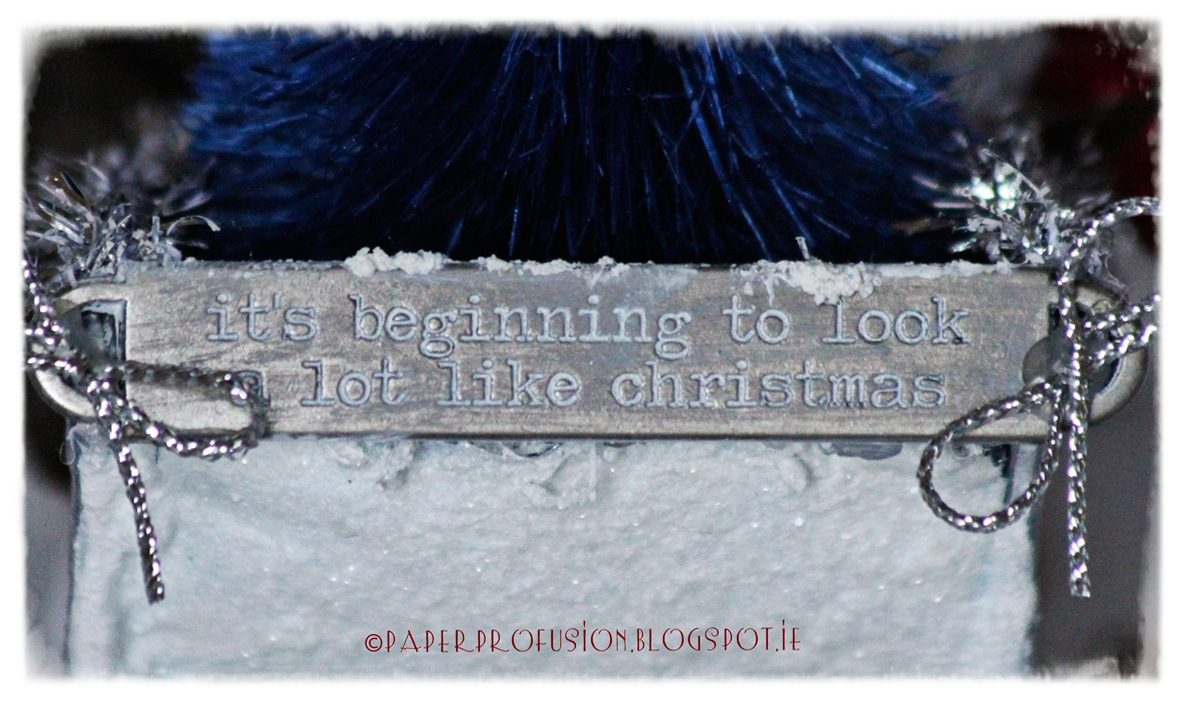
The little toys, instruments and several other metal embellishments have been polished with silver gilding wax. I stencilled (TH 'Holly Bough') the front walls and sprinkled on Melissa Frances silver glitter to adhere whilst texture paste still wet. Also hot glued several berries. Decorated the windows with lace curtains and created shutters from some narrow strips of corrugated card that I sprayed with Sapphire glimmer mist. I secured an Idea-ology metal word band to the front using silver string between two TH ring fasteners (having highlighted the inscribed text with white paint). Also sprayed an Idea-ology tree to make it blue and decorated with tinsel and copper star by Nunn Design. Added lace, bows and pearls to eaves.

The beautiful pin in the chimney is made by the lovely Mandy and you can purchase her gorgeous sets here.


Moving around to the right side I stencilled some snowflakes (TH ' Holiday Knit') and coated them with Clear Rock Candy glitter.

Diecut a layered snowflake (by TH), coated with crackle, highlighted with DIs and finished with a centre brad. Also diecut text using Thinlits 'Holiday Words' and painted with 'Ground Espresso' topped with crackle.

Placed an owl charm at top having gilded him with silver wax. Metal box corners are on the roof corners too once I dabbed them with 'antique bronze' distress stain and some stickles. I can see that there is a little gap up at the roof/eaves joining but hey, as Mr. Cohen sings; "There is a crack in everything. That's how the light gets in"!

Let's now turn to the rear...


I've stamped and embossed both the angel and the wise men using TH 'Joyful Song' stamp set. A technique I use to try and define stamped images better is to add a thick coat of glossy or crackle accents over and to the rims of image, it just adds a little relief. I masked the angel and stamped music across the roof with a Katzelkraft stamp. Should have included earlier that the house walls are also stamped randomly with a Germanic Script stamp by Katzelkraft. On the roof are silver star brads with blue gems added to each centre. The wise men have been overstencilled with DIs through the TH 'Rays' stencil and adorned amidst stencilled stars (some of which are white embossed for variation - another TH technique!). The scene is positioned through an aperture cut using the TH 'Baroque' die and 'grounded' with glass glitter. Stamped sentiments are by Cat's Life Press stamps.

Some close ups;


An Idea-ology lightbulb, inked blue, atop a stained Game Spinner.

Tinsel and 'Mercury Glass' Stickles present too!


A gilded Prima resin wing is placed on the stamped Angel's wing.


The Guiding Star dangles from a Ring Fastener on a Game Spinner.


If you are still reading this I'm seriously impressed and very grateful!


Another twirl around to find a faux wooden door chained shut using an Idea-ology Swivel Clasp. The doors hinge open and are held in place with Idea-ology Hitch Fasteners and brads.

Wood effect achieved using embossing folder and DIs. I've used lots of Gesso and Snow-Tex on whole project for snowy effects.

More stencilling evident and lots more metal embellishments. 'No Peeking' is from a Unity 'itty bitty' stamp. Pearls placed on the fence all the way round.


Bet you'll never guess who is behind the door!!!

You can see too that some-one has left parcels lying around for the munchkins inside. 


Finally, let's inspect the very sparkly delivery agents;


The sleigh sides are cut using a die by TH. When cutting reverse sides remember to turn any patterned paper back to front so to speak, otherwise you'll end up having to do everything twice just like me!! Including the Flourish stencilling! Stencil by TH using crackle paste by Decoart. Over-painted sides then with the usual Ranger crackle. The base of the sleigh has been embossed with sliver glitter EP. Created a centre for the sleigh using some blue sprayed corrugated card that was pliable to shape. Again sprayed an Idea-ology tree blue, added berries and painted burlap 'sack' with 'Ground Espresso' - knew it would come in handy.

The dashing reindeer are cut with die by you know who! (I mean Tim Holtz - not Voldemort!) Again, make sure to cut any reverse patterned paper right rather than get it wrong, again, like me!! I've adorned the deer with sprayed Idea-ology wreaths. These are couture, made-to-measure wreaths in fact as the standard size issued by Ranger was too large and required adjustment. (Am I mad entirely?) Jingle bells are stitched to the wreaths also! These cardboard reinforced deer have lovely blingy antlers and lots of crackle and are tied to the sleigh via little Idea-ology Screw Eyes.

Mounted the Sleigh etc. on a wrapped rectangle of chipboard and placed the house etc. on Idea-ology Foundations Feet that have been painted quite a few shades but ended up finally being glossy white.

So what more can I say but:


Huge thanks to all the talented ladies over at A Vintage Journey for inviting me to Guest Design today. This has taken a long time to make, in fits and starts, but I'm pleased with results - a rare happening! You still have plenty of time to enter their 'Home Sweet Home' challenge here.

It is too early though to say 'Hxxxy Cxxxxxxxs' but you know what I mean. If you would like to see any more of my altered Melissa Frances chipboard houses they are here, here and here.

Thanks so much as always for stopping by.

Nicola x


I wish to enter project to the following challenges:
Simon Says Stamp Monday - Love This Technique
Country View Crafts Challenge - Numbers
Craft For The Craic - Anything but a square or rectangle
The Ribbon Girl Challenge - Everything goes with an Image
Try it on Tuesdays - Add Some Metal
Scrapy Land Challenge - Add an Image plus use die Scrapland sells (Sizzix)
Christmas at Sweet Stampin' Challenge - Festive Decor
Sparkles Christmas Challenges - Oh Christmas Tree!
Creative Inspirations - Your Favourite Occasion (Christmas)
Love To Create - ANything Mixed Media / Creative Goes

Thursday 20 August 2015

Birthday Wishes

Hello and many thanks for stopping by.

I'm sorry for such a prolonged absence but a long-term neck condition has worsened recently, now affecting my shoulder / arm, and thereby keeping me away from crafting and pc (and lots of other necessary tasks!). I'll receive nerve block injections the week after next and hopefully they will enable me to resume crafting etc.

In the meantime, here's a birthday card I made some time back for a dear and very loyal blogging pal.


Embellishments: Beautiful Stick Pin by Mandy - available here.
Roses by Jeans. Dots done with Liquid Pearls.
Papers: Maja Design
Dies: Sizzix thinlits, TH 'Butterfly Frenzy', Memory Box and Spellbinders
Punches: TH Bow and Martha Stewart edger
Other: Edges inked with DIs and Krylon gilding pen. Frantage sprinkled randomly. Sentiment stamp by Anna Griffin

Thank-you so much for your visit and hoping to see you around blogland soon.
Nicola x

I wish to enter card to the following challenges:
We Love Vintage - Anything Goes
Vintage Udfordring - Butterfly
In The Pink - Fly Away
Crafty Cardmakes - Warm summer colours
Kort o Mania - Pastel Colours
Card and Scrap - Anything Goes
Seize the Birthday - Anything that Flies
Papertake Weekly - To Die For

Monday 6 July 2015

21st Birthday

Hi again and welcome! The sunshine we enjoyed last week made me go with a summery theme for a 21st Birthday card I needed to make. Short post as I know lots of people are rightly busy making the most of their summer.


Papers: Prima
Dies: Sizzix 'Upon a Time' decorative strip. Memory Box 'Grape Vine', Cheery Lynn 'City Girl' edger, Martha Stewart butterfly punch
Flowers: Prima and Wild Orchid Crafts and faux dew drops courtery of glossy accents
Embellishments: Resin frame painted with pink pearlescent paint. Metal corners painted with matt white paint. Diecut numerals and metal key (on butterfly) coated with Krylon 18kt gilding pen. Also sank pearls, seed beads and glass glitter into glossy accents in centre of resin frame. Added little pearls to corners too.
Splatters: Daley Rowney Pink and Gold paints, Paper Artsy white and pink paints, Tattered Angels Pink and Gold sprays
Other: Ribbon by May Arts and Glass Glitter from Melissa Frances

Huge thanks for stopping by and for any comments you might leave. Thank-you too to the lovely people who have recently signed up to follow - you are most appreciated!

Have a lovely week,
Nicola x

I wish to enter card to the following challenges:
The Ribbon Girl - July - Anything goes
Vintage Cafe card challenge - Botanical
Card and Scrap - #100 Anything Goes and blog hop
We Love Vintage - Picture Inspiration
Allsorts - How does your garden grow?
In The Pink - Shabby / Vintage pink
Craft for the craic - Summer Time!
Alphabet Challenge - J for Jewels