A belated Happy St. Patrick's day to you from Ireland. It's a lovely compliment that so many worldwide enjoy partaking in our special day.
This is a scheduled post so I hope that it has synced ok. Thank-you to everyone for kind wishes on last post.
I'm very happy to feature today over at the wonderful
A Vintage Journey with a guest design piece. The remit for both my project, and the current AVJ challenge, is to create a vintage project referencing all 4 of the following:
Substrate – Board (eg - grey board, coaster board, cardboard)
Main Colour – Lilac or pale purple
Technique – Rust Effects (perhaps using rusting or embossing powders or rust coloured paints)
Product – Something metal
I decided to create something in the style of
Frank Garcia, Prima Designer, whose work I love. I also took great inspiration from the lovely Terri of
Artful Affirmations. Terri has made many Marie Antoinette style shoes and has kindly shared a super how-to
video on YouTube. It, and Terri's blog, are definitely worth checking out.
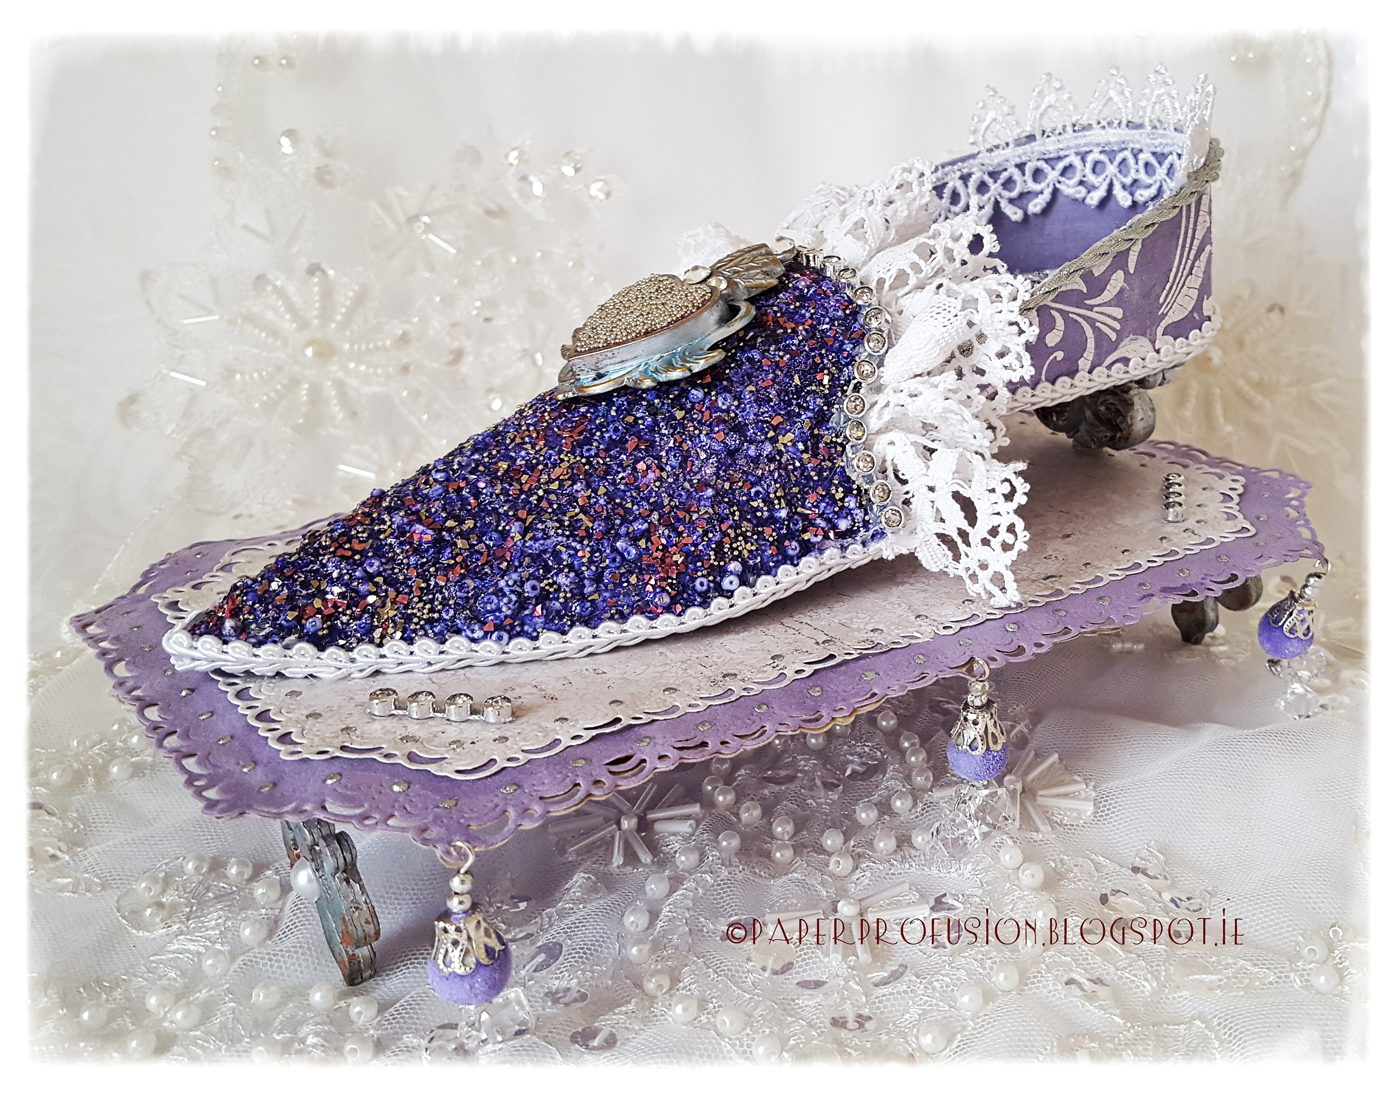
Without further ado, here's my shoe!
The shoe upper is made of Grungepaper by Tim Holtz. This was perfect for holding all the media I applied whilst still remaining pliable. Started off with a coat of gesso. Then built up several layers of seed beads, glass beads, glass glitters (Finnabair violet and silver) and micro beads using 3D gel to adhere. Coated each successive layer with gesso and once that was dry sprayed it with Tattered Angels glimmer mist in 'Lavender Fields'. (Thank-you to
Ger who gifted me this some time ago as I don't have much violet to hand). Also splashed on Twinkling H20 in 'English Lavender' and a little watered Distress Ink in 'Dusty Concord'. The top rim is adorned with Rhinestone chain and ruffled lace.
A metal bezel by Spellbinders sits atop the shoe. It was golden but I changed that with some silver gilding wax. Then gave it a little patina with a blend of Pearl Ex pigments. Filled it with lots of violet/silver glass glitter and opted for Finnabair's silver micro beads for the top layer. Set the mixture with Judikins diamond glaze. Finally, positioned Swarovski crystals on the bezel panache.
The ornate 'stand' has been made from cardboard sandwiched between layers of paper by Maja Design and SEI Velvet. These papers have been diecut with a Cheery Lynn die and remain relatively unadorned given so much bling on the shoe itself. There are little rhinestone accents atop each corner. The dangling baubles are by Prima. They were white but I coloured the white velvet with lavender ink to blend them in better. I've also added little silver dots around the perimeters using a Waco chrome pearl pen.
Using Tim Holtz 'Flourish' stencil, I stencilled crackle paste (DecoArt) around the shoe. When crackle was dry, painted on Twinkling H20 in 'English Lavender'. This gave a lovely fabric like shimmer and also served to highlight the cracks.
The shoe's sole has been made from cardboard with thin inner corrugation so as to bend nicely. This is layered between paper by Maja Design topside and SEI velvet paper underneath. The Maja paper has been painted with Silks acrylic glaze in 'Oyster' to give it a silken lustre (although most of this is unseen). Happened to have a stamp by 7 Gypsies (Avignon set) with a date mark of 1764 (during Marie Antoinette lifetime) so had to include same. Stamped date on a little fancy square (Spellbinders Fleur-de-Lys die), coated with crackle glaze and placed on inner sole. Used lace and cord to decorate and to hide joinings.
The 'heel' has been made from 2 pieces of white polymer clay by Scrapberrys (glued back to back). I applied silver gilding wax and patina as done on bezel. Also dabbed on slight touches of faux rust using embossing powder and Distress Ink in 'Rusty Hinge' as well as Distress Glitter in 'Rusty Hinge'. Heated mixture to set.
The stand's 'feet' are made from diecut chipboard (Sizzix 'Hardware Findings' die). Each 'foot' is made from 2 adhering layers of chipboard (including that crooked one that needs to be reglued!) These were aged and rusted similarly to 'heel', with some dabs of yellow and green inks for variation. Centred pearls on back and front of each.
C'est ça!
Terri from
Artful Affirmations has kindly attached a printable template for this shoe to her YouTube
video. Thank-you very much Terri for sharing.
Finally, thank-you so much to the very talented team at
A Vintage Journey for including me today. Wishing all there a Very Happy 2nd Birthday this month.
Warmest wishes,
Nicola x
I wish to enter project to the following challenges:
Vintage Cafe Card Challenge - Neo Vintage
Rhedds Creative Spirit - Anything Goes
Creative Carte Blanche - Triple Trouble (Corrugate (hidden within sole), metal, lace)
The Craft Barn - Dictionary R for 'Reine de France'
Collins French Dictionary states Reine is feminine form for Queen, Épouse d'un roi (wife of King). Also states 'La petite reine' can mean 'the bicycle'.
Mixed Media World - Vintage
Card and Scrap - Lace
Creative Artiste - Anything Goes
Scrappiness - No cards, pocket scrapping or layouts
Scrappelyst - Substance or Thread