Friday, 28 June 2013

Pearl Drops

Welcome to another wedding card! Thanks so much for stopping by.


A quick post so will just list the ingredients;

Dies: Sizzix Bigz 'Primitive Hearts', Spellbinders 'Fancy Lattice', Cheery Lynn 'City Girl Edger'
Embossing Folder: Sizzix 'Sheet Music'
Cardstock: Bazzill and hand-made rose imprinted paper
Bling: Music Notes done with Magnolia Knick Knackerys. Lattice intersections decorated with Viva Decor pearl pen 'Ice White'. Metal Hearts - thank-you Alison. Pearl trims, venise lace, backing tulle and silver string from stash.

If you missed my last post about votes for my butterfly box then please see end of post here. Many thanks.

Wishing all a very happy weekend with abundant doses of sunshine!

Nicola x

I wish to enter card to the following challenges:
Inspiration Journal - Something Old, Something New, Something Borrowed, Something Blue
Simon Says Stamp and Show - Stripes (in the sheet music and lattice!)
Vintage Udfordring - Pearls and Lace
Divas by Design - Pretty Pearls
Crafting with Dragonflies - Vintage with pearls and lace
Crafty Ribbons - Anything goes with ribbon
Simon Says Stamp - Anything Goes
Creative Belli - Wedding
Everbody-Art-Challenge - Wedding
TotallyPaperCrafts - June Bride (and Groom of course)

Wednesday, 26 June 2013

June Wedding and a vote pretty please?

Hello all you lovely readers. Welcome all - especially recent new followers.

Since my last post I was thrilled to be the lucky winner of Butterfly's 1st Blogaversary Candy over at 'Words and Pictures'. Well the treasure trove of a parcel arrived in record time from the lovely Alison in UK. I'm absolutely delighted to have received such a generous and fantabulous stash all so perfectly wrapped. If you have never checked out Alison's blog - what you havn't??? - then you really should!! Thank-you again Alison!

Well you know it's summer when wedding cards are in high demand!


The base white cardstock has been covered with a veil of white tulle (you can't see it very well unless you expand photo). The next layer up is blue cardstock diecut with Cheery Lynn Reflection Die 'Mini Pearl French Flair'. I then dry embossed the card with Cheery Lynn 'Petite Hearts' embossing plate. Diecut some silver Stardream cardstock with the Cheery Lynn 'Sophia's Heart' die. Then layered up two more levels using Cheery Lynn 'French Flair' die again. I interwove some rose venise lace and adhered the various layers with foam tape for dimension. Added roses from Prima, Jeans and Kort & Godt with some silvery berries by Magnolia. Included some diecuts made with Cheery Lynn 'Mini Fanciful Flourish' die. Added snowtex to the flowers and liked it so much I also dabbed to the embossed blue layer of cardstock for more texture. Using Boweasy tied a bow with some May Arts silk ribbon and draped it around card. I used some of the heart punchouts from the 'Sophia's Heart' diecut to decorate the ribbon. The lovely centre silver embellishment is by Nunn Design. To complete I placed a silver wedding charm into a little silver frame by K&Co and attached to bow. Hope the Happy Couple like!

A little favour please...you may have seen my recent post regarding a Butterfly Shaped box that I crafted with lots of diecuts...post is here. One of the challenges I entered the box to is Unruly PaperArts (Reader Art Quest June - Shabby Chic in 3D). To choose the Top entries the lovely columnists at Unruly PaperArts invite you to vote for your favourite entries. If you liked my butterfly box, I would of course be grateful and happy if you popped over to Unruly PaperArts to cast a vote here. The Unruly Blogozine is well worth a visit in any event as each month it's packed full of superb inspiration and tutorials.

Stay well...
Nicola x

I wish to enter card to the following challenges;
Cheery Lynn Design - Wonderful Weddings
Inspiration Journal - Something Old, Something New, Something Borrowed, Something Blue
Country View Crafts Challenge - Diecuts
Creative Belli Blog - Wedding
Everybody-Art-Challenge - Wedding
Simon Says Stamp - Anything Goes
Our Creative Corner - Recipe (Ribbon, Metal, Snow-Tex! (ok?)

Tuesday, 18 June 2013

Little Bird Blue

Hello and thanks so much for stopping by.

My last project was made several weeks back so I am feeling relieved that I've produced a card today as I feared the ability might have disappeared! I've made this card to fit a few different challenges running at the mo. At Frilly & Funkie the challenge theme is Birds and Nests, both Simon Says Stamp & Show and Cheery Lynn Designs are running Kraft themed weeks and at Sugar Creek Hollow the lovely ladies there want us to incorporate mixed media. Serendipitously the new Mum that the card is going to was born in the month of March so this fits the Live & Love Crafts Birthstone theme with aquamarine.


The papers used are by Maja Design (It's Christmas Time and Vintage Summer Basics Collections). I painted the base layer with some Paper Artsy paints ('Snowflake' and 'Ice Blue') to give the impression of clouds. The 'Mummy' bird is die cut (Sizzix Bigz) from corrugated cardboard and some of the twigs are punched from Kraft paper - thereby meeting the 'Kraft' requirements. The longer branches are cut using a Memory Box die.

The nest is handcut from a cardboard nectarine holder which was perfectly curved for the nest shape. I've decorated it with muslin and burlap but then ended up covering most of that with feathers and diecut leaves (Marianne Design) and punched twigs (Martha Stewart). In order for the nest to 'sit into' the card I die cut a 'frame' shape that had just the right curve (Sizzix Majestic Labels die). Then double 3D mounted those two lower 'frame' layers so that they popped out sufficiently to hold the nest. The outer edges of the two lower panels are cut with Cheery Lynn's 'City Girl edger' - this is perfect to thread narrow ribbon through for extra decoration.

I distressed and hightlighted most edges with either Distress Ink ('Broken China') or Chalk Ink by Ingvild Bolme ('Dark Rust'). The latter is brilliantly shaped for edging. Also ripped into some of the base layer and tucked some lace underneath for pretty distressing.

Added the newly hatched chick (Memory Box) and placed some gems that Mummy was feeding having given her a nice feathery wing. Liberally applied frantage and colour fragments. (Wasn't it lucky that Stampendous make colour fragments in just the right shade of duck egg blue so that they match a broken eggshell!).

Added a frill underneath the nest and a bow and 3D sentiment to the top left. Completed with eyes for the birdies and gems at the corners.

Thank-you for visiting today - it is lovely to have your company!

Nicola x

I wish to enter card to the following challenges;
Sugar Creek Hollow - Mixed Media
Frilly and Funkie - Birds and Nests
Cheery Lynn Designs - Keep It Krafty
Simon Says Stamp and Show - Kraft
Live & Love Crafts - Birthstones (Aquamarine)

Saturday, 15 June 2013

A Flutter of Butterflies

Hello and welcome!

Last month I was lucky enough to be selected amongst the Top 3 by Country View Crafts for my card here. They then kindly invited me to Guest Design for their challenge this month when the theme is Die Cuts. Do pop over to Country View Crafts Challenge site to see what the rest of the Design Team and fellow 'Top 3' winners have created to inspire you - a new piece is posted every few days for your delectation! I know the team would love to see your 'Die Cuts' in action.

I had a butterfly shaped box that I felt would be perfect for this project. To meet the 'Die Cuts' theme I've used dies in a few different ways. The most obvious of course are the butterflies and wings cut using every butterfly die and punch that I possess.


The raised centre panel has been created by applying texture paste through a lattice diecut.


Some border dies feature too.


I've also used 'on the edge' dies to form a rim around part of the box (with grungeboard in between the paper layers for body).


Butterfly shapes were stencilled with texture paste - then gessoed and gilded. Most are covered up by all the die cuts but you can see the gilded outline of a butterfly hidden in the centre here.


Finally I placed a few grungeboard diecuts on the surface of the box (then again gessoed and gilded). In the centre here you might spot part of a raised golden flourish diecut.


Mixed in with all the die-cutting was a whole lot of buffing and distressing with distress inks, stamping and heat embossing, gilding paste, glass glitter, layers of crackle glaze, gloss, pearl mists and glitzy frantage. I made sure to add a floral corner as all those butterflies need nectar. I also added pearls, flowers and metal charms for thoraxes and lots of other bits and bobs to make all those fluttering wings pretty! Finally I added the sentiment (cut from My Mind's Eye paper) between musical quaver charms.

Do make sure to check out the Country View Crafts Challenge where your die cut projects are very welcome this month!

Thank-you so much for stopping by today. I greatly appreciate each and every one of you in crafty blogland. In case you missed my last post, just a reminder that I have signed up to Bloglovin' - I'd be thrilled silly if you decided to follow me there.

Have a very lovely weekend.
Nicola x

I wish to enter box to the following challenges;
Our Creative Corner: Recipe - Ribbon, Metal, Inks
Craft Room Challenge - Here Comes Summer
Simon Says Stamp - Transport (Butterflies transport Pollen)
The Crafty Bloggers Network - Bright and Breezy
Unruly PaperArts - Art Quest Chabby Chic in 3D
A Creative Romance - Anything Goes

Thursday, 13 June 2013

Following the crowd to Bloglovin'

Hi there,

Thank-you to those who have already done all the research re imminent changes to Google Reader (see Alison's post here). I too am adding a Follow Me at Bloglovin' Button to my blog - it is now in column to the right. I would be over the moon happy if you choose to follow me there.

Hoping to resume more frequent crafting very soon!

Here is the blurb that the techies at Bloglovin' require:
Follow my blog with Bloglovin

Nicola x

Sunday, 26 May 2013

Vintage Bridal Veil

Hello all you lovely readers - welcome to another post. There are lots of wedding related challenges at the moment so here is my vintage wedding card.


Please click on photo to enlarge as the tulle to the right of card becomes clearer.

Firstly I layered silver cardstock onto white CS base. The next layer of pink paper is made by my own fair hands - talk about hand crafted! (I attended a workshop last year as to how to make paper from pulp and fibres - this is the result - any little flecks are part of the organic process). I've embossed the pink layer with Cheery Lynn's 'Petite Hearts' embossing plate.

The photograph is a free image (sorry did not note source) that I adjusted to faded black and white. Printed this on handmade paper (not by me) in keeping with the vintage look. I cut the photo frame using Tim Holtz baroque and mini baroque dies and then ran it through my Tim Holtz damask embossing folder. I then followed the steps in Shelly Hickox's fab tutorial on 'Faux Tarnished Metal' - take a peek here for details. I previously used the technique in my post here, it's very effective and done with ink, embossing powder and Utee.

Stitched some lace that I had been saving for a wedding card to form a veil having made a little head-dress of pearls and roses. I was so pleased it worked as a veil as it is scalloped on both edges. Decorated veil further with a pearl flourish to the base/train. I wanted to do something different for a bouquet so decided to go with a message in a bottle! I printed out 'Sealed with a kiss' on handmade paper and placed it and some flowers into the little vial - leftover from a workshop. The cork stopper looked wrong (plus Frilly and Funkie have limited colours in their challenge) so I gave it a few coats of Metallic Distress Stain in Brushed Pewter. Added a little lace bow and heart charm and mounted on some tulle and 2 hearts that I cut using Sizzix Bigz Primitive Hearts die. Covered hearts with pink CS and translucent patterned paper.

Finally I scrunched some tulle and attached underneath the cardstock to right of card. Completed with pink ribbon along top and bottom of card that I adorned with pearls .

Thank-you for visiting my blog, your visits and comments are genuinely appreciated. I won't be present in blogland too much over the coming week but I will do my best to maintain visits. Have a lovely Sunday.

Nicola x

I wish to enter card to the following challenges:
Frilly and Funkie - A Time for Weddings
It's All about the Vintage - Spring Romances / Weddings
Vintage Udfordring - Wedding
Simon Says Stamp - Take A Picture
Sugar Creek Hollow - Clean It Out

Friday, 17 May 2013

Garden Magic

Hi there. My goodness, the sun is shining brightly in Dublin this evening! I've even left the glare on photo as evidence of this rare event (lol).

With so many flower/garden related challenges right now I turned to Graphic 45 'Secret Garden' papers - they never disappoint.


It's a short post today!

Papers: Graphic 45 'Secret Garden', Melissa Frances 'Attic Treasures', Bazzill cardstock and doily from stash.

Dies: MFT Dienamics: 'Royal Leaves', 'Mini Royal Roses', 'Mini Rolled Roses' and 'Small Scallop Border'. Magnolia: 'Heart Flower Lace'. Spellbinders: 'Romantic Rectangles' and 'Decorative Labels 27'. Memory Box: 'Perched Reed Bird' and 'Woodland Branch'.

Embellishments: I made the flowers, leaves, birds and branch from a little bit of G45 paper! Karen Foster Charms (dabbed with Treasure Gold 'White Fire'). Pearls are by Melissa Frances and water droplets are by Hero Arts. Silk Ribbon by May Arts tied using Boweasy. The beautiful lace is from The Funkie Junkie Boutique so I wish to enter card to the Frilly and Funkie Sunday Share.

Sincere thanks to all who visit - your comments/following really are much appreciated. May the sun shine on you this weekend!

Nicola x

Thank-you to the hosts, sponsors and DTs at the following challenges that I wish to enter;
Country View Crafts - How Does Your Garden Grow
Simon Says Stamp and Show - A Little Paper
Sugar Creek Hollow - Spring Flowers
By The Cute and Girly - Flowers
Happy Camper Craft Collective - Use Lace
Simon Says Stamp - Flower Power
Crafty Bloggers' Network - Os & Xs (Die Cut, flowers, ribbon)
Love To Create - Many Pretty Flowers
Songbird Challenges - Blom and Grow - Flowers
Tuesday Throwdown - Smell the Roses
Card and Scrap - Lag på lag (Layers)

Friday, 10 May 2013

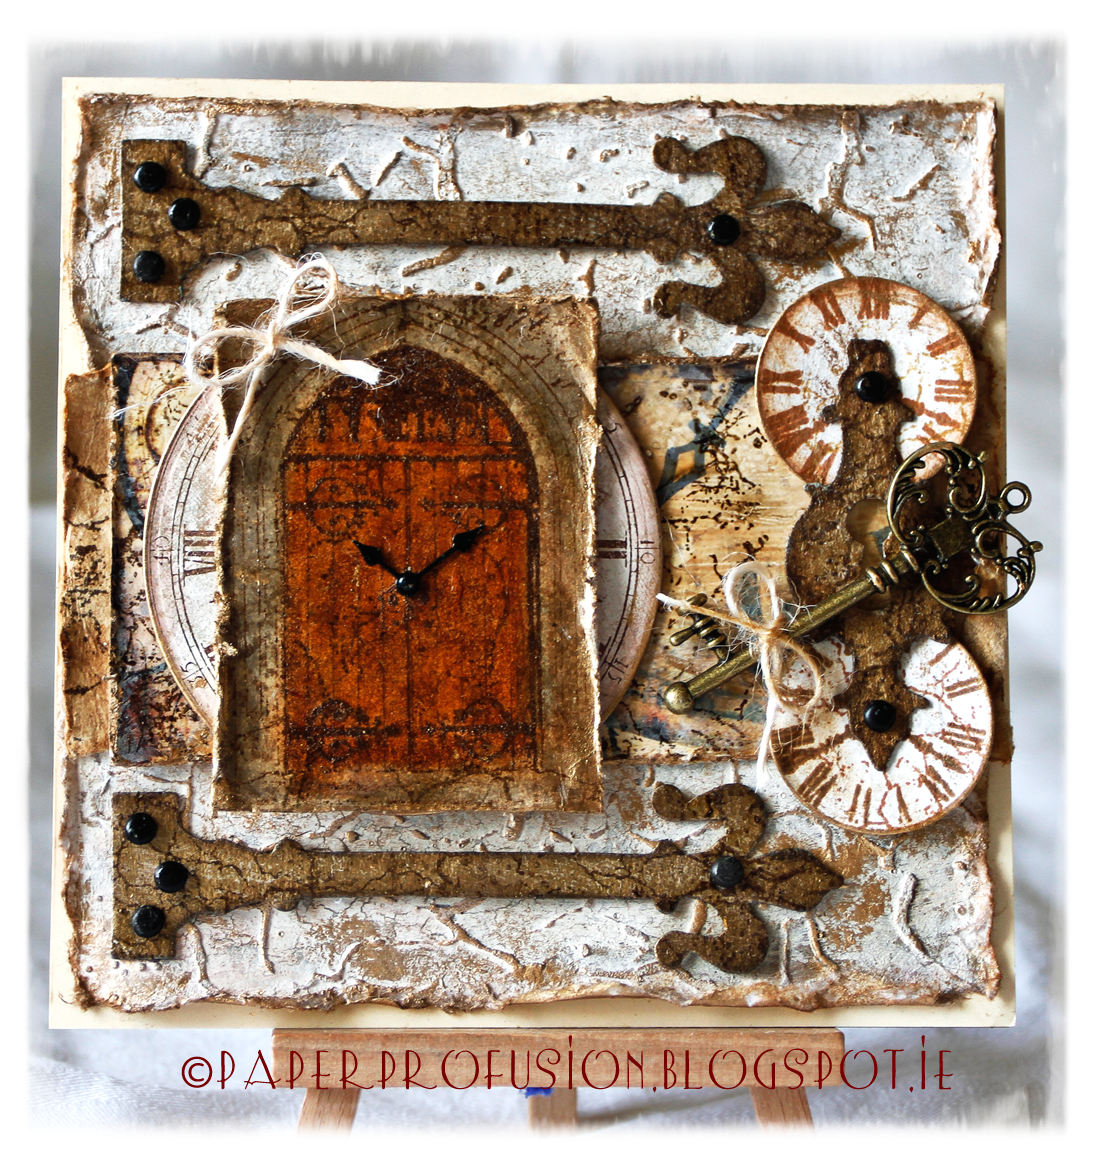
Entering Time

Hello Again! Thank-you for stopping by and a warm welcome to new followers.

I've made my card today with a number of challenges in mind. The challenge at Frilly and Funkie is 'There's no time to waste'. As this card is for someone who is sitting exams soon that challenge theme is very appropriate (although the young gentleman in question needs no reminder from anyone re his studies). The challenge at Vintage Udfordring is 'Use paint or gesso' - I've used both on my card. The challenge at Simon Says Stamp and Show is 'Inspired By' - well someone I greatly admire is Anita at The Artful Maven Haven. She is one of the most creative people in blogland - please visit her blog for immense inspiration. Anita always signs off her blogposts "I hope your hands get creatively dirty soon!". My hands sure got inky and dirty on this card so I thank Anita for her inspiration. Finally I'd like to enter card to two of my favourite challenge spots Our Creative Corner (newly revamped / 'under new management') and Fashionable Stamping Challenges who both are running 'Anything Goes' at the moment.

So without further ado, here is my card.


The base layer is a cotton handmade paper. First of all I applied embossing paste to it through a Prima 6x6 stencil ('Crackle') and left to dry overnight. I next painted the stenciled paper with Paper Artsy Fresco Finish paint in 'Old Gold'. Once dry I applied a thin layer of Paper Artsy Crackle Glaze. When that was dry I again painted the sheet with Fresco Finish paint in 'Nougat'. By this stage the paper was gorgeously crackled - it's a pity that I had to cover most of it up! I dabbed the raised stenciled parts with distress inks and then some gilding wax to highlight.

Next layer up is a band of cotton paper that I aged with a wet teabag (Twinings!). On top of that is a complimentary sample of glossy card that I kindly received from Crafty Individuals. It looked much too shiny and new for this card so I diluted a little gesso with water and brushed over the card to 'age' it. I then 'aged' further with two useful stamps that I recently bought, both Kaisercraft Clear Stamps 'Crackle' and 'Distress' using Distress Inks.

The main door image is a stamp by Crafty Individuals CI-249 'Gothic Door'. I've stamped with Archival ink and embossed with Ranger Distress EP ('Vintage Photo'). Using my Tim Holtz waterbrush I coloured in the door and stone surround with various DIs. I then painted image with Inkssentials Crackle Glaze to give it a old leathery look. The door image sits atop a clock image. To make the chalky clock, I painted some CS with Paper Artsy Fresco Finish paint in 'Vintage Lace', once dry a layer of Fresco Finish Crackle Glaze and finally, when dry, a layer of Fresco Finish in 'Nougat'. Next stamped the crackled CS using Brilliance Ink with another Crafty Individuals Stamp CI-354 'Clock Face'. I then diecut the clock with a circular Spellbinder die. The clock does have a lovely crackled appearance but once again I ended up covering it up!

Using Sizzix die 'Hardware Findings', I cut some grungeboard. I painted a layer of Paper Artsy Fresco Finish paint in 'Nougat', then FF crackle glaze, then FF 'Old Gold'. Next stamped all with the aforementioned Kaisercraft stamps for further aging effects. I attached with brads that I had coated with Inkssentials Crackle Glaze so as to look a bit worn. The two clocks on the right are stamped with a 7Gypsies stamp from the 'Venice' clear set using Archival and Brilliance inks. They are also 'aged' with DIs and cut to shape with a Spellbinders circular die. I've attached them via the keyhole diecut to fit with 'Time' theme.

Prior to assembling I decorated most edges with gilding wax. The metal clockhands are by Prima and the key is by Maya Road. Finished off with two little twine bows! Phew!

I thank each and every one of you who stop by - your visits and comments are truly appreciated.
Have a lovely weekend.

Nicola x

Thank-you to the hosts, sponsors and DTs at the following challenges that I wish to enter;
Frilly and Funkie - There's No Time To Waste
Vintage Udfording - Use Paint or Gesso
Simon Says Stamp and Show - Inspired By
Our Creative Corner - Anything Goes
Fashionable Stamping Challenge - Anything Goes

Friday, 3 May 2013

The Scissors

Hello again. Thank-you so much for your visit.

I'm tight for time today so will keep post short. I needed to make a card for a lady who is setting up a new hairdressing salon. Wasn't sure what to do but the inspiration photo at The Shabby Tea Room this week gave me lots of ideas. Here is my card:


This is The Shabby Tea Room photo:


The background paper provides a mirror shape (to echo the glass jars in photo and of course perfect for a hairdressers). I've used some Spellbinders dies for the layers including one from the new Imperial Gold series. I think that using the recommended Junior Magnetic Placement Mat really does make a difference when using this die. The outer swirls are from a Memory Box die. The papers are by Melissa Frances (5th Avenue) and Maja Design (Vintage Summer) and some Bazzill cardstock. I've inked most edges with Distress Ink in 'Victorian Velvet'.

The scissors charm should suit for hairdressing! It's available at The Funkie Junkie Boutique. I've attached a little metal tag that says Congrats. I lightly sprinkled / melted some Frantage for some pretty bling and completed with some flower embellishments (available from Cottage Crafts).

Thank-you for stopping by and huge thanks in advance for any comments that I am lucky enough to receive.

Wishing all a lovely weekend.

Nicola x


I wish to enter card to the following challenges;
The Shabby Tea Room - Beautiful Spring
Vintage Cafe Card Challenges - "Your Inspiration"
The Perfect Sentiment - Make It Feminine
Crafty Ribbons - Anything Goes With Ribbon
Happy Campers - Use Lace
MilkCoffee Challenge - Lace and Pearls

Tuesday, 30 April 2013

Spring Dressforms

A cheery hello from Dublin. I appreciate your visiting.

This was one of those cards where Plan A didn't work out at all, at all! So I'm very glad that several reconfigurations later I finally have a card to post...


I've used papers from Maja Design (Vintage Summer Basics) and all the stamping is on Ranger Speciality Stamping Paper. I had thought that I would give the dressform wings so that it was like a 'flying dressform' - but no way was this working out!

I cut dressform with Tim Holtz die and mounted on chipboard. Stamped it with Distress Inks using Crafty Individuals stamp set CI-226 'Wild Flowers'. Next stamped and embossed (Ranger Queen's Gold EP) Crafty Individuls stamp CI-357 'Springtime Robin' - I think this stamp is intended as a bookmark but I'm considering it a dress! I've coloured it in with DIs using a Tim Holtz waterbrush. The bird, butterflies and text on the dress are 'paper pieced' and raised on sticky pads.

I also stamped a large sheet with a colourful range of DIs using the CI-226 'Wild Flowers' stamp set and then diecut and punched into lots of butterflies. Then stamped and embossed clothing articles from Crafty Individuals stamp set CI-306 'French Corsets' and coloured them in using Tim Holtz water brush and DIs.

I bought the water brush from The Funkie Junkie Boutique and so wish to enter card to the Frilly and Funkie Sunday Share.

Gilded most edges with gilding wax and left them to dry overnight. All elements of the card are mounted with foam to add dimension. The two circular dies are by Cheery Lynn and Noor Design. I've also embossed the outer circle with a Cheery Lynn circular stitching plate.

That's It - hope you like! Enjoy the rest of your day.

Nicola x


I wish to enter card to the following challenges;
Crafty Individuals - Spring In Fashion
Country View Crafts - Butterflies
Fashionable Stamping Challenges - Sentimental ("Song of Spring")
Simon Says Stamp - Anything Goes
Love To Create - Punches and/or Dies
Dream Valley Challenges - Things With Wings
Sweet Stamping Challenge - Anything but Birthday